Yamaha System Owner's Manual - Page 3
Part 3 : Installing the new strings
 |
View all Yamaha System manuals
Add to My Manuals
Save this manual to your list of manuals |
Page 3 highlights
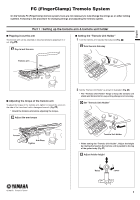
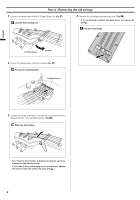
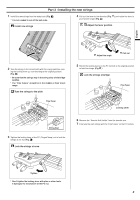
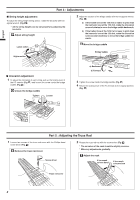
Part 3 : Installing the new strings 1 Install the new strings from the body back. (Fig. ) * It is not needed to cut off the ball ends. Install new strings 4 Pull out the lever to the direction (Fig. ) and rotate the lever to your favorite angle. (Fig. ) Adjust the lever position English 2 Tune the strings to the correct pitch with the tuning machines, leav- ing the locking lever up. (not returning to the original position) (Fig. ) * Be sure that the strings stay in the string slots of the bridge saddles. * The "Fine Tuners" should be in the middle of their travel range. Tune the strings to the pitch Fine Tuner String Slot 3 Tighten the locking lever of the FC (FingerClamp) nut to lock the strings at the nut. (Fig. ) Lock the strings at once Adjust the angle Pull out 5 Return the locking levers on the FC tremolo to the original position to lock the strings. (Fig. ) Lock the strings at bridge Fine Tuner Locking Lever 6 Remove the "Tremolo Unit Holder" from the tremolo arm. 7 Fine tune the each strings with the "Fine Tuners" on the FC tremolo. Tighten * Don't tighten the locking lever with plier or other tools. It damages the mechanism of the FC nut. 3
-
 1
1 -
 2
2 -
 3
3 -
 4
4
 |
 |
