Yamaha TP-5000 Owner's Manual - Page 10
Moving And Setup Your Timpani - lift
 |
View all Yamaha TP-5000 manuals
Add to My Manuals
Save this manual to your list of manuals |
Page 10 highlights
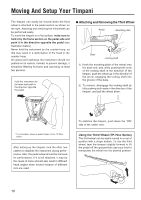
Moving And Setup Your Timpani The timpani can easily be moved when the third wheel is attached to the pedal section as shown on the right. Attaching and removing the third wheel can be performed easily. To move the timpani on a flat surface, make sure to hold it by the frame section on the pedal side and push it in the direction opposite the pedal (see illustration below). Never hold the instrument by the counter hoop, as this may result in a deformation of the head or the counter hoop. On gravel and stairways the instrument should not pushed on its casters. Instead, to prevent damage, it should be lifted by its frame and carried by at least two persons. Hold the instrument by its frame and push in the direction opposite the pedal. G Attaching and Removing the Third Wheel Pedal Mounting plate Base Locking shaft 1) Hook the mounting plate of the wheel onto the base end, and, while pushing both ends of the locking shaft in the direction of the timpani, push the wheel up in the direction of the arrow, engaging the locking shaft into the groove of the base. 2) To remove, disengage the locking shaft by fully pushing both ends in the direction of the timpani, and pull the wheel down. * The illustration shows a pedal timpani of the TP-62xx series. After setting up the timpani, lock the other two casters to stabilize the instrument during performance. Also, the pedal wheel should be removed for performance. If it is left attached, it may be the cause of noise and will also result in different head angles when several timpani of different size are used. To stabilize the timpani, push down the "ON" side of the caster lock. Using the Third Wheel (TP-70xx Series) The third wheel can be easily moved in or out of position with a single motion. To use the third wheel, lean the tympani slightly forward to lift the pedal off the ground then use your foot to manipulate the wheel into the desired position. 10
-
 1
1 -
2
-
3
-
4
-
 5
5 -
 6
6 -
 7
7 -
 8
8 -
 9
9 -
 10
10 -
 11
11
 |
 |
