Yamaha TP-5000 Owner's Manual - Page 6
Adjusting The Sound Of Your Timpani
 |
View all Yamaha TP-5000 manuals
Add to My Manuals
Save this manual to your list of manuals |
Page 6 highlights
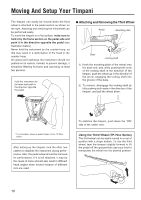
Adjusting The Sound Of Your Timpani When using the pedal timpani for the first time after unpacking, make sure to set it up according to the instructions of section "Before Using The Pedal Timpani" on pages 4 and 5. z Head Tuning* (* Adjusting the head tension to a specific note) 1 Tuning is performed for the lowest sound (note) of the timpani. For this reason, the heel of the pedal must stay fully lowered during the tuning procedure. The proper lowest note (and tonal range) depends on the size of your timpani. For example, as shown in the figure below, the lowest sound of a 26" timpani should be tuned to A. When tuned properly, your Yamaha timpani will give you its full tonal range without being overtensioned. I Standard Tonal Ranges for Yamaha Timpani 32" (81cm) 29" (74cm) 26" (66cm) 23" (58cm) 20" (51cm) Keep the heel of the pedal fully lowered during the tuning procedure (steps 2 through 7 below) if not specified otherwise. 2 Strike the head and check the sound. The stan- dard striking point is shown below. Striking point Pedal The standard striking point lies at distance B from the kettle edge, which corresponds to 1/4 to 1/3 of distance A (distance between kettle edge and center of head). G Sound lower than tuning note ¡ Go to step 3. G Sound higher than tuning note ¡ Loosen tuning bolts by an equal amount in the order shown in the figure of step 5 on page 5. 6 When loosening the tuning bolts, always loosen them by double the desired amount, and then return (retighten) them by half. When the sound lies within 1 halftone below the desired pitch after loosening the tuning bolts (repeatedly, if necessary), proceed with step 3. 3 Lightly strike the head with the mallet about 2 inch (5 cm) from the kettle edge at each tuning bolt. Check at which tuning bolt the sound is highest. G Pitch of highest sound higher than tuning note ¡ Loosen the corresponding tuning bolt by about 1/16 to 1/8 of a turn. First loosen the bolt by double the desired amount, and then return (retighten) it by half. After loosening the tuning bolt, repeat from the beginning of step 3. G Pitch of highest sound lower than tuning note ¡ Go to step 4. 4 Tighten the other bolts little by little (by about 1/ 16 to 1/8 of a turn) until the sounds at the corresponding striking points match the pitch of the highest sound. Please note that tightening of one bolt will also raise the pitch at the neighboring and opposite tuning bolts. Thus, after tightening the tuning bolt with the lowest sound, first reconfirm the sound at the other tuning bolts before tightening the tuning bolt with the next lower sound. While alternately tightening the other bolts, do not touch the tuning bolt with the highest sound (reference pitch). 5 Loosen all overtightened bolts according to the procedure described in step 3. When the pitch is approximately the same at each bolt, repeatedly depress the toe and heel of the pedal several times.
-
 1
1 -
 2
2 -
 3
3 -
 4
4 -
 5
5 -
 6
6 -
 7
7 -
 8
8 -
 9
9 -
 10
10 -
 11
11
 |
 |
