Yamaha V1.6 PX10/PX8/PX5/PX3 V1.6 Reference Manual [English] - Page 10
Setup, Setup procedure
 |
View all Yamaha V1.6 manuals
Add to My Manuals
Save this manual to your list of manuals |
Page 10 highlights
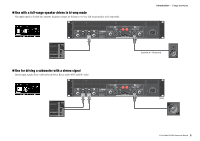
Setup Setup procedure 1. Set the PX amplifier in the desired loca- tion. If the device is to be mounted in a rack, refer to "Rack mounting" (page 11). 2. Lower the two volume knobs to the mini- mum. 3. Connect speakers to the [SPEAKERS] terminals. Refer to "Speaker connection" (page 11). 4. Connect outputs from sources, such as a mixer, to the [INPUT] connectors. 5. Connect the power cord to the [AC IN] connector. AC IN connector Power cord To AC power outlet Secure the AC power cord with the AC plug clamp to prevent accidental disconnection from the connector. Installing the AC plug clamp q w e 6. Turn on the device. WARNING To ensure that high-volume noise is not output from the speakers, power-on the equipment starting with the audio sources, then the mixer and processors, and finally the amplifiers. Reverse this order when turning the system off. 7. Set up the system configuration with the Configuration Wizard. Though the PX amplifier can be used as a normal amplifier by simply setting the volume knobs properly, using the Configuration Wizard to make settings enhances the performance of speakers. Refer to "CONFIG WIZARD screen (Basic mode)" (page 20) or "CONFIG WIZARD screen (Advanced mode)" (page 22). 8. Rotate the volume knob to adjust the vol- ume. 9. Control the tone in TUNING screen. Refer to "TUNING screen" (page 25). In this condition, the device is available. PX10/PX8/PX5/PX3 Reference Manual 10
-
 1
1 -
2
-
3
-
4
-
 5
5 -
 6
6 -
 7
7 -
 8
8 -
 9
9 -
 10
10 -
 11
11 -
 12
12 -
 13
13 -
 14
14 -
 15
15 -
16
-
17
-
18
-
19
-
20
-
21
-
22
-
23
-
24
-
25
-
26
-
27
-
28
-
29
-
30
-
31
-
32
-
33
-
34
-
35
-
36
-
37
-
38
-
39
-
40
-
41
-
42
-
43
-
44
-
45
-
46
-
47
-
48
-
49
-
50
-
51
-
52
-
53
-
54
-
55
-
56
 |
 |
