Yamaha YST-M10 Owner's Manual - Page 5
Controls & Connections, Right-Channel Cabinet, Rear Panel, Front Panel
 |
View all Yamaha YST-M10 manuals
Add to My Manuals
Save this manual to your list of manuals |
Page 5 highlights
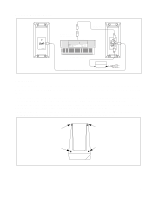
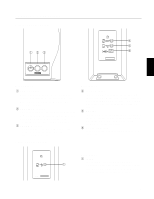
Controls & Connections Right-Channel Cabinet 123 POWER PRESENCE VOLUME STEREO INPUT OUTPUT to DC 14V ʵ ʴ SER NO. 4 5 6 English Front Panel 1 POWER switch Press to power on the YST-M10s; the power indicate will light up. Press again to power off. Before powering on and off, turn down the VOLUME control. 2 PRESENCE control This control allows frequency boost and cut of up to ±7 dB at 10 kHz. This tends to emphasize vocals, providing a warmer intimate sound. Turn it clockwise to boost, and counterclockwise to cut. 3 VOLUME control Use this control to set the volume level. Turn it clockwise to increase the volume, and counterclockwise to reduce it. Left-Channel Cabinet Rear Panel 4 STEREO INPUT This is a 3.5 mm jack connection for inputting signals to the YST-M10s. If the equipment that you are using has 6.25 mm phone jacks, or phono/RCA type connections, use the appropriate supplied adaptor. 5 OUTPUT This should be connected to the INPUT connection on the left-channel cabinet using the supplied 3.5 mm stereo jack to jack cable. Do not connect anything else to this connection. 6 DC 14V connection Connect the supplied power supply adaptor to this connection. INPUT from SER NO. Rear Panel 1 INPUT This should be connected to the OUTPUT 1 connection on the right-channel cabinet using the supplied 3.5 mm stereo jack to jack cable. Do not connect anything else to this connection. 5
-
 1
1 -
 2
2 -
 3
3 -
 4
4 -
 5
5 -
 6
6
 |
 |
