ZyXEL ES-124P User Guide - Page 1
ZyXEL ES-124P Manual
 |
View all ZyXEL ES-124P manuals
Add to My Manuals
Save this manual to your list of manuals |
Page 1 highlights
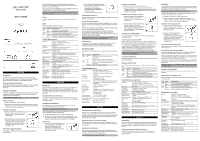
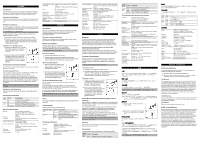
ES-116P/124P Ethernet Switch User's Guide Version 1.00 6/2005 ENGLISH Introduction The switch is a multi-port switch that can be used to build highperformance switched networks. The switch is a store-and-forward device that offers low latency for high-speed networking. Standalone Workgroup Application The switch can be used as a standalone switch to which computers, servers and a printer are directly connected to form a small workgroup. Hardware Installation The switch is suitable for an office environment where it can be rack mounted on standard 19-inch EIA racks (with the included rackmounting kit) or as a standalone. Do NOT block the ventilation holes. Desktop Installation 1 Make sure the switch is clean and dry. 2 Set the switch on a smooth and sturdy space strong enough to support the weight of the switch and the connected cables. Make sure there is a power outlet nearby. Rack Mount Installation 1 Align one bracket with the holes on one side of the switch and secure it with the bracket screws. Similarly, attach the other brackets. 2 After attaching both mounting brackets, position the switch in the rack by lining up the holes in the brackets with the appropriate holes on the rack. Secure the switch to the rack with the rackmounting screws. RJ-45 Auto-negotiating Ports The 10Base-T/100Base-TX RJ-45 ports are auto-negotiating and auto-crossover. An auto-negotiating port can detect and adjust to the optimum Ethernet speed (10/100Mpbs) and duplex mode (full duplex or half duplex) of the connected device. An auto-crossover (auto-MDI/MDI-X) port automatically works with a straight-through or crossover Ethernet cable. Make sure the cable length between connections does not exceed 100 meters (328 feet). Power Use the supplied power cable to connect your switch to a power source. LEDs The following table describes the LEDs. LED PWR LINK/ ACT STATUS DESCRIPTION On Off On Blinking Off The switch is on and receiving power. The switch is not receiving power. The port is connected to an Ethernet network. The port is receiving or transmitting data. The port is not connected to an Ethernet network. Product Specifications Standard IEEE802.3 10BASE-T Ethernet IEEE802.3u 100BASE-TX Fast Ethernet IEEE802.3x Flow Control Protocol Technology Non-blocking Wire Speed Transfer Rate Data Forwarding Rate Connector MAC Address Memory Buffer Network Cable LED Power Supply Temperature Humidity Dimension L x W x H (mm) EMI & Safety CSMA/CD Store-and-Forward switching architecture Supports broadcast storm control ES-116P: 3.2 Gb ES-124P: 4.8 Gb Ethernet: 10Mbps (half duplex), 20Mbps (full duplex) Fast Ethernet: 100 Mbps (half duplex), 200Mbps (full duplex) 14880 pps for 10Base-T (Ethernet) 148800 pps for 100Base-T (Fast Ethernet) RJ-45; Auto-MDIX on all ports 8K MAC address table 1.25 Mb 10BASE-T: 100Ω 2-pair UTP/STP Cat. 3, 4, 5 100BASE-TX: 100Ω 2-pair UTP/STP Cat. 5 Per port: LINK/ACT Per unit: PWR Internal; 3.3V 4A (100-240V/ 50-60Hz) Operating: 0º C~ 50º C (32º F ~ 122º F) Operating: 10% ~ 90% (Non-condensing) ES-116P: 215 x 133 x 42 ES-124P: 267 x 152.5 x 42 FCC Class A, CE, C-Tick DEUTSCH Einführung Der ES-116P/124P ist ein Multi - Port Switch, für den Aufbau eines Netzwerkes mit hoher Performance. Er ist ein Speicher- und Übermittlungsgerät mit niedriger Verzögerungszeit für High - Speed Netzwerke. Dieser Switch wurde für das Kleinbüro, bzw. Heimbüro entwickelt. Standalone Workgroup Anwendung Dieser Switch kann als allein stehendes Gerät direkt mit mehreren Computern, Servern und Printservern zu einer kleinen Arbeitsgruppe verbunden werden. Installation der Hardware Dieser Switch eignet sich für die Büroumgebung, wo er z.B. auf einem Schreibtisch platziert werden kann. Verdecken Sie nicht die Ventilationsöffnungen Dieser Switch eignet sich für die Büroumgebung, wo er z.B. auf einem Schreibtisch platziert werden kann. 1 Der Standort des Switch muss sauber und trocken sein. 2 Stellen Sie den Switch auf eine ebene und stabile Fläche, die das Gewicht des Switch und der Verbindungskabel tragen kann. Sorgen Sie dafür, dass ein Stromanschluss in der Nähe ist. Rackmontage 1 Richten Sie eine Montagehalterung an den Schraublöchern des Switch aus und schrauben Sie sie mit den dazugehörigen Schrauben fest. Befestigen Sie die andere Halterung auf die gleiche Weise. 2 Wenn Sie beide Montagehalterungen befestigt haben, richten Sie den Switch im so im Rack aus, dass die entsprechenden Schraublöcher ¸bereinander stehen. Befestigen Sie den Switch mit den Befestigungsschrauben am Rack. Rückwand Anschlüsse Die RJ-45 Ports und die Stromanschlussbuchse befinden sich auf der Rückwand des Switchs. RJ-45 Auto-Negotiating Ports Der ES-116P enthält sechzehn 10Base-T/100Base-TX RJ-45 Ports. Der ES-124P enthält vierundzwanzig 10Base-T/100Base-TX RJ-45 Ports. Diese Ports unterstützen Auto-MDI/MDX, welches eine Verwendung von Cross-Over Kabeln überflüssig macht. Die Auto-Sensing Funktion erkennt und justiert die optimale Geschwindigkeit (10/100 Mbps) und den Duplex Modus des angeschlossenen Netzwerkgerätes automatisch. Dies erleichtert die Installation des Switches erheblich. Vergewissern Sie sich, dass die Kabellängen zwischen den Verbindungen nicht mehr als 100 Meter betragen. Stromanschluss Verwenden Sie den mitgelieferten Stromadapter / Stromkabel, um den Switch mit dem Stromnetz zu verbinden. Zusätzliche Informationen finden Sie auf dem Etikett des Stromadapters. Frontplatten-LEDs Die LEDs an der Frontplatte zeigen den Echtzeit-Staus des Switchs an. LED PWR LINK/ ACT STATUS An Aus An Aus Blinkend DESCRIPTION Der Switch ist am Strom angeschlossen und eingeschaltet Der Switch ist nicht am Strom angeschlossen. Der Port ist mit dem Ethernet-Netzwerk verbunden. Der Port ist nicht mit dem Ethernet-Netzwerk verbunden. Der Port empfängt/sendet Daten. Produktspezifikationen Standard IEEE 802.3 10BASE-T Ethernet, IEEE 802.3u 100BASE-TX Fast Ethernet IEEE802.3x Flow Control und Back-pressure Protokoll Technologie Transferrate Übertragungsrate Anschluss MAC-Adresse Speicherpuffer Netzwerkkabel (bis 100 m) LED Stromversorgung Betriebstemperatur Betriebsluftfeuchtigkeit Abmessungen L x B x H (mm) EMI & Sicherheit CSMA/CD Store-and-Forward switching-Architektur 14.880 pps bei 10 Mbps 148.800 pps bei 100 Mbps Ethernet: 10 Mbps (Halbduplex), 20 Mbps (Vollduplex) Fast Ethernet: 100 Mbps (Halbduplex), 200 Mbps (Vollduplex) RJ-45; Auto-MDIX an allen Ports 1K Mac-Adresstabelle 1.25 Mb 10BASE-T: 100 Ω 2-adrig UTP / STP Cat. 3, 4, 5 100BASE-TX: 100 Ω 2-adrig UTP / STP Cat. 5 Pro Port: LINK/ACT Pro Gerät: PWR 3.3V 4A (100-240V/ 50-60Hz) 0º C~ 50º C (32º F ~ 122º F) 10 % ~ 90 % (nicht kondensierend) ES-116P: 215 x 133 x 42 ES-124P: 267 x 152.5 x 42 FCC Class A, CE, C-Tick ESPAÑOL Familiarización con el Switch El switch es un conmutador multi puerto que se puede usar para construir redes conmutadas de alto rendimiento. El switch es un dispositivo store-and-forward que ofrece una baja latencia para redes de alta velocidad. El switch está diseñado para empresas SOHO (Small Office Home Office). Aplicaciones para un solo grupo de trabajo El switch puede usarse para un solo grupo de trabajo, al cual se conectan directamente estaciones de trabajo, servidores y servidores de impresión. Instalación del Hardware El switch es apropiado para un entorno de oficina donde puede montarse sobre estantes EIA de 19 pulgadas (con el kit para montaje en estante incluido) o de forma independiente. No obstaculice los agujeros de ventilación. Instalación de sobremesa 1 Asegúrese de que el switch está limpio y seco. 2 Coloque el switch en un espacio liso, nivelado y firme, lo suficientemente fuerto como para aguantar el peso del switch y los cables que conecte. Asegúrese de que tiene una toma de corriente no muy lejos. Instalaciûn para el montaje en estante 1 Alinee un soporte con los agujeros de un lado del switch y fìjejo con los tornillos del soporte. Igualmente, fije el otro soporte. 2 Tras fijar ambos soportes de montaje, coloque el switch en el estante alineando los agujeros de los soportes con los agujeros del estante. Fije el switch al estante con los tornillos para montaje en estante. Conexiones del panel trasero Los puertos 10Base-T/100Base-TX RJ-45 son de negociaciûn y cruce automóticos. Autonegociación en puertos RJ-45 El switch dispone de ocho puertos RJ-45 10Base-T/100Base-TX. Estos puertos soportan tanto autonegociación como auto-crossover. Un puerto con autonegociación puede detectar y ajustarse a la velocidad Ethernet (10/100Mbps) y al modo de transferencia (full dúplex o half dúplex) del dispositivo conectado. Un puerto con soporte de auto-crossover (auto-MDI/MDI-X) va a funcionar correctamente tanto con un cable Ethernet recto como cruzado. Asegúrese de que la longitud de sus cables no supera los 100 metros entre sus dos extremos. Conexión de alimentación Use el adaptador de corriente sumnistrado para conectar su switch a la toma de corriente. LEDs de Panel Frontal Los LEDs del panel frontal indican el estado del switch en tiempo real. LED PWR LINK/ ACT ESTADO On Off On Off Parpadea DESCRIPCIÓN El switch está encendido y recibiendo alimentación. El switch no recibe alimentación. El puerto está conectado a la red Ethernet. El puerto no está conectado a la red Ethernet. El puerto está recibiendo o enviando datos. Especificaciones de producto Estándar Protocolo Tecnología Velocidad de transferencia Conector Dirección MAC Búfer de memoria Cable de red (Hasta 100m o 328ft) LED Fuente de alimentación Temperatura Humedad (Sin condensación) Dimensiones L x A x H (mm) EMI y Seguridad IEEE 802.3 10BASE-T Ethernet, IEEE 802.3u 100BASE-TX Fast Ethernet IEEE 802.3x Control de flujo y presión posterior CSMA/CD Arquitectura Store-and-Forward 14,880 pps para 10Mbps 148,800 pps para 100Mbps RJ-45 ; Auto-MDIX en todos los puertos Tabla de direcciones Mac de 1K 1.25 Mb 10BASE-T: 100Ω 2 pares UTP/STP. 3, 4, 5 100BASE-TX: 100Ω 2 pares UTP/STP. 5 Por puerto: LINK/ACT Por unidad: PWR 3.3V 4A (100-240V/ 50-60Hz) de funcionamiento: 0º C~ 50º C (32º F ~ 122º F) de funcionamiento: 10% ~ 90% ES-116P: 215 x 133 x 42 ES-124P: 267 x 152.5 x 42 FCC Class A, CE, C-Tick FRANÇAIS Introduction Ce Switch multi port est utilisé pour augmenter les performances du réseau. Le switch a un dispositif d'enregistrement des transferts qui permet des temps de réponses faibles pour les réseaux à grandes vitesses. Application pour groupe de travail autonome Le Switch est utilisé pour connecter des stations de travail, des serveurs, et des serveurs d'impression entre eux pour former un groupe de travail. Installation Le commutateur convient á un environnement de bureau o il peut ítre montè en rack, sur des racks EIA 19 pouces standard (avec le kit de montage en rack fourni) ou de façon autonome. NE PAS OBSTRUER LES GRILLES DE VENTILATION Le switch est approprié pour un environnement de bureau, il peut être posé sur un bureau ou une étagère. 1 Installez le switch sur un endroit propre et sec.. 2 Placez le switch sur un endroit suffisamment solide pour supporter le poids du Switch et des câbles connectés. Assurezvous qu'il y ait une prise électrique à proximité. Installation avec montage en rack 1 Alignez un support avec les trous sur un cùtè du commutateur et fixez-le avec les vis du support. De míme, fixez les autres supports. 2 Aprës avoir fixè les supports de montage, mettez en place le commutateur dans le rack en alignant les trous des supports avec les trous appropriès sur le rack. Fixez le commutateur sur le rack avec les vis de montage de rack. Connexion du panneau arrière Les ports RJ-45 et le connecteur "Power" se trouvent sur la face arrière du switch. Ports RJ-45 à négociation automatique Votre switch est équipé de huit ports RJ-45 10Base-T/100Base-TX. Ces ports sont à négociation et croisement automatiques. Un port à négociation automatique peut détecter et ajuster sa vitesse à la vitesse Ethernet optimale (10/100Mbps) et au mode duplex (full duplex ou half duplex) de l'appareil connecté. Un port auto-crossover ou à croisement automatique (auto MDI/MDIX) fonctionne automatiquement avec un câble Ehternet droit ou un câble croisé. ASSUREZ VOUS QUE LA LONGUEUR DES CABLES N'EXCEDE PAS 100 METRES Connexion de l'alimentation Utilisez le transformateur fourni pour relier votre switch au réseau électrique. Voyants DEL du panneau avant Les voyants DEL sur le panneau avant indiquent l'état en temps réel du commutateur. LED PWR LINK/ ACT ETAT On Off On Off Clignotant DESCRIPTION Le switch est démarré et correctement alimenté Le switch est éteint ou n'est pas alimenté Le port est connecté au réseau Ethernet Le port n'est pas connecté au réseau Ethernet Le port reçoit ou transmet des données Spécifications du produit Norme Protocole Technologie Taux de transfert Vitesse de transfert Connecteur Adresse MAC Tampon mémoire Câble réseau (Jusqu'à 100m ou 328 pieds) Voyant DEL Alimentation électrique Température Humidité (Sans condensation) Dimensions (mm) Long x Larg x Haut EMI & Sécurité IEEE 802.3 10BASE-T Ethernet, IEEE 802.3u 100BASE-TX Fast Ethernet IEEE 802.3x Flow Control and Back-pressure CSMA/CD Architecture de commutation stockage et retransmission 14,880 pps pour 10Mbps 148,800 pps pour 100Mbps Ethernet : 10Mbps (half duplex), 20Mbps (full duplex) Fast Ethernet : 100 Mbps (half duplex), 200Mbps (full duplex) RJ-45 ; Auto-MDIX sur tous les ports Table d'adresses 1K Mac 1.25 Mb 10BASE-T : 100Ω 2-paires UTP/STP Cat. 3, 4, 5 100BASE-TX : 100Ω 2-paires UTP/STP Cat. 5 Par port: LINK/ACT Par unité: PWR 3.3V 4A (100-240V/ 50-60Hz) De fonctionnement: 0º C~ 50º C (32º F ~ 122º F) En fonctionnement: 10% ~ 90% ES-116P: 215 x 133 x 42 ES-124P: 267 x 152.5 x 42 FCC Class A, CE, C-Tick
-
 1
1 -
 2
2 -
 3
3
 |
 |
