eMachines eView_17F3 eMachines 17F3 User Guide
eMachines eView_17F3 Manual
 |
View all eMachines eView_17F3 manuals
Add to My Manuals
Save this manual to your list of manuals |
eMachines eView_17F3 manual content summary:
- eMachines eView_17F3 | eMachines 17F3 User Guide - Page 1
17f3 User Guide - eMachines eView_17F3 | eMachines 17F3 User Guide - Page 2
- eMachines eView_17F3 | eMachines 17F3 User Guide - Page 3
Contents Using Your 17f3 Monitor 1 Setting up the monitor 2 Adjusting settings 4 On-screen display menu options 5 Video modes 6 Maintaining 7 Cleaning 7 Troubleshooting 7 Specifications 9 Safety, Regulatory, and Legal Information 11 i - eMachines eView_17F3 | eMachines 17F3 User Guide - Page 4
Contents www.emachines.com ii - eMachines eView_17F3 | eMachines 17F3 User Guide - Page 5
Using Your 17f3 Monitor • Setting up the monitor • Adjusting settings • Maintaining • Troubleshooting • Specifications - eMachines eView_17F3 | eMachines 17F3 User Guide - Page 6
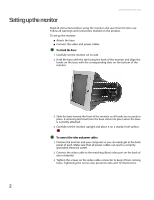
.emachines.com Setting up the monitor Read all instructions before using the monitor and save them for later use. Follow all warnings and instructions marked on the product. To set up the monitor: ■ Attach the base ■ Connect the video and power cables To attach the base: 1 Carefully set the monitor - eMachines eView_17F3 | eMachines 17F3 User Guide - Page 7
it for ventilation. Setting up the monitor 4 Connect the power cable that came with the monitor to the AC power connector on the back of the monitor. Only use the power cable that came with the monitor. AC power connector 5 Plug the other end of the power cable into a correctly grounded electrical - eMachines eView_17F3 | eMachines 17F3 User Guide - Page 8
www.emachines.com To turn on the monitor: 1 Press the power button on the front of the monitor. Power button/ power indicator 2 Turn on your computer. MENU button EXIT button Brightness/ button Contrast/ button Adjusting settings Power button. Turns the monitor on and off. Power indicator. - eMachines eView_17F3 | eMachines 17F3 User Guide - Page 9
www.emachines.com To adjust monitor settings: 1 Press the MENU button. The OSD menu opens. Adjusting settings 2 Press the or buttons to highlight an OSD menu option, then press the MENU button to select the option. 3 Press the or buttons to adjust an OSD menu option. 4 Press the EXIT button to - eMachines eView_17F3 | eMachines 17F3 User Guide - Page 10
6500°K) or USER. USER lets you adjust the red, green, and blue colors separately. OSD ADJUSTMENT. Opens a submenu that contains menu options that let you change OSD the position of the OSD menu on the screen and the length of time the OSD menu is visible. RESET. Resets the monitor settings to the - eMachines eView_17F3 | eMachines 17F3 User Guide - Page 11
pad or glass cleaner. You will permanently scratch the glass panel. Troubleshooting No picture ■ Make sure that the monitor is turned on. ■ Make sure that the power cord is connected correctly to both the back of the monitor and the wall outlet. ■ Make sure that the video cable is connected - eMachines eView_17F3 | eMachines 17F3 User Guide - Page 12
warms up for at least 30 minutes before making a final judgment about color uniformity. ■ Non-shielded speakers are not placed too close to the monitor. ■ The monitor is not positioned too close to another monitor, power transformer or adapter, electric fan, fluorescent light, metal shelf, or laser - eMachines eView_17F3 | eMachines 17F3 User Guide - Page 13
indicate that the monitor is defective. Specifications are subject to change without obligation or notification. CRT Synchronization range Resolution Dot rate Power supply Input signal Display analog input Weight Dimensions (W×H×D) Operating conditions Storage conditions Flat 17-inch diagonal (16 - eMachines eView_17F3 | eMachines 17F3 User Guide - Page 14
www.emachines.com 10 - eMachines eView_17F3 | eMachines 17F3 User Guide - Page 15
Safety, Regulatory, and Legal Information • Important safety information • Environmental information • Regulatory compliance statements • Notices - eMachines eView_17F3 | eMachines 17F3 User Guide - Page 16
and buildup of static charges. Warning To prevent electric shock, never remove the cover. No user serviceable parts inside. Refer servicing to qualified service personnel. Care during use ■ Do not walk on the power cord or allow anything to rest on it. ■ Do not spill anything on the system. The - eMachines eView_17F3 | eMachines 17F3 User Guide - Page 17
. You can do your part for the environment by following eMachines to see if this program is available in your area. ■ If you need further assistance in recycling, reusing, or trading in your "end of life" product, you may contact us at the Customer Care number listed in your product's user guide - eMachines eView_17F3 | eMachines 17F3 User Guide - Page 18
, which can be determined by turning the equipment off and on, the user is encouraged to try to correct the interference by one or more of declaration of conformity Responsible party: eMachines, Inc. 7565 Irvine Center Drive Irvine, CA 92618 USA This device complies with Part 15 of the FCC Rules. - eMachines eView_17F3 | eMachines 17F3 User Guide - Page 19
This publication is protected by copyright and all rights are reserved. No part of it may be reproduced or transmitted by any means or in any form, without prior consent in writing from eMachines. The information in this manual has been carefully checked and is believed to be accurate. However - eMachines eView_17F3 | eMachines 17F3 User Guide - Page 20
Notices www.emachines.com 16 - eMachines eView_17F3 | eMachines 17F3 User Guide - Page 21
- eMachines eView_17F3 | eMachines 17F3 User Guide - Page 22
MAN MON 17F3 USR GDE R4 11/05
-
 1
1 -
 2
2 -
 3
3 -
 4
4 -
 5
5 -
 6
6 -
 7
7 -
8
-
9
-
10
-
11
-
12
-
13
-
14
-
15
-
16
-
17
-
18
-
19
-
20
-
21
-
22
 |
 |

17
f3
User Guide