1993 Chevrolet Lumina Owner's Manual - Page 222
1993 Chevrolet Lumina Manual
Page 222 highlights
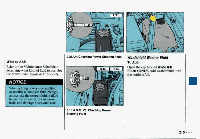
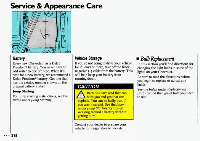
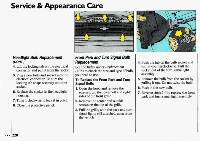
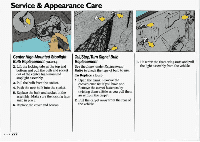
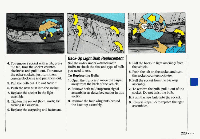
Service & Appearance Care HwdDghf Bulb Replacement (COW..) 4. Lift the lacking tab on the electrical connector and p d it from the socket. 5. plug a new bulb ayld socket into the electxical cannectur, Be sure the lacking tabsnaps securely onto the socket. 6. Replace the socket in the headlight 4. Push the tab on the bulb socket and turn it c=own.t~do;ckwise. the 9ull socket out of the t [email protected] w I assembly. 5. Remove thebulb from the socket by housing. 7. Turn it clockwise to lo& it i place. n 8. Close the protective panel, palling it out. De not twistthe bulb. 6. Push in the new bulb. 7. Reverse steps 1-4to replace the front park and turn signal light assembly.
-
 1
1 -
2
-
3
-
4
-
5
-
6
-
7
-
8
-
9
-
10
-
11
-
12
-
13
-
14
-
15
-
16
-
17
-
18
-
19
-
20
-
21
-
22
-
23
-
24
-
25
-
26
-
27
-
28
-
29
-
30
-
31
-
32
-
33
-
34
-
35
-
36
-
37
-
38
-
39
-
40
-
41
-
42
-
43
-
44
-
45
-
46
-
47
-
48
-
49
-
50
-
51
-
52
-
53
-
54
-
55
-
56
-
57
-
58
-
59
-
60
-
61
-
62
-
63
-
64
-
65
-
66
-
67
-
68
-
69
-
70
-
71
-
72
-
73
-
74
-
75
-
76
-
77
-
78
-
79
-
80
-
81
-
82
-
83
-
84
-
85
-
86
-
87
-
88
-
89
-
90
-
91
-
92
-
93
-
94
-
95
-
96
-
97
-
98
-
99
-
100
-
101
-
102
-
103
-
104
-
105
-
106
-
107
-
108
-
109
-
110
-
111
-
112
-
113
-
114
-
115
-
116
-
117
-
118
-
119
-
120
-
121
-
122
-
123
-
124
-
125
-
126
-
127
-
128
-
129
-
130
-
131
-
132
-
133
-
134
-
135
-
136
-
137
-
138
-
139
-
140
-
141
-
142
-
143
-
144
-
145
-
146
-
147
-
148
-
149
-
150
-
151
-
152
-
153
-
154
-
155
-
156
-
157
-
158
-
159
-
160
-
161
-
162
-
163
-
164
-
165
-
166
-
167
-
168
-
169
-
170
-
171
-
172
-
173
-
174
-
175
-
176
-
177
-
178
-
179
-
180
-
181
-
182
-
183
-
184
-
185
-
186
-
187
-
188
-
189
-
190
-
191
-
192
-
193
-
194
-
195
-
196
-
197
-
198
-
199
-
200
-
201
-
202
-
203
-
204
-
205
-
206
-
207
-
208
-
209
-
210
-
211
-
212
-
213
-
214
-
215
-
216
-
 217
217 -
 218
218 -
 219
219 -
 220
220 -
 221
221 -
 222
222 -
 223
223 -
 224
224 -
 225
225 -
 226
226 -
 227
227 -
228
-
229
-
230
-
231
-
232
-
233
-
234
-
235
-
236
-
237
-
238
-
239
-
240
-
241
-
242
-
243
-
244
-
245
-
246
-
247
-
248
-
249
-
250
-
251
-
252
-
253
-
254
-
255
-
256
-
257
-
258
-
259
-
260
-
261
-
262
-
263
-
264
-
265
-
266
-
267
-
268
-
269
-
270
-
271
-
272
-
273
-
274
-
275
-
276
-
277
-
278
-
279
-
280
-
281
-
282
-
283
-
284
-
285
-
286
-
287
-
288
-
289
-
290
-
291
-
292
-
293
-
294
-
295
-
296
-
297
-
298
-
299
-
300
-
301
-
302
-
303
-
304
-
305
-
306
-
307
-
308
-
309
-
310
-
311
-
312
-
313
-
314
-
315
-
316
-
317
-
318
-
319
-
320
-
321
-
322
-
323
-
324
 |
 |

Service
&
Appearance
Care
HwdDghf
Bulb
Replacement
(COW..)
4.
Lift
the
lacking
tab
on
the
electrical
connector
and
p d
it
from
the
socket.
5.
plug
a
new
bulb
ayld
socket
into
the
electxical
cannectur,
Be
sure
the
lacking
tab
snaps
securely
onto
the
socket.
6.
Replace
the
socket
in
the
headlight
housing.
7.
Turn
it
clockwise
to
lo&
it
in
place.
8.
Close
the
protective
panel,
4.
Push
the
tab
on
the
bulb
socket
and
I
turn
it
c=own.t~do;ckwise.
9ull
the
assembly.
5.
Remove
the
bulb
from
the
socket
by
palling
it
out.
De
not
twist
the
bulb.
6.
Push
in
the
new
bulb.
7.
Reverse
steps
1-4
to
replace
the
front
park
and
turn
signal
light
assembly.
socket
out
of
the
tw