2005 Chevrolet Express Van Owner's Manual - Page 312
2005 Chevrolet Express Van Manual
Page 312 highlights
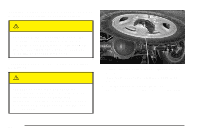
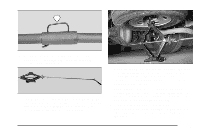
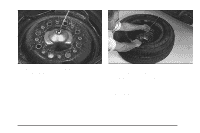
6. Raise the tire fully against the underside of the vehicle. Continue turning the ratchet until the tire is secure and the cable is tight. The spare tire hoist cannot be overtightened. 7. Make sure the tire is stored securely. Push, pull, and then try to rotate or turn the tire. If the tire moves, use the ratchet to tighten the cable. You will hear two clicks when the tire is up all the way. Return the jacking equipment to the proper location. Secure the items and replace the jack cover. After installing the spare tire on your vehicle, you should stop as soon as possible and make sure the spare is correctly inflated. Have the damaged or flat road tire repaired or replaced as soon as you can and installed back onto your vehicle. This way, a spare tire will be available in case you need it again. Your vehicle may have a different size spare tire than the road tires - those originally installed on your vehicle. This spare tire was developed for use on your vehicle, so it's all right to drive on it. If your vehicle has a spare tire that does not match your vehicle's original road tires and wheels in size and type, do not include the spare in the tire rotation. Spare Tire Your vehicle, when new, had a fully inflated spare tire. A spare tire may lose air over time, so check its inflation pressure regularly. See Inflation - Tire Pressure on page 5-58 and Loading Your Vehicle on page 4-29 for information regarding proper tire inflation and loading your vehicle. For instructions on how to remove, install or store a spare tire, see Removing the Flat Tire and Installing the Spare Tire on page 5-72 and Storing a Flat or Spare Tire and Tools on page 5-80. Appearance Care Cleaning products can be hazardous. Some are toxic. Other cleaning products can burst into flames if a match is struck near them or if they get on a hot part of the vehicle. Some are dangerous if their fumes are inhaled in an enclosed space. When anything from a container is used to clean the vehicle, be sure to follow the manufacturer's warnings and instructions. Always open the doors or windows of the vehicle when cleaning the inside. 5-82
-
 1
1 -
2
-
3
-
4
-
5
-
6
-
7
-
8
-
9
-
10
-
11
-
12
-
13
-
14
-
15
-
16
-
17
-
18
-
19
-
20
-
21
-
22
-
23
-
24
-
25
-
26
-
27
-
28
-
29
-
30
-
31
-
32
-
33
-
34
-
35
-
36
-
37
-
38
-
39
-
40
-
41
-
42
-
43
-
44
-
45
-
46
-
47
-
48
-
49
-
50
-
51
-
52
-
53
-
54
-
55
-
56
-
57
-
58
-
59
-
60
-
61
-
62
-
63
-
64
-
65
-
66
-
67
-
68
-
69
-
70
-
71
-
72
-
73
-
74
-
75
-
76
-
77
-
78
-
79
-
80
-
81
-
82
-
83
-
84
-
85
-
86
-
87
-
88
-
89
-
90
-
91
-
92
-
93
-
94
-
95
-
96
-
97
-
98
-
99
-
100
-
101
-
102
-
103
-
104
-
105
-
106
-
107
-
108
-
109
-
110
-
111
-
112
-
113
-
114
-
115
-
116
-
117
-
118
-
119
-
120
-
121
-
122
-
123
-
124
-
125
-
126
-
127
-
128
-
129
-
130
-
131
-
132
-
133
-
134
-
135
-
136
-
137
-
138
-
139
-
140
-
141
-
142
-
143
-
144
-
145
-
146
-
147
-
148
-
149
-
150
-
151
-
152
-
153
-
154
-
155
-
156
-
157
-
158
-
159
-
160
-
161
-
162
-
163
-
164
-
165
-
166
-
167
-
168
-
169
-
170
-
171
-
172
-
173
-
174
-
175
-
176
-
177
-
178
-
179
-
180
-
181
-
182
-
183
-
184
-
185
-
186
-
187
-
188
-
189
-
190
-
191
-
192
-
193
-
194
-
195
-
196
-
197
-
198
-
199
-
200
-
201
-
202
-
203
-
204
-
205
-
206
-
207
-
208
-
209
-
210
-
211
-
212
-
213
-
214
-
215
-
216
-
217
-
218
-
219
-
220
-
221
-
222
-
223
-
224
-
225
-
226
-
227
-
228
-
229
-
230
-
231
-
232
-
233
-
234
-
235
-
236
-
237
-
238
-
239
-
240
-
241
-
242
-
243
-
244
-
245
-
246
-
247
-
248
-
249
-
250
-
251
-
252
-
253
-
254
-
255
-
256
-
257
-
258
-
259
-
260
-
261
-
262
-
263
-
264
-
265
-
266
-
267
-
268
-
269
-
270
-
271
-
272
-
273
-
274
-
275
-
276
-
277
-
278
-
279
-
280
-
281
-
282
-
283
-
284
-
285
-
286
-
287
-
288
-
289
-
290
-
291
-
292
-
293
-
294
-
295
-
296
-
297
-
298
-
299
-
300
-
301
-
302
-
303
-
304
-
305
-
306
-
 307
307 -
 308
308 -
 309
309 -
 310
310 -
 311
311 -
 312
312 -
 313
313 -
 314
314 -
 315
315 -
 316
316 -
 317
317 -
318
-
319
-
320
-
321
-
322
-
323
-
324
-
325
-
326
-
327
-
328
-
329
-
330
-
331
-
332
-
333
-
334
-
335
-
336
-
337
-
338
-
339
-
340
-
341
-
342
-
343
-
344
-
345
-
346
-
347
-
348
-
349
-
350
-
351
-
352
-
353
-
354
-
355
-
356
-
357
-
358
-
359
-
360
-
361
-
362
-
363
-
364
-
365
-
366
-
367
-
368
-
369
-
370
 |
 |
