2006 Chevrolet Monte Carlo Owner's Manual - Page 180
2006 Chevrolet Monte Carlo Manual

Page 180 highlights
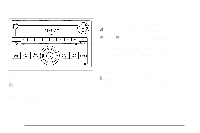
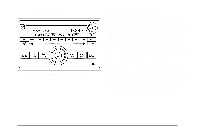
CD Messages CHECK DISC: If this message appears on the display and/or the CD comes out, it could be for one of the following reasons: • It is very hot. When the temperature returns to normal, the CD should play. • You are driving on a very rough road. When the road becomes smoother, the CD should play. • The CD is dirty, scratched, wet, or upside down. • The air is very humid. If so, wait about an hour and try again. • There may have been a problem while burning the CD-R. • The label may be caught in the CD player. If the CD is not playing correctly, for any other reason, try a known good CD. If any error occurs repeatedly or if an error cannot be corrected, contact your dealer. If the radio displays an error message, write it down and provide it to your dealer while reporting the problem. To use a portable audio player, connect a 3.5 mm (1/8 inch) cable to the radio's front auxiliary input jack. When a device is connected, press the radio CD/AUX button to begin playing audio from the device over the car speakers. When a device is connected, the radio automatically begins playing audio from the device over the car speakers. O (Power/Volume): Turn this knob clockwise or counterclockwise to increase or decrease the volume of the portable player. You may need to do additional volume adjustments from the portable device if the volume does not go loud or soft enough. BAND: Press this button to listen to the radio while a portable audio device is playing. The portable audio device will continue playing, so you may want to stop it or turn it off. CD/AUX (CD/Auxiliary): Press this button to play a CD while a portable audio device is playing. Press this button again and the system will begin playing audio from the connected portable audio player. If a portable audio player is not connected, "no input device found" will be displayed. Using the Auxiliary Input Jack Your radio system has an auxiliary input jack located on the lower right side of the faceplate. You can connect an external audio device such as an iPod, MP3 player, CD changer, or cassette player, to the auxiliary input jack for use as another source for audio listening. 3-66
-
 1
1 -
2
-
3
-
4
-
5
-
6
-
7
-
8
-
9
-
10
-
11
-
12
-
13
-
14
-
15
-
16
-
17
-
18
-
19
-
20
-
21
-
22
-
23
-
24
-
25
-
26
-
27
-
28
-
29
-
30
-
31
-
32
-
33
-
34
-
35
-
36
-
37
-
38
-
39
-
40
-
41
-
42
-
43
-
44
-
45
-
46
-
47
-
48
-
49
-
50
-
51
-
52
-
53
-
54
-
55
-
56
-
57
-
58
-
59
-
60
-
61
-
62
-
63
-
64
-
65
-
66
-
67
-
68
-
69
-
70
-
71
-
72
-
73
-
74
-
75
-
76
-
77
-
78
-
79
-
80
-
81
-
82
-
83
-
84
-
85
-
86
-
87
-
88
-
89
-
90
-
91
-
92
-
93
-
94
-
95
-
96
-
97
-
98
-
99
-
100
-
101
-
102
-
103
-
104
-
105
-
106
-
107
-
108
-
109
-
110
-
111
-
112
-
113
-
114
-
115
-
116
-
117
-
118
-
119
-
120
-
121
-
122
-
123
-
124
-
125
-
126
-
127
-
128
-
129
-
130
-
131
-
132
-
133
-
134
-
135
-
136
-
137
-
138
-
139
-
140
-
141
-
142
-
143
-
144
-
145
-
146
-
147
-
148
-
149
-
150
-
151
-
152
-
153
-
154
-
155
-
156
-
157
-
158
-
159
-
160
-
161
-
162
-
163
-
164
-
165
-
166
-
167
-
168
-
169
-
170
-
171
-
172
-
173
-
174
-
 175
175 -
 176
176 -
 177
177 -
 178
178 -
 179
179 -
 180
180 -
 181
181 -
 182
182 -
 183
183 -
 184
184 -
 185
185 -
186
-
187
-
188
-
189
-
190
-
191
-
192
-
193
-
194
-
195
-
196
-
197
-
198
-
199
-
200
-
201
-
202
-
203
-
204
-
205
-
206
-
207
-
208
-
209
-
210
-
211
-
212
-
213
-
214
-
215
-
216
-
217
-
218
-
219
-
220
-
221
-
222
-
223
-
224
-
225
-
226
-
227
-
228
-
229
-
230
-
231
-
232
-
233
-
234
-
235
-
236
-
237
-
238
-
239
-
240
-
241
-
242
-
243
-
244
-
245
-
246
-
247
-
248
-
249
-
250
-
251
-
252
-
253
-
254
-
255
-
256
-
257
-
258
-
259
-
260
-
261
-
262
-
263
-
264
-
265
-
266
-
267
-
268
-
269
-
270
-
271
-
272
-
273
-
274
-
275
-
276
-
277
-
278
-
279
-
280
-
281
-
282
-
283
-
284
-
285
-
286
-
287
-
288
-
289
-
290
-
291
-
292
-
293
-
294
-
295
-
296
-
297
-
298
-
299
-
300
-
301
-
302
-
303
-
304
-
305
-
306
-
307
-
308
-
309
-
310
-
311
-
312
-
313
-
314
-
315
-
316
-
317
-
318
-
319
-
320
-
321
-
322
-
323
-
324
-
325
-
326
-
327
-
328
-
329
-
330
-
331
-
332
-
333
-
334
-
335
-
336
-
337
-
338
-
339
-
340
-
341
-
342
-
343
-
344
-
345
-
346
-
347
-
348
-
349
-
350
-
351
-
352
-
353
-
354
-
355
-
356
-
357
-
358
-
359
-
360
-
361
-
362
-
363
-
364
-
365
-
366
-
367
-
368
-
369
-
370
-
371
-
372
-
373
-
374
-
375
-
376
-
377
-
378
-
379
-
380
-
381
-
382
-
383
-
384
-
385
-
386
-
387
-
388
-
389
-
390
 |
 |