1999 Ford Explorer Owner Guide 1st Printing - Page 103
1999 Ford Explorer Manual
Page 103 highlights
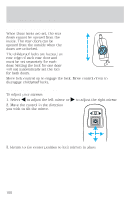
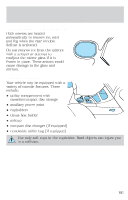
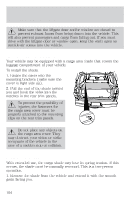
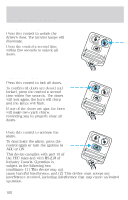
Controls and features POSITIVE RETENTION FLOOR MAT To install floor mats: 1. Move the driver's seat to the most rearward position 2. Position the driver's side floor mat with the rear of the mat against left (outboard) front edge of seat track mounting bracket. 3. Use a screwdriver to screw locator post into vehicle carpeting. Exert pressure while turning to pierce the carpeting. When installed properly, the locator will not screw down tightly, but will rotate freely. Use only Ford original Equipment floor mats. Do not stack multiple floor mats over the Ford original equipment floor mats as they are not positively retained. REAR LIFTGATE The liftgate area is only intended for cargo, not passengers. You can open and close the liftgate from outside the vehicle. It cannot be opened from inside the cargo area. • To open the liftgate window, unlock the liftgate (with the key or power door locks) and push the key lock cylinder. • To open the liftgate, unlock the liftgate and pull up on the handle under the license plate lamp shield. To lock the liftgate and the liftgate window, use the key or the power door locks, depress the key lock cylinder or press the door lock switch on the left side of the cargo area. The liftgate door and window should be closed before driving your vehicle. If not, possible damage may occur to the liftgate door lift cylinders and attaching hardware. 103
-
 1
1 -
2
-
3
-
4
-
5
-
6
-
7
-
8
-
9
-
10
-
11
-
12
-
13
-
14
-
15
-
16
-
17
-
18
-
19
-
20
-
21
-
22
-
23
-
24
-
25
-
26
-
27
-
28
-
29
-
30
-
31
-
32
-
33
-
34
-
35
-
36
-
37
-
38
-
39
-
40
-
41
-
42
-
43
-
44
-
45
-
46
-
47
-
48
-
49
-
50
-
51
-
52
-
53
-
54
-
55
-
56
-
57
-
58
-
59
-
60
-
61
-
62
-
63
-
64
-
65
-
66
-
67
-
68
-
69
-
70
-
71
-
72
-
73
-
74
-
75
-
76
-
77
-
78
-
79
-
80
-
81
-
82
-
83
-
84
-
85
-
86
-
87
-
88
-
89
-
90
-
91
-
92
-
93
-
94
-
95
-
96
-
97
-
 98
98 -
 99
99 -
 100
100 -
 101
101 -
 102
102 -
 103
103 -
 104
104 -
 105
105 -
 106
106 -
 107
107 -
 108
108 -
109
-
110
-
111
-
112
-
113
-
114
-
115
-
116
-
117
-
118
-
119
-
120
-
121
-
122
-
123
-
124
-
125
-
126
-
127
-
128
-
129
-
130
-
131
-
132
-
133
-
134
-
135
-
136
-
137
-
138
-
139
-
140
-
141
-
142
-
143
-
144
-
145
-
146
-
147
-
148
-
149
-
150
-
151
-
152
-
153
-
154
-
155
-
156
-
157
-
158
-
159
-
160
-
161
-
162
-
163
-
164
-
165
-
166
-
167
-
168
-
169
-
170
-
171
-
172
-
173
-
174
-
175
-
176
-
177
-
178
-
179
-
180
-
181
-
182
-
183
-
184
-
185
-
186
-
187
-
188
-
189
-
190
-
191
-
192
-
193
-
194
-
195
-
196
-
197
-
198
-
199
-
200
-
201
-
202
-
203
-
204
-
205
-
206
-
207
-
208
-
209
-
210
-
211
-
212
-
213
-
214
-
215
-
216
-
217
-
218
-
219
-
220
-
221
-
222
-
223
-
224
-
225
-
226
-
227
-
228
-
229
-
230
-
231
-
232
-
233
-
234
-
235
-
236
-
237
-
238
-
239
-
240
-
241
-
242
-
243
-
244
-
245
-
246
-
247
-
248
-
249
-
250
-
251
-
252
-
253
-
254
-
255
-
256
-
257
-
258
-
259
-
260
-
261
-
262
-
263
-
264
 |
 |