1999 Ford F350 Owner Guide 4th Printing - Page 207
1999 Ford F350 Manual

Page 207 highlights
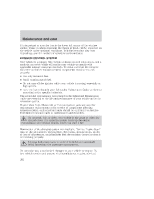
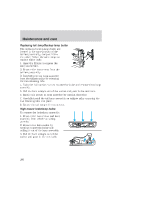
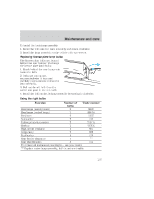
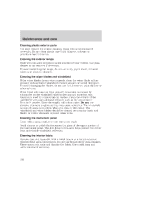
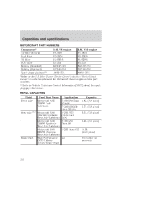
Maintenance and care To install the brakelamp assembly: 1. Install the bulb into the lamp assembly and rotate clockwise. 2. Install the lamp assembly on the vehicle with two screws. Replacing license plate lamp bulbs The license plate bulbs are located behind the rear bumper. To change the license plate lamp bulbs: 1. Reach behind the rear bumper to locate the bulb. 2. Twist the bulb socket counterclockwise 1⁄4 turn and carefully pull to remove it from the lamp assembly. 3. Pull out the old bulb from the socket and push in the new bulb. 4. Install the bulb socket in lamp assembly by turning it clockwise. Using the right bulbs Number of Trade number bulbs Headlamps (aerodynamic) 2 9007 Headlamps (sealed beam) 2 H6054 Park/turn 2 3157 Sidemarker 2 194 Tail/stop/turn/sidemarker 2 3157 K Backup 2 3156K High-mount stoplamp 1 921 Cargo lamp 2 906 Roofmarker 5 194 (a) Rear fender clearance 4 Rear identification 3 194 To replace all instrument panel lights - see your dealer (a) Replace entire lamp assembly; bulb is not serviceable. Function 207
-
 1
1 -
2
-
3
-
4
-
5
-
6
-
7
-
8
-
9
-
10
-
11
-
12
-
13
-
14
-
15
-
16
-
17
-
18
-
19
-
20
-
21
-
22
-
23
-
24
-
25
-
26
-
27
-
28
-
29
-
30
-
31
-
32
-
33
-
34
-
35
-
36
-
37
-
38
-
39
-
40
-
41
-
42
-
43
-
44
-
45
-
46
-
47
-
48
-
49
-
50
-
51
-
52
-
53
-
54
-
55
-
56
-
57
-
58
-
59
-
60
-
61
-
62
-
63
-
64
-
65
-
66
-
67
-
68
-
69
-
70
-
71
-
72
-
73
-
74
-
75
-
76
-
77
-
78
-
79
-
80
-
81
-
82
-
83
-
84
-
85
-
86
-
87
-
88
-
89
-
90
-
91
-
92
-
93
-
94
-
95
-
96
-
97
-
98
-
99
-
100
-
101
-
102
-
103
-
104
-
105
-
106
-
107
-
108
-
109
-
110
-
111
-
112
-
113
-
114
-
115
-
116
-
117
-
118
-
119
-
120
-
121
-
122
-
123
-
124
-
125
-
126
-
127
-
128
-
129
-
130
-
131
-
132
-
133
-
134
-
135
-
136
-
137
-
138
-
139
-
140
-
141
-
142
-
143
-
144
-
145
-
146
-
147
-
148
-
149
-
150
-
151
-
152
-
153
-
154
-
155
-
156
-
157
-
158
-
159
-
160
-
161
-
162
-
163
-
164
-
165
-
166
-
167
-
168
-
169
-
170
-
171
-
172
-
173
-
174
-
175
-
176
-
177
-
178
-
179
-
180
-
181
-
182
-
183
-
184
-
185
-
186
-
187
-
188
-
189
-
190
-
191
-
192
-
193
-
194
-
195
-
196
-
197
-
198
-
199
-
200
-
201
-
 202
202 -
 203
203 -
 204
204 -
 205
205 -
 206
206 -
 207
207 -
 208
208 -
 209
209 -
 210
210 -
 211
211 -
 212
212 -
213
-
214
-
215
-
216
-
217
-
218
-
219
-
220
-
221
-
222
-
223
-
224
-
225
-
226
-
227
-
228
-
229
-
230
-
231
-
232
-
233
-
234
-
235
-
236
-
237
-
238
-
239
-
240
-
241
-
242
-
243
-
244
-
245
-
246
-
247
-
248
 |
 |