1999 Ford Windstar Owner Guide 1st Printing - Page 227
1999 Ford Windstar Manual
Page 227 highlights
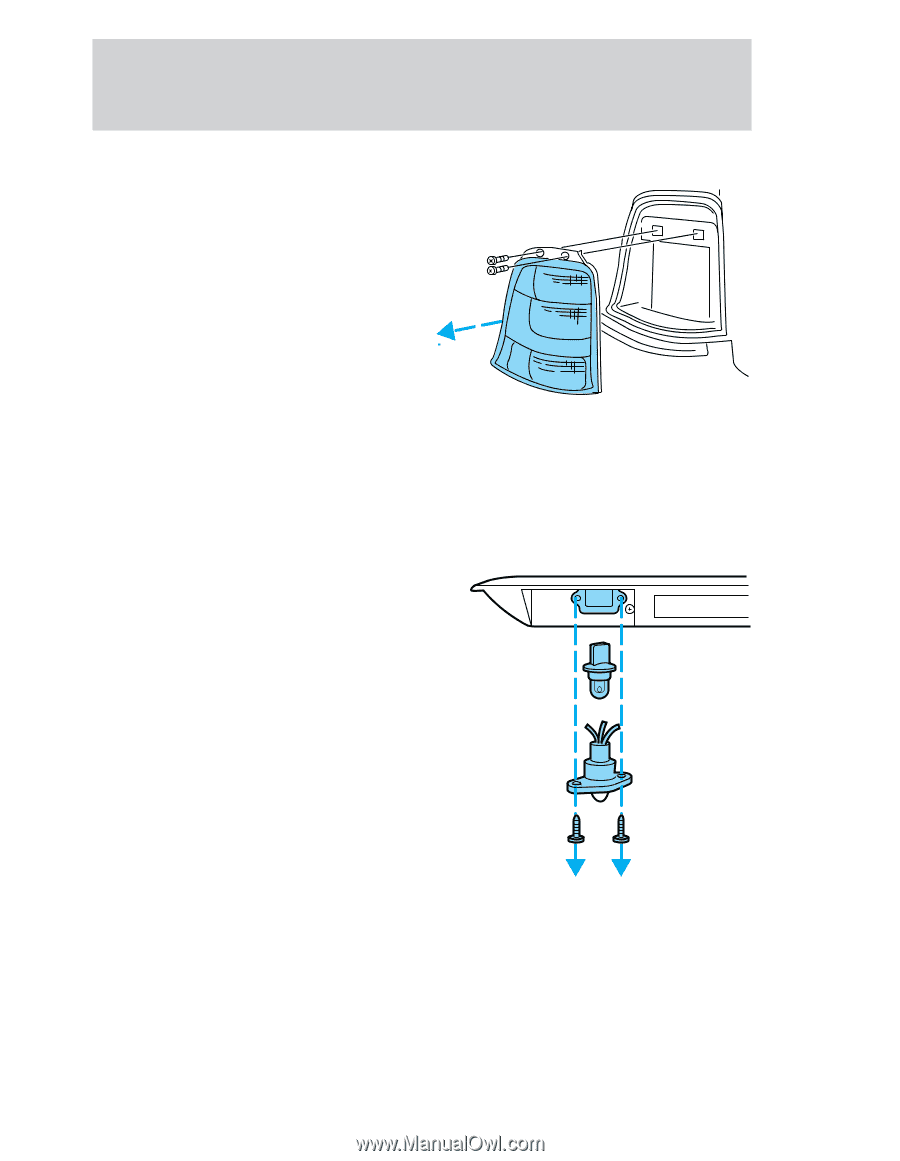
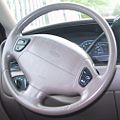
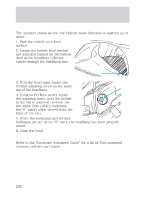
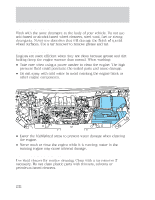
Maintenance and care Replacing tail lamp/backup lamp bulbs 1. Open the liftgate to expose the tail lamp assemblies. 2. Remove the two screws from the lamp assembly. 3. Carefully remove the lamp assembly by pulling it rearward about 45 degrees. 4. Rotate bulb socket counterclockwise 1⁄4 turn and remove from lamp assembly. 5. Pull bulb straight out of socket and push in new bulb. 6. To complete installation, follow the removal procedure in the reverse order. Replacing license plate lamp bulbs To change the license plate bulbs: 1. Remove two screws and the license plate lamp assembly from the liftgate. 2. Remove bulb socket by pulling it straight out of the lamp assembly. 3. Carefully pull the bulb out from the socket and push in the new bulb. 4. Push bulb socket in to the lamp assembly. 5. Install the lamp assembly on liftgate with two screws. High-mount brakelamp bulbs For bulb replacement, see a dealer or qualified technician. Cornering lamp bulbs For bulb replacement, see a dealer or qualified technician. 227
-
 1
1 -
2
-
3
-
4
-
5
-
6
-
7
-
8
-
9
-
10
-
11
-
12
-
13
-
14
-
15
-
16
-
17
-
18
-
19
-
20
-
21
-
22
-
23
-
24
-
25
-
26
-
27
-
28
-
29
-
30
-
31
-
32
-
33
-
34
-
35
-
36
-
37
-
38
-
39
-
40
-
41
-
42
-
43
-
44
-
45
-
46
-
47
-
48
-
49
-
50
-
51
-
52
-
53
-
54
-
55
-
56
-
57
-
58
-
59
-
60
-
61
-
62
-
63
-
64
-
65
-
66
-
67
-
68
-
69
-
70
-
71
-
72
-
73
-
74
-
75
-
76
-
77
-
78
-
79
-
80
-
81
-
82
-
83
-
84
-
85
-
86
-
87
-
88
-
89
-
90
-
91
-
92
-
93
-
94
-
95
-
96
-
97
-
98
-
99
-
100
-
101
-
102
-
103
-
104
-
105
-
106
-
107
-
108
-
109
-
110
-
111
-
112
-
113
-
114
-
115
-
116
-
117
-
118
-
119
-
120
-
121
-
122
-
123
-
124
-
125
-
126
-
127
-
128
-
129
-
130
-
131
-
132
-
133
-
134
-
135
-
136
-
137
-
138
-
139
-
140
-
141
-
142
-
143
-
144
-
145
-
146
-
147
-
148
-
149
-
150
-
151
-
152
-
153
-
154
-
155
-
156
-
157
-
158
-
159
-
160
-
161
-
162
-
163
-
164
-
165
-
166
-
167
-
168
-
169
-
170
-
171
-
172
-
173
-
174
-
175
-
176
-
177
-
178
-
179
-
180
-
181
-
182
-
183
-
184
-
185
-
186
-
187
-
188
-
189
-
190
-
191
-
192
-
193
-
194
-
195
-
196
-
197
-
198
-
199
-
200
-
201
-
202
-
203
-
204
-
205
-
206
-
207
-
208
-
209
-
210
-
211
-
212
-
213
-
214
-
215
-
216
-
217
-
218
-
219
-
220
-
221
-
 222
222 -
 223
223 -
 224
224 -
 225
225 -
 226
226 -
 227
227 -
 228
228 -
 229
229 -
 230
230 -
 231
231 -
 232
232 -
233
-
234
-
235
-
236
-
237
-
238
-
239
-
240
-
241
-
242
-
243
-
244
-
245
-
246
-
247
-
248
 |
 |