2001 Ford Escape Owner's Manual - Page 171
2001 Ford Escape Manual
Page 171 highlights
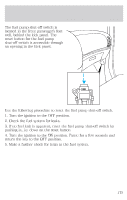
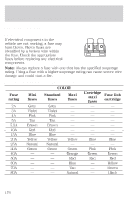
Driving 1. Loosen the screws on the cross-bar with the supplied Torx driver. 2. Move the cross-bar to the desired location, keeping the cross-bar parallel with the upper bar. 3. Tighten the screws with the supplied Torx driver. 4. Ensure that the cross-bar is tightened and secured into place before attempting to load cargo. Loading cargo: Only load cargo in the approved area (1) shown above. Do not load cargo outside of the designated area (2). Distribute the load as evenly as possible. Always use tie downs to secure the load. Always stow the inner rack on the roof when using an automated car wash. Do not attempt to open the liftgate or rear window when the rack is in the down position. This may damage the rack of your vehicle. 171
-
 1
1 -
2
-
3
-
4
-
5
-
6
-
7
-
8
-
9
-
10
-
11
-
12
-
13
-
14
-
15
-
16
-
17
-
18
-
19
-
20
-
21
-
22
-
23
-
24
-
25
-
26
-
27
-
28
-
29
-
30
-
31
-
32
-
33
-
34
-
35
-
36
-
37
-
38
-
39
-
40
-
41
-
42
-
43
-
44
-
45
-
46
-
47
-
48
-
49
-
50
-
51
-
52
-
53
-
54
-
55
-
56
-
57
-
58
-
59
-
60
-
61
-
62
-
63
-
64
-
65
-
66
-
67
-
68
-
69
-
70
-
71
-
72
-
73
-
74
-
75
-
76
-
77
-
78
-
79
-
80
-
81
-
82
-
83
-
84
-
85
-
86
-
87
-
88
-
89
-
90
-
91
-
92
-
93
-
94
-
95
-
96
-
97
-
98
-
99
-
100
-
101
-
102
-
103
-
104
-
105
-
106
-
107
-
108
-
109
-
110
-
111
-
112
-
113
-
114
-
115
-
116
-
117
-
118
-
119
-
120
-
121
-
122
-
123
-
124
-
125
-
126
-
127
-
128
-
129
-
130
-
131
-
132
-
133
-
134
-
135
-
136
-
137
-
138
-
139
-
140
-
141
-
142
-
143
-
144
-
145
-
146
-
147
-
148
-
149
-
150
-
151
-
152
-
153
-
154
-
155
-
156
-
157
-
158
-
159
-
160
-
161
-
162
-
163
-
164
-
165
-
 166
166 -
 167
167 -
 168
168 -
 169
169 -
 170
170 -
 171
171 -
 172
172 -
 173
173 -
 174
174 -
 175
175 -
 176
176 -
177
-
178
-
179
-
180
-
181
-
182
-
183
-
184
-
185
-
186
-
187
-
188
-
189
-
190
-
191
-
192
-
193
-
194
-
195
-
196
-
197
-
198
-
199
-
200
-
201
-
202
-
203
-
204
-
205
-
206
-
207
-
208
-
209
-
210
-
211
-
212
-
213
-
214
-
215
-
216
-
217
-
218
-
219
-
220
-
221
-
222
-
223
-
224
-
225
-
226
-
227
-
228
-
229
-
230
-
231
-
232
-
233
-
234
-
235
-
236
-
237
-
238
-
239
-
240
-
241
-
242
-
243
-
244
-
245
-
246
-
247
-
248
-
249
-
250
-
251
-
252
-
253
-
254
-
255
-
256
-
257
-
258
-
259
-
260
-
261
-
262
-
263
-
264
-
265
-
266
-
267
-
268
-
269
-
270
-
271
-
272
-
273
-
274
-
275
-
276
-
277
-
278
-
279
-
280
 |
 |

1. Loosen the screws on the
cross-bar with the supplied Torx
driver.
2. Move the cross-bar to the desired
location, keeping the cross-bar
parallel with the upper bar.
3. Tighten the screws with the
supplied Torx driver.
4. Ensure that the cross-bar is
tightened and secured into place
before attempting to load cargo.
Loading cargo:
Only load cargo in the approved
area (1) shown above. Do not load
cargo outside of the designated area
(2). Distribute the load as evenly as
possible. Always use tie downs to
secure the load.
Always stow the inner rack on the roof when using an automated
car wash.
Do not attempt to open the liftgate or rear window when the rack
is in the down position. This may damage the rack of your
vehicle.
Driving
171