2003 Ford Thunderbird Owner Guide 2nd Printing - Page 51
2003 Ford Thunderbird Manual
Page 51 highlights
Driver Controls 3. Lower the rear of the top into position so that the pins are placed into the bracket receivers. 4. Position the front of the top so that the locating tabs on each side are placed in the mounting castings. Ensure that the weather-strip on the top is placed on the body mounted seal without any wrinkles or gaps. The joint should have a smooth and continuous transition to prevent water leaks. 5. Take the mounting key from the bag located in the trunk. 6. Partially turn, 1/2 turn forward, the levers of the top (located in the rear on the left and right-hand side of the vehicle). 51 2003 Thunderbird (tbr) Owners Guide (post-2002-fmt) USA English (fus)
-
 1
1 -
2
-
3
-
4
-
5
-
6
-
7
-
8
-
9
-
10
-
11
-
12
-
13
-
14
-
15
-
16
-
17
-
18
-
19
-
20
-
21
-
22
-
23
-
24
-
25
-
26
-
27
-
28
-
29
-
30
-
31
-
32
-
33
-
34
-
35
-
36
-
37
-
38
-
39
-
40
-
41
-
42
-
43
-
44
-
45
-
 46
46 -
 47
47 -
 48
48 -
 49
49 -
 50
50 -
 51
51 -
 52
52 -
 53
53 -
 54
54 -
 55
55 -
 56
56 -
57
-
58
-
59
-
60
-
61
-
62
-
63
-
64
-
65
-
66
-
67
-
68
-
69
-
70
-
71
-
72
-
73
-
74
-
75
-
76
-
77
-
78
-
79
-
80
-
81
-
82
-
83
-
84
-
85
-
86
-
87
-
88
-
89
-
90
-
91
-
92
-
93
-
94
-
95
-
96
-
97
-
98
-
99
-
100
-
101
-
102
-
103
-
104
-
105
-
106
-
107
-
108
-
109
-
110
-
111
-
112
-
113
-
114
-
115
-
116
-
117
-
118
-
119
-
120
-
121
-
122
-
123
-
124
-
125
-
126
-
127
-
128
-
129
-
130
-
131
-
132
-
133
-
134
-
135
-
136
-
137
-
138
-
139
-
140
-
141
-
142
-
143
-
144
-
145
-
146
-
147
-
148
-
149
-
150
-
151
-
152
-
153
-
154
-
155
-
156
-
157
-
158
-
159
-
160
-
161
-
162
-
163
-
164
-
165
-
166
-
167
-
168
-
169
-
170
-
171
-
172
-
173
-
174
-
175
-
176
-
177
-
178
-
179
-
180
-
181
-
182
-
183
-
184
-
185
-
186
-
187
-
188
-
189
-
190
-
191
-
192
-
193
-
194
-
195
-
196
-
197
-
198
-
199
-
200
 |
 |

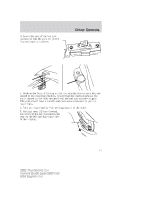
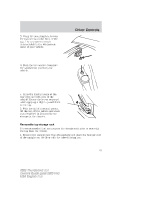
3. Lower the rear of the top into
position so that the pins are placed
into the bracket receivers.
4. Position the front of the top so that the locating tabs on each side are
placed in the mounting castings. Ensure that the weather-strip on the
top is placed on the body mounted seal without any wrinkles or gaps.
The joint should have a smooth and continuous transition to prevent
water leaks.
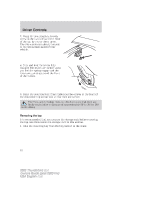
5. Take the mounting key from the bag located in the trunk.
6. Partially turn, 1/2 turn forward,
the levers of the top (located in the
rear on the left and right-hand side
of the vehicle).
2003 Thunderbird
(tbr)
Owners Guide (post-2002-fmt)
USA English
(fus)
Driver Controls
51