2004 Ford Explorer Quick Reference Guide 1st Printing - Page 1
2004 Ford Explorer Manual
Page 1 highlights
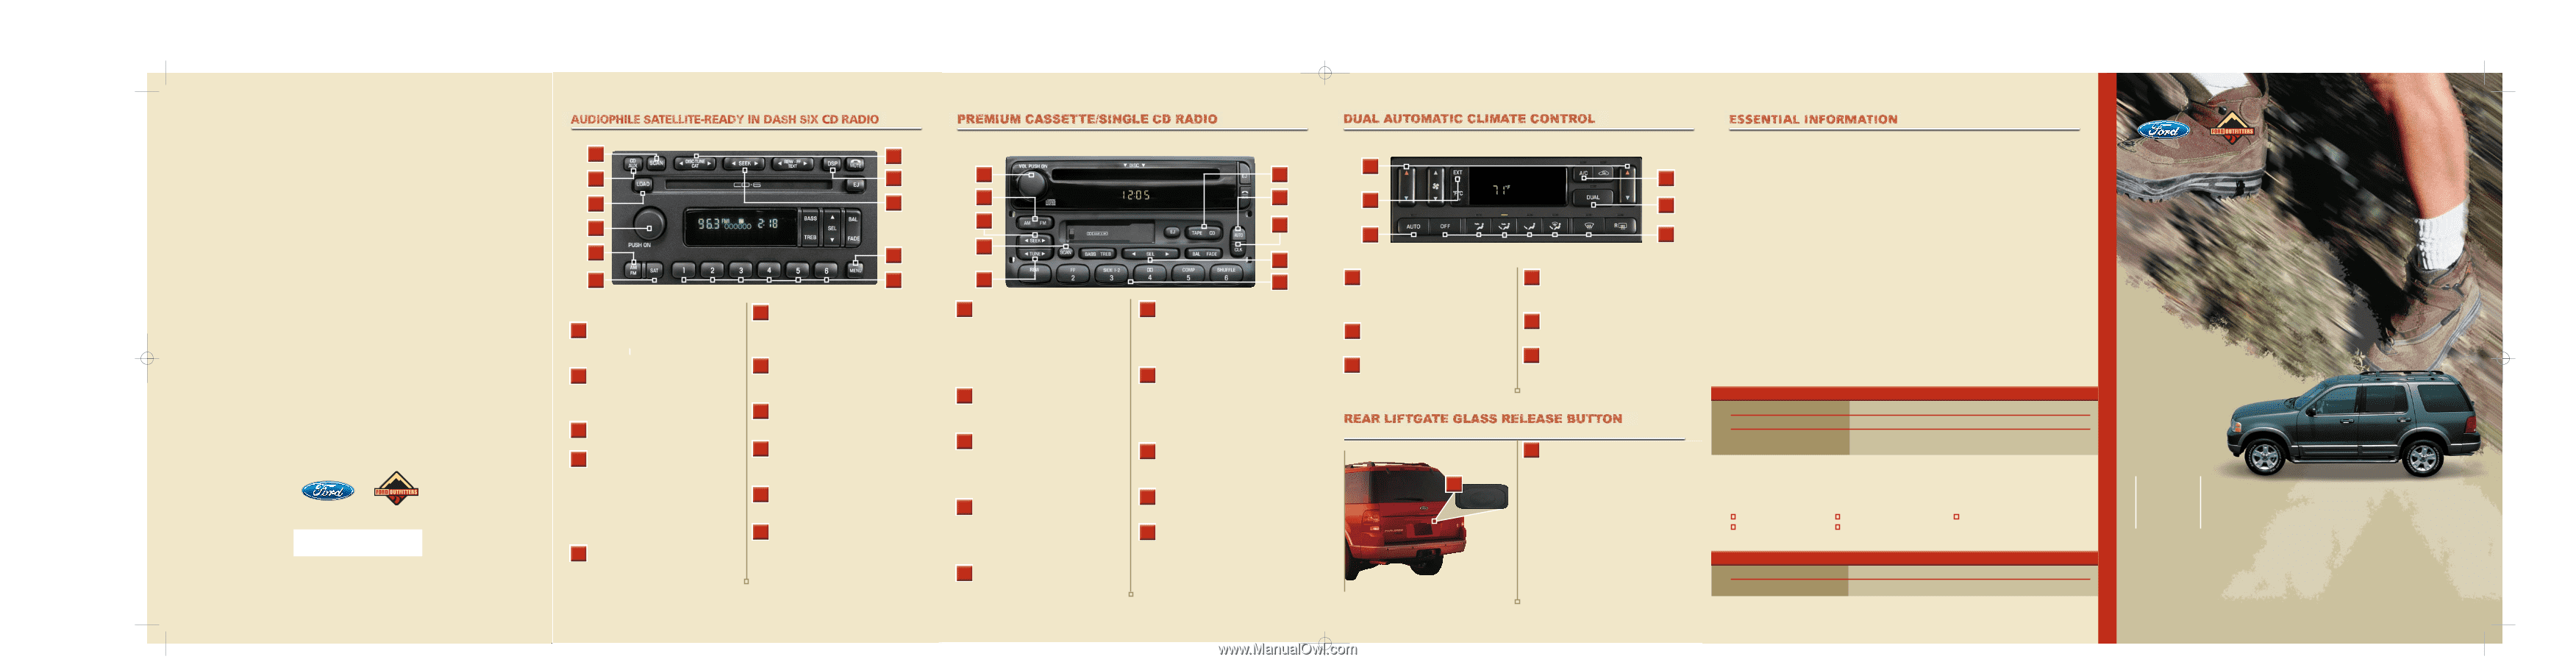
21270 Explorer_QRG_06.25.03.qxd 7/3/03 12:53 PM Page 1 (if equipped) (if equipped) (if equipped) CAUTION: DO NOT USE CD WITH ADHESIVE LABEL* A B C D This Quick Reference Guide is not intended to replace your vehicle's Owner's Guide, which contains more detailed information concerning the features of your vehicle and important safety warnings to help reduce the risk of injury to you and your occupants. Always carefully read your entire Owner's Guide when first learning about your vehicle and consult the appropriate chapter when questions arise. All information contained on the Quick Reference Guide was accurate at the time of duplication. We reserve the right to change features, operation and/or functionality of any vehicle specification at any time. Your Ford dealer is the best source for the most current information. For detailed operating and safety information, please consult your Owner's Guide. Ford Motor Company I Customer Relationship Center 16800 Executive Plaza Drive I P.O. Box 6248 Dearborn, Michigan 48121 I (800) 392-3673 G H I A B C J K F Satellite - Your Audiophile radio comes equipped with satellite-ready capability. The kit to enable satellite reception is available through your Ford dealer. Detailed satellite instructions are included with the dealer-installed kit. Disc/Tune CAT - In radio mode, press to move to the next frequency up or down the band. In CD mode, press to select a disc in the CD player. CAT is only available when equipped with satellite radio. Digital Signal Processing - Press DSP and then SEL to choose the desired signal mode (DSP OFF, NEWS, JAZZ CLUB, HALL, CHURCH, STADIUM). Seek Function - In radio mode, press to move to the next listenable station up or down the band. In CD mode, press to select the next/previous track on the current disc. Setting the Clock - Press MENU until SELECT HOUR or SELECT MINUTE is displayed. Press SEL to set the time. Press MENU again to disengage the clock mode. Setting Memory Preset Stations - Select AM, FM1, or FM2 band, then select a station. Next, press and hold a numbered control until the sound returns. F G H A D B C E F Fuel Tank Capacity - Your vehicle's fuel tank can accommodate 85.2L (22.5 gallons) of gasoline. Your vehicle is designed to use"Regular"unleaded gasoline with a pump (R+M)/2 octane rating of 87 for optimum performance. The use of gasoline with lower octane ratings may degrade performance. Fuses - If electrical components in the vehicle are not working, a fuse may have blown. For more information about changing a fuse, please consult your Owner's Guide. Fuel Pump Shut-Off Switch - After a collision, if the engine cranks but does not start, the fuel pump shut-off switch may have to be reset. The switch is located in the passenger's footwell, by the kick panel. For complete details on resetting the switch, please consult your Owner's Guide. Changing the Tires - Your spare is not equipped with a tire pressure monitoring system sensor. The tire pressure monitoring system indicator light (if equipped) will illuminate when the spare is in use. Replace the spare with the road tire as soon as possible. If your vehicle is equipped with AWD, remember that a spare tire of a different size shall not be used. It can make your vehicle difficult to control and can result in damage to driveline components. If you get a flat tire while driving, do not apply the brake heavily. Instead, gradually decrease your speed. Hold the steering wheel firmly and slowly move to a safe place on the side of the road. Location of the Spare Tire and Tools Item Spare Tire Spare Tire Winch Drive Nut Location Under the vehicle, just in front of the rear bumper At the rear center of the cargo area under a lid Behind the rear seat, under the carpeted floor lid in the cargo floor E F For information on other types of radios, please refer to your Owner's Guide. D I E A Volume/Power Control - Press the control to turn the audio system on or off. Turn the control to raise or lower volume. If the volume is set above a certain level and the ignition is turned off, the volume will come back on at a "nominal" listening level when the ignition switch is turned back on. AM/FM Select - In radio mode, press to select AM or FM frequency bands. In tape or CD mode, press to stop play and begin radio play. Seek Function - In radio mode, press to find the next listenable station up or down the band. In tape mode, press to move to the next/previous selection on the tape. In CD mode, press to select the next/previous track of the disc. Scan Function - In radio mode, press to hear a sampling of all listenable stations. In tape or CD mode, press to hear a brief sampling of all selections. Press the control again to stop the scan mode. Tune Adjust - In radio mode, press to move to the next frequency up or down the band. J F Tape/CD Select - To begin tape play while in radio or CD mode, press the tape control. To begin CD play, press the CD control. Press the CD control again to toggle between single CD and CD changer play (if equipped). Autoset Memory Preset - Select AM, FM1, or FM2 band, then press AUTO to activate autoset memory preset, which allows you to set strong radio stations without losing your original manually set preset stations. Press again to deactivate autoset. Setting the Clock - Press EXT and hold CLK and then press SEEK to set the hour. Press and hold CLK and then press TUNE to set the minute. Select - press to adjust sound output and distribution after selecting BASS, TREB, BAL or FADE. Setting Memory Preset Stations - Select AM, FM1, or FM2 band, then select a station. Next, press and hold a numbered control until the sound returns. A A Scan Function - In radio mode, press to hear a sampling of all listenable stations. In CD mode, press to hear a brief sampling of all selections on the current CD. CD/AUX - Press to select CD/AUX modes. No CD will display if there is not a CD present in the audio system. If a disc is loaded, there will be a number (1-6) inside the circle on the display. When in radio mode, press CD/AUX to play a loaded CD. Loading CD - Press LOAD and then a preset number to select a slot. Press and hold LOAD to activate autoload. Volume/Power Control - Press the control to turn the audio system on or off. Turn the control to raise or lower volume. The speed-sensitive volume feature automatically adjusts radio volume in accordance with vehicle speed to compensate for road and wind noise. To engage, press and hold the volume control for five seconds (with the radio on), then simultaneously press SEL to choose the compensation level. AM/FM Select - In radio mode, press AM/FM to select AM or FM frequency bands. In CD mode, press AM/FM to stop play and begin radio play. Press and hold AM/FM to activate autoset. B C C Outside Temperature - Press EXT to display the outside air temperature. Press again to disengage. Automatic Operation - In this mode, the system will automatically determine fan speed and airflow location to achieve the temperature selected. E F Dual Operation - Press DUAL to enable /disable the dual zone temperature feature. Manual Override Controls - When pressed, these six controls will override automatic operation. To return to automatic operation, press AUTO. G B H C D I C H A A M O D E L To open the liftgate window, with the liftgate unlocked, push the control button on the right side under the license plate lamp shield, or press the control on the remote entry key fob. To lock the liftgate window and the liftgate, use the power door locks or press the door lock switch on the left side of the cargo area. The liftgate door and window should be closed before driving. If not, possible damage may occur to your vehicle. Always close the liftgate window before opening the liftgate. The liftgate glass and the liftgate should never be open at the same time. Jack, Lug Nut Wrench, Jack Handle, and Wheel Chock J I J D *F4L2J19G217AA* E 4L2J-19G217-AA June 2003 First Printing Quick Reference Explorer Litho in U.S.A. K Roadside Emergencies - To fully assist you if you should have a vehicle concern, Ford Motor Company offers a complimentary roadside assistance program. This program is separate from the New Vehicle Limited Warranty. The service is available: 24 hours, seven days a week for the Basic Warranty period (Canada) or New Vehicle Limited Warranty period (U.S.) of three years or 60,000 km (36,000 miles). Roadside assistance will cover: Changing a flat tire Jump-starts Limited fuel delivery Lock-out assistance Towing of your vehicle Roadside Assistance Centers Country United States Canada Phone Number (800) 241-3673 (800) 665-2006 E X P L O R E R B G Q U I C K Temperature Selection - To control the temperature for the driver and passenger, select the desired temperature by pressing the driver's or passenger's temperature controls. D A/C Control - Press to manually enable or disable the air conditioning in all modes except Defrost and Floor and Defrost. R E F E R E N C E Tire Pressure - Your tire pressure is properly set at the dealership according to the recommended specifications found on the Tire Pressure Label located on the driver door jamb. Please check your tire pressure during routine maintenance and seasonal changes. If the Tire Pressure Monitoring System light (if equipped) stays illuminated after starting, immediately check your tire pressure. Warning: Improperly inflated tires can affect vehicle handling and can fail suddenly, possibly resulting in loss of vehicle control. G U I D E 2004 model EXPLORER Quick Reference Guide E *CDs with adhesive labels and irregularly shaped CDs may get stuck in the CD player. Homemade CDs should be identified with permanent felt tip marker rather than adhesive labels. For complete details on any roadside assistance concern, see the Roadside Emergencies chapter or the Customer Assistance chapter in your Owner's Guide. 2 0 0 4
-
 1
1 -
 2
2
 |
 |