2004 Ford Explorer Quick Reference Guide 1st Printing - Page 2
2004 Ford Explorer Manual
Page 2 highlights
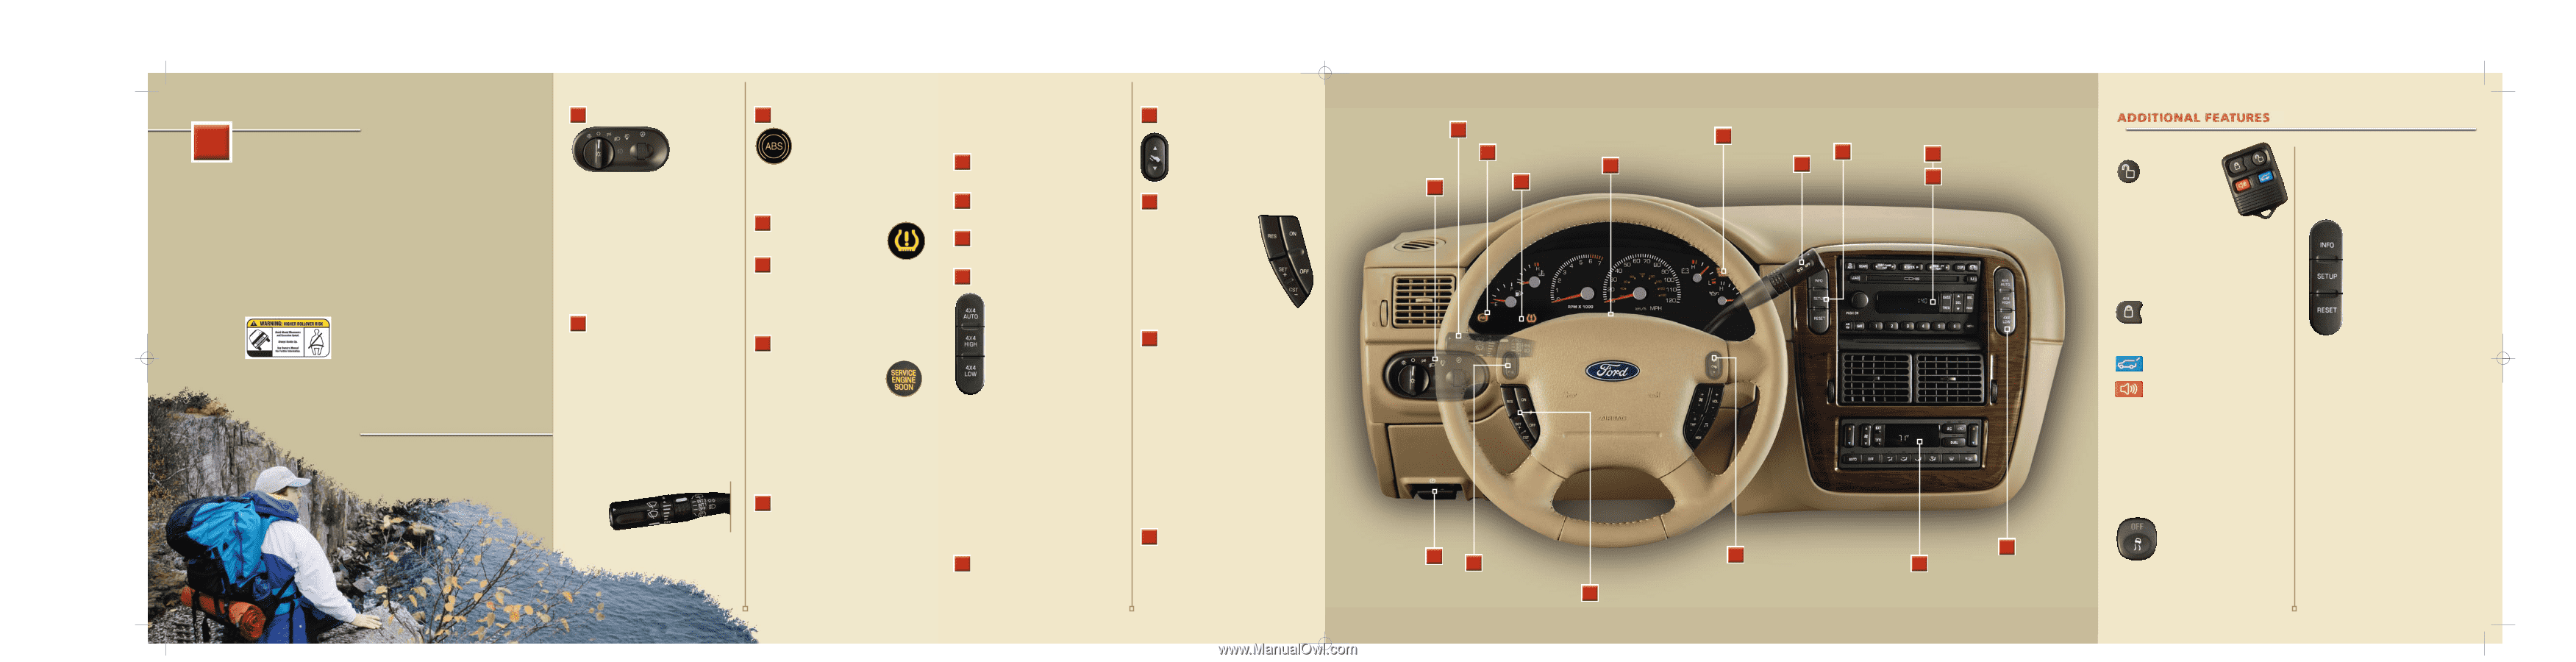
21270 Explorer_QRG_06.25.03.qxd 7/3/03 1:02 PM Page 7 2 Headlamp and Panel Dimmer Control 4 ABS Warning Lamp 1 From the rugged exterior styling to the bountiful amenities, every No Boundaries vehicle is equipped to help you enter the next territory. In order to help you fully appreciate the countless features of your new Explorer, we invite you to explore this easy to use Quick Reference Guide. Using the image of the instrument panel located in the center of the guide, locate the feature you would like to learn more about. Each numbered feature is briefly described to the left of the instrument panel image. For more information, please consult your Owner's Guide. Rotate clockwise to the first position to turn on the parking lamps. Rotate to the second position to also turn on the headlamps. Rotate counterclockwise to activate autolamp (if equipped), which provides light-sensitive automatic on-off control of the exterior lights. When the control is in any position except high beams or off, pull the control toward you to activate the foglamps (if equipped). Use the instrument panel dimmer control, which is located to the right of the headlamp control, to adjust the brightness of the instrument panel during headlamp and parking lamp operation. Your anti-lock braking system (ABS) detects the onset of wheel lockup during brake applications and helps prevent wheels from locking during extreme braking situations. The ABS warning light will illuminate when you start your engine; however, if it stays on, continues to flash or fails to illuminate, see your dealership's service department immediately. may shift firmly. This is considered normal and will not affect function or durability. For more information, please consult your Owner's Guide. 14 Power Adjustable Foot Pedals (if equipped) 9 Message Center (if equipped) Please see Additional Features for more details. Press and hold the rocker control to adjust the accelerator and brake pedal toward you or away from you. Adjust the pedals only when the vehicle is stopped and the gearshift lever is in the P (Park) position. Turn Signal and Wiper/Washer Control 3 4 ABS Warning Lamp 5 Tire Pressure Warning Lamp (if equipped) Service Engine Soon Lamp 6 Hazard Flasher Control 7 Gearshift/ Overdrive Control 8 9 Message Center (if equipped) 10 11 Remote Entry System Audio Systems 10 Premium Cassette/Single CD Radio (if equipped) 15 Speed Control Headlamp and Panel Dimmer Control 2 5 Tire Pressure Warning Lamp (if equipped) Please see reverse side for more details. 11 In Dash Six CD Radio (if equipped) See Additional Features for details. Please see reverse side for more details. 6 Hazard Flasher Control This vehicle handles differently from an ordinary passenger car in driving conditions which may occur on streets and highways and off-road. DRIVE WITH CARE AND WEAR A SAFETY BELT AT ALL TIMES. Ford urges you to read the Owner's Guide and Driving Your SUV or Truck Supplement for further information on safe driving precautions and instructions. 3 Turn Signal and Wiper/Washer Control Press to activate all hazard flashers simultaneously in an emergency to warn traffic of vehicle breakdown, approaching danger, etc. Press the control again to turn the flashers off. The hazard flashers can be operated when the ignition is off. 12 Control Trac Four-Wheel Drive Control (if equipped) For front wiper operation, rotate the ring on the left to the desired interval, low- or high-speed position. When in the intermittent position, rotate the control up for fast or down for slow intervals. In addition, the speed-sensitive front wipers automatically adjust as the vehicle's speed changes when the control is set for intermittent operation. Push the end of the stalk briefly for a single wipe (no wash). Push and hold for three swipes with wash. The ring on the right operates the rear window wiper. Rotate the control to the normal speed (INT 2), intermittent (INT 1), or washer position. 7 Service Engine Soon Lamp Illuminates briefly to ensure the system is functional. If it illuminates while driving, it can mean that one of the engine's emission systems has failed or that your fuel cap is not properly installed. A loose fuel cap can cause the "Check Fuel Cap" lamp to illuminate or create a "Check Fuel Cap" warning message in the optional message center. These warnings reset once the cap is warning tightened and your vehicle is driven a short distance. To prevent activation of these systems, always secure your fuel cap by turning it clockwise 1/8 of a turn until it stops. 4X4 Auto automatically delivers full power to the rear axle and to the front axle as required for increased traction. This is appropriate for normal on-road driving. 4X4 High provides four-wheel drive with full power to all four wheels. 4X4 Low provides four-wheel drive with full power to both axles and includes a lower gear ratio for low speed. 4X4 High and 4X4 Low should not be used on dry or merely wet pavement. To shift between 4X4 Auto and 4X4 High, press either button at a stop, or while driving at any speed. To shift to and from 4X4 Low, bring the vehicle to a stop and keep the brake pedal depressed. Next, place the gearshift in N (Neutral), then press the 4X4 Low control, or press 4X4 Auto or 4X4 High if you are in the 4X4 Low mode. When shifting from one four-wheel drive position to the next, a mechanical noise may be heard. This is normal and no service should be required. To operate, the speed control must be ON and the vehicle's speed must be at or above 48 km/h (30 mph). To set a speed, press SET +. To set a higher speed, press SET + again. To set a lower speed, press CST -. Pressing RES will return to a previously set speed. To turn the speed control off, press OFF, or depress the brake pedal to disengage. Press this control once to unlock the driver's door, and twice to unlock all doors and liftgate. The optional memory seat and power memory pedals will automatically move to the desired memory position when this control is pressed once. Please consult your Owner's Guide for complete details on activating/ deactivating. Press this control once to lock all doors and liftgate. Pressing the control a second time will chirp the horn and flash the lights to confirm that all doors are closed and locked. Press this control to unlatch the liftgate window. Press this control to activate the panic alarm. To deactivate, press the control again, or turn the ignition to ACC or ON. Please note: When the key is removed from the ignition, the easy entry/exit feature (if equipped) automatically moves the driver's seat backwards slightly (if room is available). It will automatically move the seat forward to the original position when the key is inserted into the ignition. AdvanceTracTM System (if equipped) If your vehicle should become stuck, try switching the system off by pressing the AdvanceTrac™ button on the center console. When the system is functioning, a yellow icon will flash. Message Center (if equipped) 16 Reverse Sensing System (RSS) (if equipped) The RSS sounds a tone to warn the driver of obstacles near the rear bumper when the R (Reverse) gear is selected. The system detects obstacles within approximately 2 meters (6 ft.) behind the rear bumper, or near the rear periphery, while the vehicle moves in reverse at speeds less than 5 km/h (3 mph). The system defaults to ON, but the RSS control allows you to disable the system when the ignition is ON, and the gearshift is in R (Reverse). The RSS may not detect small objects, particularly those close to the ground. The system may also operate incorrectly under inclement weather conditions, especially if the rear bumper sensors are covered with dirt, snow, or ice. The message center displays important vehicle information through a constant monitor of vehicle systems (with the ignition in the ON position). The system will notify you of potential vehicle problems with a display of system warnings followed by a long indicator chime. You may select display features on the message center by pressing the INFO or SETUP button. The RESET button may be used to reset select functions in the Info and Setup menus. For complete details on the message center display features, please consult your Owner's Guide. Tire Pressure Monitoring System (if equipped) Using radio-frequency pressure sensors, this system monitors tire pressure on all road tires and provides the driver with a yellow warning light when air needs to be added. Message Center equipped vehicles provide additional warning messages. Please note: Outside temperature affects tire pressure. See your Owner's Guide. HomeLink® Universal Transceiver (if equipped) 8 Gearshift/Overdrive Control Overdrive is the normal drive position for the best fuel economy. Only deactivate (O/D OFF) overdrive when: driving with a heavy load, towing a trailer up or down steep hills, or when additional engine braking is desired. To deactivate, press the switch located on the end of the gearshift lever. When the battery is disconnected or a new battery is installed, the engine must relearn its idle and fuel trim strategy. Therefore, the transmission 17 Brake Release 13 Automatic Dual Climate Control System (if equipped) Please see reverse side for more details. Pull the release lever (rearward) to release the parking brake. To set the parking brake, press the parking brake pedal down until the pedal stops. The BRAKE warning lamp in the instrument cluster will illuminate (when the ignition is turned ON). Brake 17 Release 16 Reverse Sensing System (RSS) (if equipped) 14 Power Adjustable Foot Pedals (if equipped) 15 Speed Control Climate 13 Control System (if equipped) 12 Control Trac Four-Wheel Drive Control (if equipped) By monitoring vehicle speed, yaw, lateral acceleration, and intended direction, the AdvanceTrac™ system provides enhanced traction and stability on slippery surfaces, or in emergency maneuvers. The system defaults to on; however, if equipped with four-wheel drive, the stability control does not function in 4L. This three-button control, located on the overhead console, is a convenient way to replace up to three hand-held transmitters. For more information, please consult your Owner's Guide.
-
 1
1 -
 2
2
 |
 |