2004 Honda Accord Owner's Manual - Page 250
2004 Honda Accord Manual
Page 250 highlights
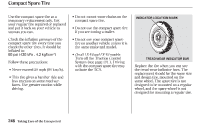
Changing a Flat Tire EXTENSION 11.Remove the wheel nuts and flat tire. Place the flat tire on the ground with the outside surface of the wheel facing up. WHEEL WRENCH BRAKE HUB 10.Use the extension and wheel wrench as shown to raise the vehicle until the flat tire is off the ground. U.S. DX, LX and LX-G model in Canada: 12.Before mounting the spare tire, wipe any dirt off the mounting surface of the wheel and hub with a clean cloth. Wipe the hub carefully; it may be hot from driving. Do not attempt to forcibly pry the wheel cover off with a screwdriver or other tool. The wheel cover cannot be removed without first removing the wheel nuts. CONTINUED Taking Care of the Unexpected 251
-
 1
1 -
2
-
3
-
4
-
5
-
6
-
7
-
8
-
9
-
10
-
11
-
12
-
13
-
14
-
15
-
16
-
17
-
18
-
19
-
20
-
21
-
22
-
23
-
24
-
25
-
26
-
27
-
28
-
29
-
30
-
31
-
32
-
33
-
34
-
35
-
36
-
37
-
38
-
39
-
40
-
41
-
42
-
43
-
44
-
45
-
46
-
47
-
48
-
49
-
50
-
51
-
52
-
53
-
54
-
55
-
56
-
57
-
58
-
59
-
60
-
61
-
62
-
63
-
64
-
65
-
66
-
67
-
68
-
69
-
70
-
71
-
72
-
73
-
74
-
75
-
76
-
77
-
78
-
79
-
80
-
81
-
82
-
83
-
84
-
85
-
86
-
87
-
88
-
89
-
90
-
91
-
92
-
93
-
94
-
95
-
96
-
97
-
98
-
99
-
100
-
101
-
102
-
103
-
104
-
105
-
106
-
107
-
108
-
109
-
110
-
111
-
112
-
113
-
114
-
115
-
116
-
117
-
118
-
119
-
120
-
121
-
122
-
123
-
124
-
125
-
126
-
127
-
128
-
129
-
130
-
131
-
132
-
133
-
134
-
135
-
136
-
137
-
138
-
139
-
140
-
141
-
142
-
143
-
144
-
145
-
146
-
147
-
148
-
149
-
150
-
151
-
152
-
153
-
154
-
155
-
156
-
157
-
158
-
159
-
160
-
161
-
162
-
163
-
164
-
165
-
166
-
167
-
168
-
169
-
170
-
171
-
172
-
173
-
174
-
175
-
176
-
177
-
178
-
179
-
180
-
181
-
182
-
183
-
184
-
185
-
186
-
187
-
188
-
189
-
190
-
191
-
192
-
193
-
194
-
195
-
196
-
197
-
198
-
199
-
200
-
201
-
202
-
203
-
204
-
205
-
206
-
207
-
208
-
209
-
210
-
211
-
212
-
213
-
214
-
215
-
216
-
217
-
218
-
219
-
220
-
221
-
222
-
223
-
224
-
225
-
226
-
227
-
228
-
229
-
230
-
231
-
232
-
233
-
234
-
235
-
236
-
237
-
238
-
239
-
240
-
241
-
242
-
243
-
244
-
 245
245 -
 246
246 -
 247
247 -
 248
248 -
 249
249 -
 250
250 -
 251
251 -
 252
252 -
 253
253 -
 254
254 -
 255
255 -
256
-
257
-
258
-
259
-
260
-
261
-
262
-
263
-
264
-
265
-
266
-
267
-
268
-
269
-
270
-
271
-
272
-
273
-
274
-
275
-
276
-
277
-
278
-
279
-
280
-
281
-
282
-
283
-
284
-
285
-
286
-
287
-
288
-
289
-
290
-
291
-
292
-
293
-
294
-
295
-
296
-
297
-
298
-
299
 |
 |

CONTINUED
Before mounting the spare tire,
wipe any dirt off the mounting
surface of the wheel and hub with
a clean cloth. Wipe the hub
carefully; it may be hot from
driving.
Remove the wheel nuts and flat
tire. Place the flat tire on the
ground with the outside surface of
the wheel facing up.
Use the extension and wheel
wrench as shown to raise the
vehicle until the flat tire is off the
ground.
Do not attempt to forcibly pry the
wheel cover off with a screwdriver
or other tool. The wheel cover
cannot be removed without first
removing the wheel nuts.
10.
12.
11.
U.S. DX, LX and LX-G model in
Canada:
Changing a Flat Tire
Taking Care of the Unexpected
251
WHEEL WRENCH
EXTENSION
BRAKE HUB