2015 Jeep Cherokee User Guide - Page 41
2015 Jeep Cherokee Manual

Page 41 highlights
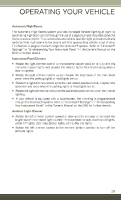
OPERATING YOUR VEHICLE Automatic High Beams The Automatic High Beams system provides increased forward lighting at night by automating high beam control through the use of a digital camera mounted above the inside rearview mirror. This camera detects vehicle specific light and automatically switches from high beams to low beams until the approaching vehicle is out of view. This feature is programmable through the Uconnect® system. Refer to "Uconnect® Settings" in "Understanding Your Instrument Panel" in the Owner's Manual on the DVD for further details. Instrument Panel Dimmer • Rotate the right dimmer control to the extreme bottom position to fully dim the instrument panel lights and prevent the interior lights from illuminating when a door is opened. • Rotate the right dimmer control up to increase the brightness of the instrument panel when the parking lights or headlights are on. • Rotate the right dimmer control up to the next detent position to fully brighten the odometer and radio when the parking lights or headlights are on. • Rotate the right dimmer control up to the last detent position to turn on the interior lighting. • If your vehicle is equipped with a touchscreen, the dimming is programmable through the Uconnect® system. Refer to "Uconnect® Settings " in "Understanding Your Instrument Panel" in the Owner's Manual on the DVD for further details. Ambient Light Dimmer • Rotate the left dimmer control upward or downward to increase or decrease the brightness of the ambient light located in the overhead console, door handle lights, under I/P lights, door map pocket lights, and cubby bin lights. • Rotate the left dimmer control to the extreme bottom position to turn off the ambient lights. 39
-
 1
1 -
2
-
3
-
4
-
5
-
6
-
7
-
8
-
9
-
10
-
11
-
12
-
13
-
14
-
15
-
16
-
17
-
18
-
19
-
20
-
21
-
22
-
23
-
24
-
25
-
26
-
27
-
28
-
29
-
30
-
31
-
32
-
33
-
34
-
35
-
 36
36 -
 37
37 -
 38
38 -
 39
39 -
 40
40 -
 41
41 -
 42
42 -
 43
43 -
 44
44 -
 45
45 -
 46
46 -
47
-
48
-
49
-
50
-
51
-
52
-
53
-
54
-
55
-
56
-
57
-
58
-
59
-
60
-
61
-
62
-
63
-
64
-
65
-
66
-
67
-
68
-
69
-
70
-
71
-
72
-
73
-
74
-
75
-
76
-
77
-
78
-
79
-
80
-
81
-
82
-
83
-
84
-
85
-
86
-
87
-
88
-
89
-
90
-
91
-
92
-
93
-
94
-
95
-
96
-
97
-
98
-
99
-
100
-
101
-
102
-
103
-
104
-
105
-
106
-
107
-
108
-
109
-
110
-
111
-
112
-
113
-
114
-
115
-
116
-
117
-
118
-
119
-
120
-
121
-
122
-
123
-
124
-
125
-
126
-
127
-
128
-
129
-
130
-
131
-
132
-
133
-
134
-
135
-
136
-
137
-
138
-
139
-
140
-
141
-
142
-
143
-
144
-
145
-
146
-
147
-
148
-
149
-
150
-
151
-
152
-
153
-
154
-
155
-
156
-
157
-
158
-
159
-
160
-
161
-
162
-
163
-
164
-
165
-
166
-
167
-
168
-
169
-
170
-
171
-
172
-
173
-
174
-
175
-
176
-
177
-
178
-
179
-
180
-
181
-
182
-
183
-
184
-
185
-
186
-
187
-
188
-
189
-
190
-
191
-
192
-
193
-
194
-
195
-
196
-
197
-
198
-
199
-
200
-
201
-
202
-
203
-
204
-
205
-
206
-
207
-
208
-
209
-
210
-
211
-
212
-
213
-
214
-
215
-
216
-
217
-
218
-
219
-
220
-
221
-
222
-
223
-
224
-
225
-
226
-
227
-
228
-
229
-
230
-
231
-
232
-
233
-
234
-
235
-
236
-
237
-
238
-
239
-
240
-
241
-
242
-
243
-
244
 |
 |
