1998 Lincoln Town Car Owner Guide 1st Printing - Page 168
1998 Lincoln Town Car Manual
Page 168 highlights
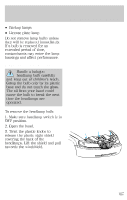
Maintenance and care 2. Slip the bulb retaining ring over the plastic base until it contacts the rear of the socket by rotating it clockwise until you feel a "stop." 3. Push the electrical connector into the rear of the plastic base until it snaps, locking it into position. 4. Turn the headlamps on and make sure they work properly. If the headlamp was correctly aligned before you changed the bulb, you should not need to align it again. 5. Carefully insert the headlamp assembly into the vehicle making sure the alignment pins are inserted into the proper holes and into the guides. AIMING THE HEADLAMPS Your vehicle is equipped with a Vehicle Headlamp Aim Device (VHAD) on each headlamp body. Each headlamp may be properly aimed in the horizontal direction (left/right) and the vertical position (up/down). A non-zero bubble reading does not necessarily indicate out-of-aim headlamps. If your vehicle is not positioned on a level surface, the slope will be included in the level indicator. Therefore, vertical headlamp adjustment should be performed only when beam direction appears to be incorrect or a level surface can not be verified. 169
-
 1
1 -
2
-
3
-
4
-
5
-
6
-
7
-
8
-
9
-
10
-
11
-
12
-
13
-
14
-
15
-
16
-
17
-
18
-
19
-
20
-
21
-
22
-
23
-
24
-
25
-
26
-
27
-
28
-
29
-
30
-
31
-
32
-
33
-
34
-
35
-
36
-
37
-
38
-
39
-
40
-
41
-
42
-
43
-
44
-
45
-
46
-
47
-
48
-
49
-
50
-
51
-
52
-
53
-
54
-
55
-
56
-
57
-
58
-
59
-
60
-
61
-
62
-
63
-
64
-
65
-
66
-
67
-
68
-
69
-
70
-
71
-
72
-
73
-
74
-
75
-
76
-
77
-
78
-
79
-
80
-
81
-
82
-
83
-
84
-
85
-
86
-
87
-
88
-
89
-
90
-
91
-
92
-
93
-
94
-
95
-
96
-
97
-
98
-
99
-
100
-
101
-
102
-
103
-
104
-
105
-
106
-
107
-
108
-
109
-
110
-
111
-
112
-
113
-
114
-
115
-
116
-
117
-
118
-
119
-
120
-
121
-
122
-
123
-
124
-
125
-
126
-
127
-
128
-
129
-
130
-
131
-
132
-
133
-
134
-
135
-
136
-
137
-
138
-
139
-
140
-
141
-
142
-
143
-
144
-
145
-
146
-
147
-
148
-
149
-
150
-
151
-
152
-
153
-
154
-
155
-
156
-
157
-
158
-
159
-
160
-
161
-
162
-
 163
163 -
 164
164 -
 165
165 -
 166
166 -
 167
167 -
 168
168 -
 169
169 -
 170
170 -
 171
171 -
 172
172 -
 173
173 -
174
-
175
-
176
-
177
-
178
-
179
-
180
-
181
-
182
-
183
-
184
-
185
-
186
-
187
-
188
 |
 |
