2010 Mazda RX-8 Owner's Manual - Page 269
2010 Mazda RX-8 Manual

Page 269 highlights
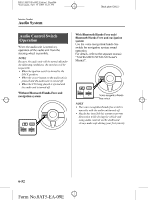
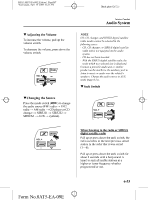
RX-8_8AT5-EA-09E_Edition1 Page269 Wednesday, April 15 2009 10:33 AM Black plate (269,1) Interior Comfort Audio System CAUTION Ø Close the cover when the auxiliary jack is not in use to prevent foreign objects and liquids from penetrating the auxiliary jack. Ø Do not place objects or apply force to the auxiliary jack with the plug connected. Ø Noise may occur during playback if the accessory socket equipped on the vehicle is used. (If noise occurs, do not use the accessory socket.) NOTE l To listen to a portable audio unit 1. Turn the ignition switch to the ACC or ON position. 2. Insert the connection plug into the auxiliary jack. 3. Press the power/volume dial to turn the audio system on. 4. Press the source change button ) of the audio unit or the mode ( ) of the audio control switch ( switches on the steering wheel to change to the AUX mode. Audio Unit Audio Control Switches l l l l l l l Before using the auxiliary jack, read the manufacturer's instructions for the product being connected. Use a commercially-available, nonimpedance (3.5 ) stereo mini plug for connecting the portable audio unit to the auxiliary jack. Before using the auxiliary jack, read the manufacture's instructions for connecting a portable audio unit to the auxiliary jack. To prevent discharging of the battery, do not use the auxiliary input for long periods with the engine off or idling. Noise may occur depending on the product connected to the auxiliary jack. With regard to connecting a portable audio or similar device to a power source, use the battery for the device, not the accessory socket. Insert the plug to the auxiliary jack securely. Insert or remove the plug with the plug perpendicular to the auxiliary jack hole. Insert or remove the plug by holding its base. NOTE l l l Set the volume of the portable audio unit to the maximum within the range that the sound does not become distorted, then adjust the volume using the power/volume dial of the audio unit or the volume switch ( , ) of the audio control switch. Use your portable audio unit for operations other than volume adjustment. If the connection plug is pulled out from the auxiliary jack while in AUX mode, noise may occur. 6-55 Form No.8AT5-EA-09E
-
 1
1 -
2
-
3
-
4
-
5
-
6
-
7
-
8
-
9
-
10
-
11
-
12
-
13
-
14
-
15
-
16
-
17
-
18
-
19
-
20
-
21
-
22
-
23
-
24
-
25
-
26
-
27
-
28
-
29
-
30
-
31
-
32
-
33
-
34
-
35
-
36
-
37
-
38
-
39
-
40
-
41
-
42
-
43
-
44
-
45
-
46
-
47
-
48
-
49
-
50
-
51
-
52
-
53
-
54
-
55
-
56
-
57
-
58
-
59
-
60
-
61
-
62
-
63
-
64
-
65
-
66
-
67
-
68
-
69
-
70
-
71
-
72
-
73
-
74
-
75
-
76
-
77
-
78
-
79
-
80
-
81
-
82
-
83
-
84
-
85
-
86
-
87
-
88
-
89
-
90
-
91
-
92
-
93
-
94
-
95
-
96
-
97
-
98
-
99
-
100
-
101
-
102
-
103
-
104
-
105
-
106
-
107
-
108
-
109
-
110
-
111
-
112
-
113
-
114
-
115
-
116
-
117
-
118
-
119
-
120
-
121
-
122
-
123
-
124
-
125
-
126
-
127
-
128
-
129
-
130
-
131
-
132
-
133
-
134
-
135
-
136
-
137
-
138
-
139
-
140
-
141
-
142
-
143
-
144
-
145
-
146
-
147
-
148
-
149
-
150
-
151
-
152
-
153
-
154
-
155
-
156
-
157
-
158
-
159
-
160
-
161
-
162
-
163
-
164
-
165
-
166
-
167
-
168
-
169
-
170
-
171
-
172
-
173
-
174
-
175
-
176
-
177
-
178
-
179
-
180
-
181
-
182
-
183
-
184
-
185
-
186
-
187
-
188
-
189
-
190
-
191
-
192
-
193
-
194
-
195
-
196
-
197
-
198
-
199
-
200
-
201
-
202
-
203
-
204
-
205
-
206
-
207
-
208
-
209
-
210
-
211
-
212
-
213
-
214
-
215
-
216
-
217
-
218
-
219
-
220
-
221
-
222
-
223
-
224
-
225
-
226
-
227
-
228
-
229
-
230
-
231
-
232
-
233
-
234
-
235
-
236
-
237
-
238
-
239
-
240
-
241
-
242
-
243
-
244
-
245
-
246
-
247
-
248
-
249
-
250
-
251
-
252
-
253
-
254
-
255
-
256
-
257
-
258
-
259
-
260
-
261
-
262
-
263
-
 264
264 -
 265
265 -
 266
266 -
 267
267 -
 268
268 -
 269
269 -
 270
270 -
 271
271 -
 272
272 -
 273
273 -
 274
274 -
275
-
276
-
277
-
278
-
279
-
280
-
281
-
282
-
283
-
284
-
285
-
286
-
287
-
288
-
289
-
290
-
291
-
292
-
293
-
294
-
295
-
296
-
297
-
298
-
299
-
300
-
301
-
302
-
303
-
304
-
305
-
306
-
307
-
308
-
309
-
310
-
311
-
312
-
313
-
314
-
315
-
316
-
317
-
318
-
319
-
320
-
321
-
322
-
323
-
324
-
325
-
326
-
327
-
328
-
329
-
330
-
331
-
332
-
333
-
334
-
335
-
336
-
337
-
338
-
339
-
340
-
341
-
342
-
343
-
344
-
345
-
346
-
347
-
348
-
349
-
350
-
351
-
352
-
353
-
354
-
355
-
356
-
357
-
358
-
359
-
360
-
361
-
362
-
363
-
364
-
365
-
366
-
367
-
368
-
369
-
370
-
371
-
372
-
373
-
374
-
375
-
376
-
377
-
378
-
379
-
380
-
381
-
382
-
383
-
384
-
385
-
386
-
387
-
388
-
389
-
390
-
391
-
392
-
393
-
394
-
395
-
396
-
397
-
398
-
399
-
400
-
401
-
402
-
403
-
404
-
405
-
406
-
407
-
408
-
409
-
410
-
411
-
412
-
413
-
414
-
415
-
416
-
417
-
418
-
419
-
420
-
421
-
422
-
423
-
424
-
425
-
426
-
427
-
428
-
429
-
430
-
431
-
432
-
433
-
434
-
435
-
436
-
437
-
438
 |
 |