2000 Mercedes C-Class Owner's Manual - Page 98
2000 Mercedes C-Class Manual
Page 98 highlights
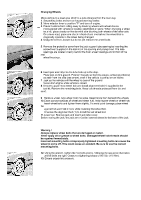
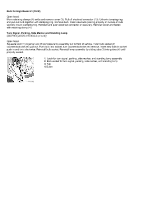
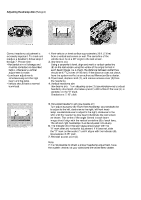
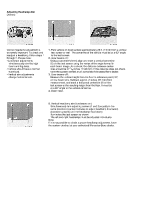
Adjusting Headlamp Aim (Halogen) Correct headlamp adjustment is extremely important. To check and readjust a headlamp follow steps 1 through 7. Please note: • Horizontal aim will change and must be corrected as described below, whenever a vertical adjustment is made. • Low beam adjustments simultaneously aim the high beam and fog lamp. • Vehicle should have a normal trunk load. 1. Park vehicle on level surface approximately 25 ft. (7.6 m) from a vertical test screen or wall. The centerline of the vehicle must be at a 90° angle to the test screen. 2. (low beams on): Using a carpenter's level, align and mark a vertical centerline (8) on the test screen using the vertex of the angle formed in each beam image. As a check, the distance between centerlines should be 47 1/4 inches (1198 mm). If the distance does not check, have the system verified at an authorized Mercedes-Benz dealer. 3. Open hood, depress latch (1), and remove access cover (2) from the headlamp. 4. Vertical headlamp aim (low beams on): Turn adjusting screw (3) (counterclockwise to adjust headlamp downward, clockwise upward) until bubble in the level (4) is centered on the "0" mark. Graduations: 0.18° pitch. 5. Horizontal headlamp aim (low beams on): Turn adjusting screw (5) (Right front headlamp: counterclockwise to adjust to the left, clockwise to the right; left front headlamp: counterclockwise to adjust to the right, clockwise to the left.) until the headlamps (low beam) illuminate the test screen as shown. The vertex of the angle formed in each beam image should align with the vertical centerline (8) of each lamp. The left and right headlamps must be adjusted individually. 6. The indicator (6) in the sight glass should align with the "0" mark after any horizontal adjustment. If it does not, slide the "0" mark on the scale (7) until it aligns with the indicator (6). Graduations: 0.38° pitch. 7. Reinstall access cover(2). Note: If it is not possible to obtain a proper headlamp adjustment, have the system checked at your authorized Mercedes-Benz dealer.
-
 1
1 -
2
-
3
-
4
-
5
-
6
-
7
-
8
-
9
-
10
-
11
-
12
-
13
-
14
-
15
-
16
-
17
-
18
-
19
-
20
-
21
-
22
-
23
-
24
-
25
-
26
-
27
-
28
-
29
-
30
-
31
-
32
-
33
-
34
-
35
-
36
-
37
-
38
-
39
-
40
-
41
-
42
-
43
-
44
-
45
-
46
-
47
-
48
-
49
-
50
-
51
-
52
-
53
-
54
-
55
-
56
-
57
-
58
-
59
-
60
-
61
-
62
-
63
-
64
-
65
-
66
-
67
-
68
-
69
-
70
-
71
-
72
-
73
-
74
-
75
-
76
-
77
-
78
-
79
-
80
-
81
-
82
-
83
-
84
-
85
-
86
-
87
-
88
-
89
-
90
-
91
-
92
-
 93
93 -
 94
94 -
 95
95 -
 96
96 -
 97
97 -
 98
98 -
 99
99 -
 100
100 -
 101
101 -
 102
102 -
 103
103 -
104
-
105
-
106
-
107
-
108
-
109
-
110
-
111
-
112
-
113
-
114
-
115
-
116
-
117
-
118
-
119
-
120
-
121
-
122
-
123
-
124
-
125
-
126
-
127
-
128
-
129
-
130
 |
 |
