2009 Mercury Grand Marquis Owner's Manual - Page 255
2009 Mercury Grand Marquis Manual

Page 255 highlights
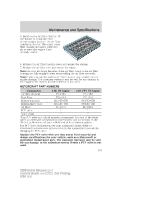
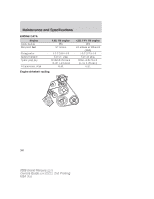
Maintenance and Specifications 5. Install a new air filter element. Be careful not to crimp the filter element edges between the air filter housing and cover. This could cause filter damage and allow unfiltered air to enter the engine if not properly seated. 6. Replace the air filter housing cover and secure the clamps. 7. Replace the air inlet tube and secure the clamp. Note: Be sure the hinge features of the air filter cover to the air filter housing are fully engaged when reassembling the air filter assembly. Note: Failure to use the correct air filter element may result in severe engine damage. The customer warranty may be void for any damage to the engine if the correct air filter element is not used. MOTORCRAFT PART NUMBERS Component 4.6L V8 engine 4.6L FFV V8 engine Air filter element FA-1783 FA-1783 Fuel filter FG-1114 FG-1114 Battery-standard BXT-65-650 BXT-65-650 Battery-heavy duty BXT-65-750 BXT-65-750 Oil filter FL-820-S FL-820-S 1 1 PCV valve 2 2 Spark plugs 1 The PCV valve is a critical emission component. It is one of the items listed in scheduled maintenance information and is essential to the life and performance of your vehicle and to its emissions system. For PCV valve replacement, see your authorized dealer. Refer to scheduled maintenance information for the appropriate intervals for changing the PCV valve. Replace the PCV valve with one that meets Ford material and design specifications for your vehicle, such as a Motorcraft or equivalent replacement part. The customer warranty may be void for any damage to the emissions system if such a PCV valve is not used. 255 2009 Grand Marquis (grn) Owners Guide (own2002), 2nd Printing USA (fus)
-
 1
1 -
2
-
3
-
4
-
5
-
6
-
7
-
8
-
9
-
10
-
11
-
12
-
13
-
14
-
15
-
16
-
17
-
18
-
19
-
20
-
21
-
22
-
23
-
24
-
25
-
26
-
27
-
28
-
29
-
30
-
31
-
32
-
33
-
34
-
35
-
36
-
37
-
38
-
39
-
40
-
41
-
42
-
43
-
44
-
45
-
46
-
47
-
48
-
49
-
50
-
51
-
52
-
53
-
54
-
55
-
56
-
57
-
58
-
59
-
60
-
61
-
62
-
63
-
64
-
65
-
66
-
67
-
68
-
69
-
70
-
71
-
72
-
73
-
74
-
75
-
76
-
77
-
78
-
79
-
80
-
81
-
82
-
83
-
84
-
85
-
86
-
87
-
88
-
89
-
90
-
91
-
92
-
93
-
94
-
95
-
96
-
97
-
98
-
99
-
100
-
101
-
102
-
103
-
104
-
105
-
106
-
107
-
108
-
109
-
110
-
111
-
112
-
113
-
114
-
115
-
116
-
117
-
118
-
119
-
120
-
121
-
122
-
123
-
124
-
125
-
126
-
127
-
128
-
129
-
130
-
131
-
132
-
133
-
134
-
135
-
136
-
137
-
138
-
139
-
140
-
141
-
142
-
143
-
144
-
145
-
146
-
147
-
148
-
149
-
150
-
151
-
152
-
153
-
154
-
155
-
156
-
157
-
158
-
159
-
160
-
161
-
162
-
163
-
164
-
165
-
166
-
167
-
168
-
169
-
170
-
171
-
172
-
173
-
174
-
175
-
176
-
177
-
178
-
179
-
180
-
181
-
182
-
183
-
184
-
185
-
186
-
187
-
188
-
189
-
190
-
191
-
192
-
193
-
194
-
195
-
196
-
197
-
198
-
199
-
200
-
201
-
202
-
203
-
204
-
205
-
206
-
207
-
208
-
209
-
210
-
211
-
212
-
213
-
214
-
215
-
216
-
217
-
218
-
219
-
220
-
221
-
222
-
223
-
224
-
225
-
226
-
227
-
228
-
229
-
230
-
231
-
232
-
233
-
234
-
235
-
236
-
237
-
238
-
239
-
240
-
241
-
242
-
243
-
244
-
245
-
246
-
247
-
248
-
249
-
 250
250 -
 251
251 -
 252
252 -
 253
253 -
 254
254 -
 255
255 -
 256
256 -
 257
257 -
 258
258 -
 259
259 -
 260
260 -
261
-
262
-
263
-
264
-
265
-
266
-
267
-
268
-
269
-
270
 |
 |
