2013 Nissan Altima Quick Reference Guide - Page 11
2013 Nissan Altima Manual

Page 11 highlights
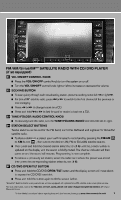
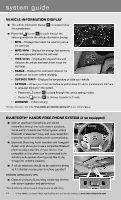
07 05 06 01 02 04 03 FM/AM/SiriusXM™* SATELLITE RADIO WITH CD/DVD PLAYER (if so equipped) 01 VOL/ON•OFF CONTROL KNOB Press the VOL/ON•OFF control knob to turn the system on or off. Turn the VOL/ON•OFF control knob right or left to increase or decrease the volume. To scan quickly through each broadcasting station, press the seeking button left or or right . 02 SEEKING BUTTON For SiriusXM™ satellite radio, press next category Press or Press and hold or to switch to the first channel of the previous or to change tracks on a CD. to fast forward or rewind a track on a CD. 03 TUNE/FOLDER/AUDIO CONTROL KNOB To manually tune the radio, turn the TUNE/FOLDER/AUDIO control knob left or right. Twelve stations can be set for the FM band, six for the AM band and eighteen for SiriusXM satellite radio. To store a station in a preset, you must first select a radio band by pressing the FM•AM 05 or XM button 06 , then tune to the desired AM, FM or SiriusXM satellite station. Then press and hold the desired station select button (1-6) until the preset number is updated on the display and the sound is briefly muted. The channel indicator will then come on and the sound will resume. Programming is now complete. 04 STATION SELECT BUTTONS To retrieve a previously set station, select the radio band where the preset was stored then press the corresponding station select button (1-6). 07 CD/DVD OPEN/TILT BUTTON Press and hold the CD/DVD OPEN/TILT button and the display screen will move down to expose the CD/DVD insert slot. Press and hold the button again to tilt the screen farther. *SiriusXM™ Satellite Radio is only available on vehicles equipped with optional SiriusXM satellite radio subscription service. For more information, refer to the "Monitor, climate, audio, phone and voice recognition systems (section 4)" of your Owner's Manual. To view detailed instructional videos regarding these and other features, please go to www.nissanownersinfo.mobi 9
-
 1
1 -
2
-
3
-
4
-
5
-
 6
6 -
 7
7 -
 8
8 -
 9
9 -
 10
10 -
 11
11 -
 12
12 -
 13
13 -
 14
14 -
 15
15 -
 16
16 -
17
-
18
-
19
-
20
-
21
-
22
-
23
-
24
-
25
-
26
 |
 |
