2000 Saab 9-3 Owner's Manual - Page 125
2000 Saab 9-3 Manual
Page 125 highlights
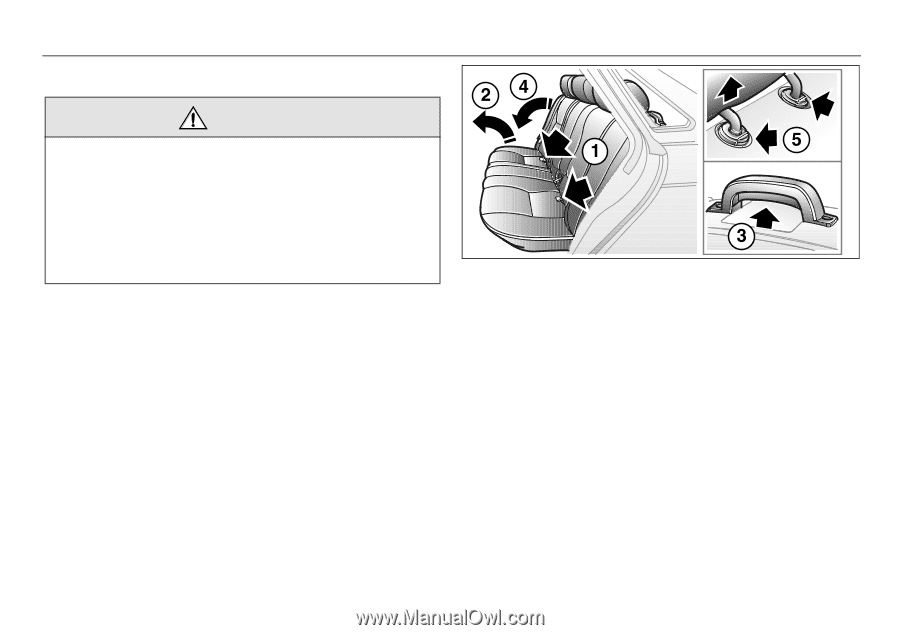
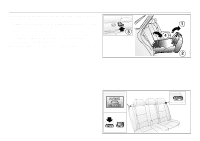
Interior equipment, trunk 125 Trunk, Coupé and 5-door WARNING When the back seat has been put back in place, make certain that the belt beam is locked firmly on both sides (the red warning tabs must go down). This is vital since the upper anchorages for the safety belts are located in the belt beam. The belts will not restrain a rear seat occupant if the belt beam is not properly latched. When the entire rear seat has been lowered, you must remove the rear window shelf. Otherwise it could come loose and cause personal injury during a collision. IB850 Lowering the entire rear seat To lower the rear seat, the front seats must be moved forward if they are in the most rearward position. The seat back must be almost vertical. 1 Flip up the seat bottom by pulling the loops located between the backrest cushions and seat cushions. 2 Rest the seat cushions on edge just behind the front seats. 3 Release the entire backrest cushion, including the belt beam, by pressing in the latch in the handle on the left (driver's) side. After this has been done, the fact that the belt beam has been released is indicated by the red "warning tabs" popping up on the right and left sides of the beam. For increased load capacity with the backrest cushion down, remove the rear seat head restraints (5). Trunk lid lock Unlock the trunk lid by pressing the lower button on the remote transmitter, by pressing the remote release button on the driver's door or by using the key. The alarm horn sounds three times and the lights flash when the trunk is released with the remote control. Programming features, see page 231.
-
 1
1 -
2
-
3
-
4
-
5
-
6
-
7
-
8
-
9
-
10
-
11
-
12
-
13
-
14
-
15
-
16
-
17
-
18
-
19
-
20
-
21
-
22
-
23
-
24
-
25
-
26
-
27
-
28
-
29
-
30
-
31
-
32
-
33
-
34
-
35
-
36
-
37
-
38
-
39
-
40
-
41
-
42
-
43
-
44
-
45
-
46
-
47
-
48
-
49
-
50
-
51
-
52
-
53
-
54
-
55
-
56
-
57
-
58
-
59
-
60
-
61
-
62
-
63
-
64
-
65
-
66
-
67
-
68
-
69
-
70
-
71
-
72
-
73
-
74
-
75
-
76
-
77
-
78
-
79
-
80
-
81
-
82
-
83
-
84
-
85
-
86
-
87
-
88
-
89
-
90
-
91
-
92
-
93
-
94
-
95
-
96
-
97
-
98
-
99
-
100
-
101
-
102
-
103
-
104
-
105
-
106
-
107
-
108
-
109
-
110
-
111
-
112
-
113
-
114
-
115
-
116
-
117
-
118
-
119
-
 120
120 -
 121
121 -
 122
122 -
 123
123 -
 124
124 -
 125
125 -
 126
126 -
 127
127 -
 128
128 -
 129
129 -
 130
130 -
131
-
132
-
133
-
134
-
135
-
136
-
137
-
138
-
139
-
140
-
141
-
142
-
143
-
144
-
145
-
146
-
147
-
148
-
149
-
150
-
151
-
152
-
153
-
154
-
155
-
156
-
157
-
158
-
159
-
160
-
161
-
162
-
163
-
164
-
165
-
166
-
167
-
168
-
169
-
170
-
171
-
172
-
173
-
174
-
175
-
176
-
177
-
178
-
179
-
180
-
181
-
182
-
183
-
184
-
185
-
186
-
187
-
188
-
189
-
190
-
191
-
192
-
193
-
194
-
195
-
196
-
197
-
198
-
199
-
200
-
201
-
202
-
203
-
204
-
205
-
206
-
207
-
208
-
209
-
210
-
211
-
212
-
213
-
214
-
215
-
216
-
217
-
218
-
219
-
220
-
221
-
222
-
223
-
224
-
225
-
226
-
227
-
228
-
229
-
230
-
231
-
232
-
233
-
234
-
235
-
236
 |
 |