2003 Saab 9-3 Owner's Manual - Page 215
2003 Saab 9-3 Manual
Page 215 highlights
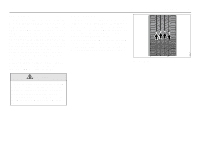
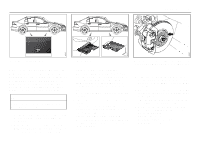
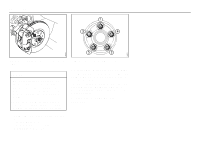
Car care 215 Marking of jacking points When the car has to be lifted, the jack must be positioned at one of the four jacking points (front or rear) under the sill members. If a floor jack is used, the lifting plate must be positioned under the normal jacking points. If the car is equipped with a towbar, the jack can also be placed under this. Jacking points arrow on the sill (see illustration). Make sure that the jack fully engages the jacking point in the underside of the sill member and that the entire foot of the jack is steady and flat on the ground. The jack must not stand on snow, ice or similar. Wind up the jack until it just begins to lift the car. 3 It is not necessary to remove the wheel cover. If, none the less, you wish to remove the wheel cover, take hold of the outer edge and pull it straight out. Loosen the wheel bolts half a turn. 4 Wind the jack to raise the wheel clear of the ground. Remove the wheel bolts and lift off the wheel. Clean any rust or dirt from the contact surfaces between the wheel and brake disc. NOTICE Apply the jack only to the jacking points indicated on the body. 1 Apply the parking brake and engage 1st or reverse gear (automatic transmission: select P). 2 Wind the jack up to a suitable height before placing it under the jacking point. Each jacking point is indicated by an 5 Clean any rust or dirt from the contact surfaces between the wheel and brake disc. Do not wipe away the grease in the wheel hub. 6 Fit the wheel and screw in the bolts in the sequence shown on the following page (opposite pairs). Tighten the bolts enough for the bolts and wheel to be seated correctly. 7 Lower the car and tighten the wheel bolts to torque in sequence as shown on the following page. Tightening torque: Light-alloy wheels: 110 Nm. Steel wheels: 110 Nm.
-
 1
1 -
2
-
3
-
4
-
5
-
6
-
7
-
8
-
9
-
10
-
11
-
12
-
13
-
14
-
15
-
16
-
17
-
18
-
19
-
20
-
21
-
22
-
23
-
24
-
25
-
26
-
27
-
28
-
29
-
30
-
31
-
32
-
33
-
34
-
35
-
36
-
37
-
38
-
39
-
40
-
41
-
42
-
43
-
44
-
45
-
46
-
47
-
48
-
49
-
50
-
51
-
52
-
53
-
54
-
55
-
56
-
57
-
58
-
59
-
60
-
61
-
62
-
63
-
64
-
65
-
66
-
67
-
68
-
69
-
70
-
71
-
72
-
73
-
74
-
75
-
76
-
77
-
78
-
79
-
80
-
81
-
82
-
83
-
84
-
85
-
86
-
87
-
88
-
89
-
90
-
91
-
92
-
93
-
94
-
95
-
96
-
97
-
98
-
99
-
100
-
101
-
102
-
103
-
104
-
105
-
106
-
107
-
108
-
109
-
110
-
111
-
112
-
113
-
114
-
115
-
116
-
117
-
118
-
119
-
120
-
121
-
122
-
123
-
124
-
125
-
126
-
127
-
128
-
129
-
130
-
131
-
132
-
133
-
134
-
135
-
136
-
137
-
138
-
139
-
140
-
141
-
142
-
143
-
144
-
145
-
146
-
147
-
148
-
149
-
150
-
151
-
152
-
153
-
154
-
155
-
156
-
157
-
158
-
159
-
160
-
161
-
162
-
163
-
164
-
165
-
166
-
167
-
168
-
169
-
170
-
171
-
172
-
173
-
174
-
175
-
176
-
177
-
178
-
179
-
180
-
181
-
182
-
183
-
184
-
185
-
186
-
187
-
188
-
189
-
190
-
191
-
192
-
193
-
194
-
195
-
196
-
197
-
198
-
199
-
200
-
201
-
202
-
203
-
204
-
205
-
206
-
207
-
208
-
209
-
 210
210 -
 211
211 -
 212
212 -
 213
213 -
 214
214 -
 215
215 -
 216
216 -
 217
217 -
 218
218 -
 219
219 -
 220
220 -
221
-
222
-
223
-
224
-
225
-
226
-
227
-
228
-
229
-
230
-
231
-
232
-
233
-
234
-
235
-
236
-
237
-
238
-
239
-
240
-
241
-
242
-
243
-
244
-
245
-
246
-
247
-
248
-
249
-
250
-
251
-
252
-
253
-
254
-
255
-
256
 |
 |
