2006 Saturn Ion Owner's Manual - Page 170
2006 Saturn Ion Manual
Page 170 highlights
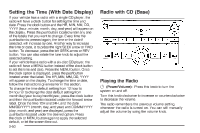
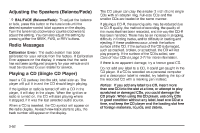
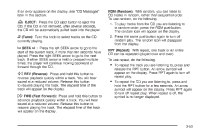
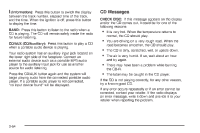
Adjusting the Speakers (Balance/Fade) ` BAL/FADE (Balance/Fade): To adjust the balance or fade, press this button or the tune knob until the desired speaker control label appears on the display. Turn the tune knob clockwise or counterclockwise to adjust the setting. You can also adjust the setting by pressing either the SEEK, FWD, or REV buttons. Radio Messages Calibration Error: The audio system has been calibrated for your vehicle from the factory. If Calibration Error appears on the display, it means that the radio has not been configured properly for your vehicle and it must be returned to your retailer for service. The CD player can play the smaller 3 inch (8 cm) single CDs with an adapter ring. Full-size CDs and the smaller CDs are loaded in the same manner. If playing a CD-R, the sound quality may be reduced due to CD-R quality, the method of recording, the quality of the music that has been recorded, and the way the CD-R has been handled. There may be an increase in skipping, difficulty in finding tracks, and/or difficulty in loading and ejecting. If these problems occur, check the bottom surface of the CD. If the surface of the CD is damaged, such as cracked, broken, or scratched, the CD will not play properly. If the surface of the CD is soiled, see Care of Your CDs on page 3-71 for more information. If there is no apparent damage, try a known good CD. Do not add any label to a CD, it could get caught in the CD player. If a CD is recorded on a personal computer and a description label is needed, try labeling the top of the recorded CD with a marking pen instead. Notice: If you add any label to a CD, insert more than one CD into the slot at a time, or attempt to play scratched or damaged CDs, you could damage the CD player. When using the CD player, use only CDs in good condition without any label, load one CD at a time, and keep the CD player and the loading slot free of foreign materials, liquids, and debris. Playing a CD (Single CD Player) Insert a CD partway into the slot, label side up. The player will pull it in and the CD should begin playing. If the ignition or radio is turned off with a CD in the player, it will stay in the player. When the ignition or radio is turned on, the CD will start playing where it stopped, if it was the last selected audio source. When a CD is inserted, the CD symbol will appear on the radio display. As each new track starts to play, the track number will appear on the display. 3-52
-
 1
1 -
2
-
3
-
4
-
5
-
6
-
7
-
8
-
9
-
10
-
11
-
12
-
13
-
14
-
15
-
16
-
17
-
18
-
19
-
20
-
21
-
22
-
23
-
24
-
25
-
26
-
27
-
28
-
29
-
30
-
31
-
32
-
33
-
34
-
35
-
36
-
37
-
38
-
39
-
40
-
41
-
42
-
43
-
44
-
45
-
46
-
47
-
48
-
49
-
50
-
51
-
52
-
53
-
54
-
55
-
56
-
57
-
58
-
59
-
60
-
61
-
62
-
63
-
64
-
65
-
66
-
67
-
68
-
69
-
70
-
71
-
72
-
73
-
74
-
75
-
76
-
77
-
78
-
79
-
80
-
81
-
82
-
83
-
84
-
85
-
86
-
87
-
88
-
89
-
90
-
91
-
92
-
93
-
94
-
95
-
96
-
97
-
98
-
99
-
100
-
101
-
102
-
103
-
104
-
105
-
106
-
107
-
108
-
109
-
110
-
111
-
112
-
113
-
114
-
115
-
116
-
117
-
118
-
119
-
120
-
121
-
122
-
123
-
124
-
125
-
126
-
127
-
128
-
129
-
130
-
131
-
132
-
133
-
134
-
135
-
136
-
137
-
138
-
139
-
140
-
141
-
142
-
143
-
144
-
145
-
146
-
147
-
148
-
149
-
150
-
151
-
152
-
153
-
154
-
155
-
156
-
157
-
158
-
159
-
160
-
161
-
162
-
163
-
164
-
 165
165 -
 166
166 -
 167
167 -
 168
168 -
 169
169 -
 170
170 -
 171
171 -
 172
172 -
 173
173 -
 174
174 -
 175
175 -
176
-
177
-
178
-
179
-
180
-
181
-
182
-
183
-
184
-
185
-
186
-
187
-
188
-
189
-
190
-
191
-
192
-
193
-
194
-
195
-
196
-
197
-
198
-
199
-
200
-
201
-
202
-
203
-
204
-
205
-
206
-
207
-
208
-
209
-
210
-
211
-
212
-
213
-
214
-
215
-
216
-
217
-
218
-
219
-
220
-
221
-
222
-
223
-
224
-
225
-
226
-
227
-
228
-
229
-
230
-
231
-
232
-
233
-
234
-
235
-
236
-
237
-
238
-
239
-
240
-
241
-
242
-
243
-
244
-
245
-
246
-
247
-
248
-
249
-
250
-
251
-
252
-
253
-
254
-
255
-
256
-
257
-
258
-
259
-
260
-
261
-
262
-
263
-
264
-
265
-
266
-
267
-
268
-
269
-
270
-
271
-
272
-
273
-
274
-
275
-
276
-
277
-
278
-
279
-
280
-
281
-
282
-
283
-
284
-
285
-
286
-
287
-
288
-
289
-
290
-
291
-
292
-
293
-
294
-
295
-
296
-
297
-
298
-
299
-
300
-
301
-
302
-
303
-
304
-
305
-
306
-
307
-
308
-
309
-
310
-
311
-
312
-
313
-
314
-
315
-
316
-
317
-
318
-
319
-
320
-
321
-
322
-
323
-
324
-
325
-
326
-
327
-
328
-
329
-
330
-
331
-
332
-
333
-
334
-
335
-
336
-
337
-
338
-
339
-
340
-
341
-
342
-
343
-
344
-
345
-
346
-
347
-
348
-
349
-
350
-
351
-
352
-
353
-
354
-
355
-
356
-
357
-
358
-
359
-
360
-
361
-
362
-
363
-
364
-
365
-
366
-
367
-
368
-
369
-
370
-
371
-
372
-
373
-
374
-
375
-
376
-
377
-
378
-
379
-
380
-
381
-
382
-
383
-
384
-
385
-
386
-
387
-
388
-
389
-
390
-
391
-
392
 |
 |