2009 Subaru Legacy Owner's Manual - Page 362
2009 Subaru Legacy Manual
Page 362 highlights
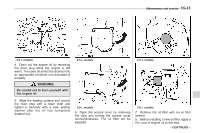
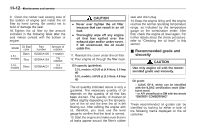
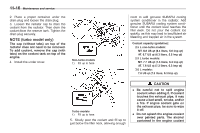
11-12 Maintenance and service 9. Clean the rubber seal seating area of the bottom of engine and install the oil filter by hand turning. Be careful not to twist or damage the seal. 10. Tighten the oil filter by the amount indicated in the following table after the seal makes contact with the bottom of engine. Model 2.5 L models 3.0 L models Oil filter color Black Blue Black Part number 15208AA100 15208AA12A 15208AA031 Amount of rotation 1 rotation 7/8 rotation 3/4 rotation CAUTION . Never over tighten the oil filter because that can result in an oil leak. . Thoroughly wipe off any engine oil that has spilled over the exhaust pipe and/or under-cover. If left unremoved, the oil could catch fire. 11. Reinstall the cover under the oil filter. 12. Pour engine oil through the filler neck. Oil capacity (guideline): 2.5 L models: 4.2 US qt (4.0 liters, 3.5 Imp qt) 3.0 L models: 5.8 US qt (5.5 liters, 4.8 Imp qt) seal and drain plug. 14. Keep the engine idling until the engine reaches the normal operating temperature range, as indicated by the temperature gauge on the combination meter. After that, check the engine oil level again. For further details about the check procedure, refer to "Checking the oil level" in this section. & Recommended grade and viscosity CAUTION Use only engine oil with the recommended grade and viscosity. Oil grade: - ILSAC GF-4, which can be identified with the ILSAC certification mark (Starburst mark) - or API classification SM with the words "ENERGY CONSERVING" The oil quantity indicated above is only a guideline. The necessary quantity of oil depends on the quantity of oil that has been drained. The quantity of drained oil differs slightly depending on the temperature of the oil and the time the oil is left flowing out. After refilling the engine with oil, therefore, you must use the level gauge to confirm that the level is correct. 13. Start the engine and make sure that no oil leaks appear around the filter's rubber These recommended oil grades can be identified by looking for either or both of the following marks displayed on the oil container.
-
 1
1 -
2
-
3
-
4
-
5
-
6
-
7
-
8
-
9
-
10
-
11
-
12
-
13
-
14
-
15
-
16
-
17
-
18
-
19
-
20
-
21
-
22
-
23
-
24
-
25
-
26
-
27
-
28
-
29
-
30
-
31
-
32
-
33
-
34
-
35
-
36
-
37
-
38
-
39
-
40
-
41
-
42
-
43
-
44
-
45
-
46
-
47
-
48
-
49
-
50
-
51
-
52
-
53
-
54
-
55
-
56
-
57
-
58
-
59
-
60
-
61
-
62
-
63
-
64
-
65
-
66
-
67
-
68
-
69
-
70
-
71
-
72
-
73
-
74
-
75
-
76
-
77
-
78
-
79
-
80
-
81
-
82
-
83
-
84
-
85
-
86
-
87
-
88
-
89
-
90
-
91
-
92
-
93
-
94
-
95
-
96
-
97
-
98
-
99
-
100
-
101
-
102
-
103
-
104
-
105
-
106
-
107
-
108
-
109
-
110
-
111
-
112
-
113
-
114
-
115
-
116
-
117
-
118
-
119
-
120
-
121
-
122
-
123
-
124
-
125
-
126
-
127
-
128
-
129
-
130
-
131
-
132
-
133
-
134
-
135
-
136
-
137
-
138
-
139
-
140
-
141
-
142
-
143
-
144
-
145
-
146
-
147
-
148
-
149
-
150
-
151
-
152
-
153
-
154
-
155
-
156
-
157
-
158
-
159
-
160
-
161
-
162
-
163
-
164
-
165
-
166
-
167
-
168
-
169
-
170
-
171
-
172
-
173
-
174
-
175
-
176
-
177
-
178
-
179
-
180
-
181
-
182
-
183
-
184
-
185
-
186
-
187
-
188
-
189
-
190
-
191
-
192
-
193
-
194
-
195
-
196
-
197
-
198
-
199
-
200
-
201
-
202
-
203
-
204
-
205
-
206
-
207
-
208
-
209
-
210
-
211
-
212
-
213
-
214
-
215
-
216
-
217
-
218
-
219
-
220
-
221
-
222
-
223
-
224
-
225
-
226
-
227
-
228
-
229
-
230
-
231
-
232
-
233
-
234
-
235
-
236
-
237
-
238
-
239
-
240
-
241
-
242
-
243
-
244
-
245
-
246
-
247
-
248
-
249
-
250
-
251
-
252
-
253
-
254
-
255
-
256
-
257
-
258
-
259
-
260
-
261
-
262
-
263
-
264
-
265
-
266
-
267
-
268
-
269
-
270
-
271
-
272
-
273
-
274
-
275
-
276
-
277
-
278
-
279
-
280
-
281
-
282
-
283
-
284
-
285
-
286
-
287
-
288
-
289
-
290
-
291
-
292
-
293
-
294
-
295
-
296
-
297
-
298
-
299
-
300
-
301
-
302
-
303
-
304
-
305
-
306
-
307
-
308
-
309
-
310
-
311
-
312
-
313
-
314
-
315
-
316
-
317
-
318
-
319
-
320
-
321
-
322
-
323
-
324
-
325
-
326
-
327
-
328
-
329
-
330
-
331
-
332
-
333
-
334
-
335
-
336
-
337
-
338
-
339
-
340
-
341
-
342
-
343
-
344
-
345
-
346
-
347
-
348
-
349
-
350
-
351
-
352
-
353
-
354
-
355
-
356
-
 357
357 -
 358
358 -
 359
359 -
 360
360 -
 361
361 -
 362
362 -
 363
363 -
 364
364 -
 365
365 -
 366
366 -
 367
367 -
368
-
369
-
370
-
371
-
372
-
373
-
374
-
375
-
376
-
377
-
378
-
379
-
380
-
381
-
382
-
383
-
384
-
385
-
386
-
387
-
388
-
389
-
390
-
391
-
392
-
393
-
394
-
395
-
396
-
397
-
398
-
399
-
400
-
401
-
402
-
403
-
404
-
405
-
406
-
407
-
408
-
409
-
410
-
411
-
412
-
413
-
414
-
415
-
416
-
417
-
418
-
419
-
420
-
421
-
422
-
423
-
424
-
425
-
426
-
427
-
428
-
429
-
430
-
431
-
432
-
433
-
434
-
435
-
436
-
437
-
438
-
439
-
440
-
441
-
442
-
443
-
444
-
445
-
446
-
447
 |
 |
