2007 Volvo S60 Owner's Manual - Page 155
2007 Volvo S60 Manual
Page 155 highlights
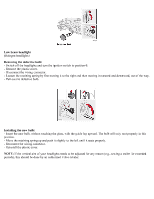
Replacing the battery - Switch off the ignition and remove the key. - Wait at least 5 minutes after switching off the ignition before disconnecting the battery so that all information in the vehicle's electrical system can be stored in the control modules. - Remove the bolts on the retaining bracket over the battery and lift out the bracket. - Fold up the plastic cover over the negative (ground) battery terminal. or unscrew the cover over the battery. - Disconnect the negative cable. - Lift off the plastic cover if necessary and disconnect the positive cable - Pull the ventilation hose from the battery. - Lift out the old battery. Installing a new battery - Put a new battery into place. - Put the lower retaining bracket in place and retighten the bolt. - Reconnect the positive cable. - Press the cover for the positive battery terminal into place and fold down the lid of the plastic cover. - Connect the negative (ground) cable and fold down the plastic cover if applicable. - Be sure that the ventilation hose is securely connected to the battery and that the other end of the hose is properly routed through the ventilation opening in the floor of the battery compartment (see the illustration). - Reinstall the retaining bracket over the battery and retighten the nuts. WARNING! Ventilation hose: The battery generates hydrogen gas, which is flammable and explosive. The battery is fitted with a ventilation hose which vents hydrogen gas out of the battery compartment through a ventilation opening in the bottom of this compartment. If the battery must be replaced, it is essential that the ventilation hose is properly connected to the battery and that it is routed through the ventilation opening provided (see illustration). Be sure the ventilation hose is free of debris. Only use replacement batteries equipped with a ventilation hose. Consult your Volvo retailer. NOTE: After the battery has been disconnected or replaced, lock and unlock the vehicle with the central locking system's remote control to reactivate such features as the power windows, moonroof, courtesy lighting, etc. pg. 182 Maintenance and servicing Replacing bulbs When replacing bulbs, keep the following points in mind: Never touch the glass of bulbs with your fingers. Grease and oils from your fingers vaporize in the heat and will leave a deposit on the reflector, which will damage it. The optional Active Bi-Xenon headlight bulbs contain trace amounts of mercury. These bulbs should always be disposed of by an authorized Volvo retailer. The following bulbs should only be replaced by an authorized Volvo service technician: - Active Bi-Xenon headlights, - Courtesy (dome) lighting, - Reading lights, - Glove compartment lights - Turn signals and courtesy lights in the side door mirrors - High-mounted brake lights
-
 1
1 -
2
-
3
-
4
-
5
-
6
-
7
-
8
-
9
-
10
-
11
-
12
-
13
-
14
-
15
-
16
-
17
-
18
-
19
-
20
-
21
-
22
-
23
-
24
-
25
-
26
-
27
-
28
-
29
-
30
-
31
-
32
-
33
-
34
-
35
-
36
-
37
-
38
-
39
-
40
-
41
-
42
-
43
-
44
-
45
-
46
-
47
-
48
-
49
-
50
-
51
-
52
-
53
-
54
-
55
-
56
-
57
-
58
-
59
-
60
-
61
-
62
-
63
-
64
-
65
-
66
-
67
-
68
-
69
-
70
-
71
-
72
-
73
-
74
-
75
-
76
-
77
-
78
-
79
-
80
-
81
-
82
-
83
-
84
-
85
-
86
-
87
-
88
-
89
-
90
-
91
-
92
-
93
-
94
-
95
-
96
-
97
-
98
-
99
-
100
-
101
-
102
-
103
-
104
-
105
-
106
-
107
-
108
-
109
-
110
-
111
-
112
-
113
-
114
-
115
-
116
-
117
-
118
-
119
-
120
-
121
-
122
-
123
-
124
-
125
-
126
-
127
-
128
-
129
-
130
-
131
-
132
-
133
-
134
-
135
-
136
-
137
-
138
-
139
-
140
-
141
-
142
-
143
-
144
-
145
-
146
-
147
-
148
-
149
-
 150
150 -
 151
151 -
 152
152 -
 153
153 -
 154
154 -
 155
155 -
 156
156 -
 157
157 -
 158
158 -
 159
159 -
 160
160 -
161
-
162
-
163
-
164
-
165
-
166
-
167
-
168
-
169
-
170
-
171
-
172
-
173
-
174
-
175
-
176
-
177
-
178
-
179
-
180
-
181
-
182
-
183
-
184
-
185
-
186
-
187
-
188
-
189
-
190
-
191
-
192
-
193
-
194
-
195
-
196
-
197
-
198
-
199
-
200
 |
 |
