2010 Volvo XC70 Owner's Manual - Page 223
2010 Volvo XC70 Manual
Page 223 highlights
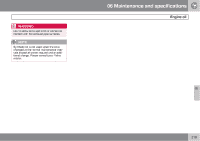
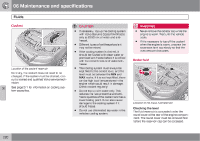
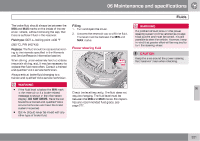
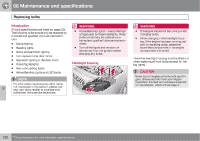
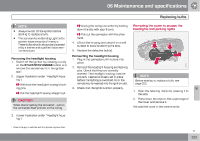
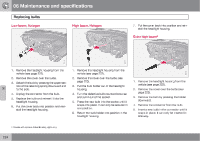
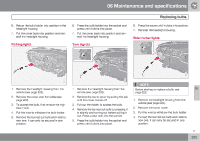
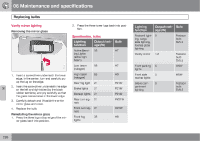
06 Maintenance and specifications Replacing bulbs NOTE Unplug the wiring connector by holding down the clip with your thumb. Pull out the connector with the other hand. 4. Lift out the housing and place it on a soft surface to avoid scratching the lens. 5. Replace the defective bulb(s). • • Always switch off the ignition before starting to replace a bulb. The optional Active Bending Light bulbs contain trace amounts of mercury. These bulbs should always be disposed of by a trained and qualified Volvo service technician. Removing the cover to access the headlights and parking lights Removing the headlight housing 1. Switch off the ignition by pressing quickly on the START/STOP ENGINE button and remove the remote key from the ignition slot1. 2. (Upper illustration under "Headlight housing") Withdraw the headlight housing's locking pins. Pull the headlight housing straight out . Reinserting the headlight housing G021745 1. Plug in the connector until it clicks into place. 2. Reinstall the headlight housing and locking pins. Check that they are correctly inserted. The headlight housing must be properly inserted and secured in place before the lighting is switched on or the remote key is inserted into the ignition slot. 3. Check that the lights function properly. NOTE Before starting to replace a bulb, see page 222. 06 1. Open the retaining clamp by pressing it to the side. 2. Press down the clips on the upper edge of the cover and remove it. Reinstall the cover in the reverse order. CAUTION When disconnecting the connector, pull on the connector itself and not on the wiring. 3. (Lower illustration under "Headlight housing") 1 Does not apply to vehicles with the optional keyless drive. `` 223
-
 1
1 -
2
-
3
-
4
-
5
-
6
-
7
-
8
-
9
-
10
-
11
-
12
-
13
-
14
-
15
-
16
-
17
-
18
-
19
-
20
-
21
-
22
-
23
-
24
-
25
-
26
-
27
-
28
-
29
-
30
-
31
-
32
-
33
-
34
-
35
-
36
-
37
-
38
-
39
-
40
-
41
-
42
-
43
-
44
-
45
-
46
-
47
-
48
-
49
-
50
-
51
-
52
-
53
-
54
-
55
-
56
-
57
-
58
-
59
-
60
-
61
-
62
-
63
-
64
-
65
-
66
-
67
-
68
-
69
-
70
-
71
-
72
-
73
-
74
-
75
-
76
-
77
-
78
-
79
-
80
-
81
-
82
-
83
-
84
-
85
-
86
-
87
-
88
-
89
-
90
-
91
-
92
-
93
-
94
-
95
-
96
-
97
-
98
-
99
-
100
-
101
-
102
-
103
-
104
-
105
-
106
-
107
-
108
-
109
-
110
-
111
-
112
-
113
-
114
-
115
-
116
-
117
-
118
-
119
-
120
-
121
-
122
-
123
-
124
-
125
-
126
-
127
-
128
-
129
-
130
-
131
-
132
-
133
-
134
-
135
-
136
-
137
-
138
-
139
-
140
-
141
-
142
-
143
-
144
-
145
-
146
-
147
-
148
-
149
-
150
-
151
-
152
-
153
-
154
-
155
-
156
-
157
-
158
-
159
-
160
-
161
-
162
-
163
-
164
-
165
-
166
-
167
-
168
-
169
-
170
-
171
-
172
-
173
-
174
-
175
-
176
-
177
-
178
-
179
-
180
-
181
-
182
-
183
-
184
-
185
-
186
-
187
-
188
-
189
-
190
-
191
-
192
-
193
-
194
-
195
-
196
-
197
-
198
-
199
-
200
-
201
-
202
-
203
-
204
-
205
-
206
-
207
-
208
-
209
-
210
-
211
-
212
-
213
-
214
-
215
-
216
-
217
-
 218
218 -
 219
219 -
 220
220 -
 221
221 -
 222
222 -
 223
223 -
 224
224 -
 225
225 -
 226
226 -
 227
227 -
 228
228 -
229
-
230
-
231
-
232
-
233
-
234
-
235
-
236
-
237
-
238
-
239
-
240
-
241
-
242
-
243
-
244
-
245
-
246
-
247
-
248
-
249
-
250
-
251
-
252
-
253
-
254
-
255
-
256
-
257
-
258
-
259
-
260
-
261
-
262
-
263
-
264
-
265
-
266
-
267
-
268
-
269
-
270
-
271
-
272
-
273
-
274
-
275
-
276
-
277
-
278
-
279
-
280
-
281
-
282
-
283
-
284
-
285
-
286
-
287
-
288
-
289
-
290
 |
 |