2012 Volvo S60 Owner's Manual - Page 290
2012 Volvo S60 Manual

Page 290 highlights
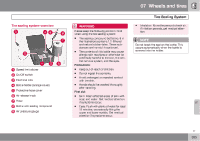
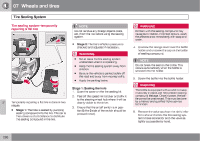
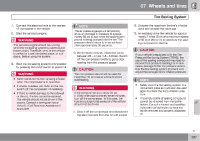
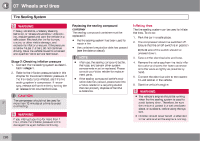
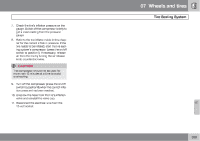
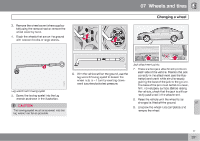
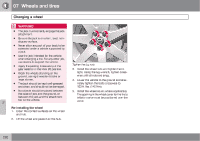
07 Wheels and tires Changing a wheel Removing a wheel the use of the spare wheel. The correct tire pressure for the spare wheel is stated in the tire pressure table on page 275. 5. After changing wheels, return the jack and tools to the foam block and close the floor hatch. 6. If possible, place the wheel with the punctured tire in the bag. 7. If there is a wheel in the bag, strap the bag securely in place in the trunk. WARNING Current legislation prohibits the use of the "Temporary Spare" tire other than as a temporary replacement for a punctured tire. It must be replaced as soon as possible by a standard tire. Road holding and handling may be affected with the "Temporary Spare" in use. Location of jack and tools WARNING • CAUTION The vehicle must never be driven with more than one temporary spare wheel. Spare wheel The following instructions only apply if you have purchased an accessory temporary spare wheel for your vehicle. If there is no temporary spare wheel in your vehicle, please see 284 for instructions on using the tire sealing system. The accessory temporary spare wheel is provided in a bag that must be strapped in place in the trunk while the vehicle is being driven. Complete instructions are provided in an information booklet found inside the bag. The spare wheel is only intended for temporary use. Replace it with a normal wheel as soon as possible. The car's handling may be altered by If there is a wheel in the bag, the bag must be securely restrained using its straps and the load anchoring eyelets in the trunk. Carefully follow the instructions in the booklet found in the spare tire bag. If the wheel with the punctured tire is too big to fit in the bag, it should be securely restrained in the trunk using suitable straps, a net for anchoring cargo, etc. The instruction booklet should always be kept in the vehicle. • Taking out the spare wheel 1. Release the bag's retaining straps. 2. Lift the bag out of the vehicle and remove the spare wheel from the bag. 3. Fold up the floor hatch in the trunk. 4. Remove the jack* and tools* from the foam block and change the wheels (see the instructions in the following section "Changing a wheel"). • 07 Changing a wheel 1. Apply the parking brake and put the gear selector in P. 2. Take out the jack*, lug wrench*, the towing eyelet and the wheel cover removal tool* stowed under the floor of the trunk. 290 * Option/accessory, for more information, see Introduction.
-
 1
1 -
2
-
3
-
4
-
5
-
6
-
7
-
8
-
9
-
10
-
11
-
12
-
13
-
14
-
15
-
16
-
17
-
18
-
19
-
20
-
21
-
22
-
23
-
24
-
25
-
26
-
27
-
28
-
29
-
30
-
31
-
32
-
33
-
34
-
35
-
36
-
37
-
38
-
39
-
40
-
41
-
42
-
43
-
44
-
45
-
46
-
47
-
48
-
49
-
50
-
51
-
52
-
53
-
54
-
55
-
56
-
57
-
58
-
59
-
60
-
61
-
62
-
63
-
64
-
65
-
66
-
67
-
68
-
69
-
70
-
71
-
72
-
73
-
74
-
75
-
76
-
77
-
78
-
79
-
80
-
81
-
82
-
83
-
84
-
85
-
86
-
87
-
88
-
89
-
90
-
91
-
92
-
93
-
94
-
95
-
96
-
97
-
98
-
99
-
100
-
101
-
102
-
103
-
104
-
105
-
106
-
107
-
108
-
109
-
110
-
111
-
112
-
113
-
114
-
115
-
116
-
117
-
118
-
119
-
120
-
121
-
122
-
123
-
124
-
125
-
126
-
127
-
128
-
129
-
130
-
131
-
132
-
133
-
134
-
135
-
136
-
137
-
138
-
139
-
140
-
141
-
142
-
143
-
144
-
145
-
146
-
147
-
148
-
149
-
150
-
151
-
152
-
153
-
154
-
155
-
156
-
157
-
158
-
159
-
160
-
161
-
162
-
163
-
164
-
165
-
166
-
167
-
168
-
169
-
170
-
171
-
172
-
173
-
174
-
175
-
176
-
177
-
178
-
179
-
180
-
181
-
182
-
183
-
184
-
185
-
186
-
187
-
188
-
189
-
190
-
191
-
192
-
193
-
194
-
195
-
196
-
197
-
198
-
199
-
200
-
201
-
202
-
203
-
204
-
205
-
206
-
207
-
208
-
209
-
210
-
211
-
212
-
213
-
214
-
215
-
216
-
217
-
218
-
219
-
220
-
221
-
222
-
223
-
224
-
225
-
226
-
227
-
228
-
229
-
230
-
231
-
232
-
233
-
234
-
235
-
236
-
237
-
238
-
239
-
240
-
241
-
242
-
243
-
244
-
245
-
246
-
247
-
248
-
249
-
250
-
251
-
252
-
253
-
254
-
255
-
256
-
257
-
258
-
259
-
260
-
261
-
262
-
263
-
264
-
265
-
266
-
267
-
268
-
269
-
270
-
271
-
272
-
273
-
274
-
275
-
276
-
277
-
278
-
279
-
280
-
281
-
282
-
283
-
284
-
 285
285 -
 286
286 -
 287
287 -
 288
288 -
 289
289 -
 290
290 -
 291
291 -
 292
292 -
 293
293 -
 294
294 -
 295
295 -
296
-
297
-
298
-
299
-
300
-
301
-
302
-
303
-
304
-
305
-
306
-
307
-
308
-
309
-
310
-
311
-
312
-
313
-
314
-
315
-
316
-
317
-
318
-
319
-
320
-
321
-
322
-
323
-
324
-
325
-
326
-
327
-
328
-
329
-
330
-
331
-
332
-
333
-
334
-
335
-
336
-
337
-
338
-
339
-
340
-
341
-
342
-
343
-
344
-
345
-
346
-
347
-
348
-
349
-
350
-
351
-
352
-
353
-
354
-
355
-
356
-
357
-
358
 |
 |
