2011 Yamaha Motorsports FX Nytro RTX Owners Manual - Page 82
2011 Yamaha Motorsports FX Nytro RTX Manual

Page 82 highlights
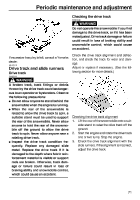
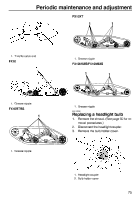
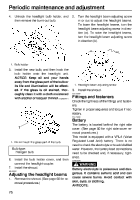
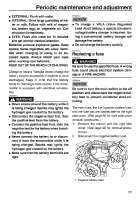
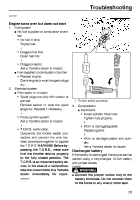
Periodic maintenance and adjustment 4. Unhook the headlight bulb holder, and then remove the burnt-out bulb. 2. Turn the headlight beam adjusting screw in or out to adjust the headlight beams. To lower the headlight beams, turn the headlight beam adjusting screw in direction (a). To raise the headlight beams, turn the headlight beam adjusting screw in direction (b). 1. Bulb holder 5. Install the new bulb, and then hook the bulb holder onto the headlight unit. NOTICE: Keep oil and your hands away from the glass part of the bulb or its life and illumination will be affected. If the glass is oil stained, thoroughly clean it with a cloth moistened with alcohol or lacquer thinner. [ECS00621] 1. Headlight beam adjusting screw 3. Install the shroud. ESU12290 Fittings and fasteners Check the tightness of the fittings and fasteners. Tighten in proper sequence and torque if necessary. ESU13890 Battery 1 The battery is located behind the right side cover. (See page 50 for right side cover removal procedures.) This model is equipped with a VRLA (Valve Regulated Lead Acid) battery. There is no need to check the electrolyte or to add distilled water. However, the battery lead connections need to be checked and, if necessary, tightened. EWS00540 1. Do not touch the glass part of the bulb. Bulb type: Halogen bulb 6. 7. Install the bulb holder cover, and then connect the headlight coupler. Install the shroud. WARNING Battery electrolyte is poisonous and dangerous. It contains sulfuric acid and can cause severe burns. Avoid contact with skin, eyes, or clothing. ANTIDOTE: ESU12861 Adjusting the headlight beams 1. Remove the shroud. (See page 50 for removal procedures.) 76
-
 1
1 -
2
-
3
-
4
-
5
-
6
-
7
-
8
-
9
-
10
-
11
-
12
-
13
-
14
-
15
-
16
-
17
-
18
-
19
-
20
-
21
-
22
-
23
-
24
-
25
-
26
-
27
-
28
-
29
-
30
-
31
-
32
-
33
-
34
-
35
-
36
-
37
-
38
-
39
-
40
-
41
-
42
-
43
-
44
-
45
-
46
-
47
-
48
-
49
-
50
-
51
-
52
-
53
-
54
-
55
-
56
-
57
-
58
-
59
-
60
-
61
-
62
-
63
-
64
-
65
-
66
-
67
-
68
-
69
-
70
-
71
-
72
-
73
-
74
-
75
-
76
-
 77
77 -
 78
78 -
 79
79 -
 80
80 -
 81
81 -
 82
82 -
 83
83 -
 84
84 -
 85
85 -
 86
86 -
 87
87 -
88
-
89
-
90
-
91
-
92
-
93
-
94
-
95
-
96
-
97
-
98
-
99
-
100
-
101
-
102
 |
 |
