3Com 3C6090 User Guide - Page 10
Installing in the Extended Chassis, Connecting a PC, Terminal, or Modem.
 |
UPC - 662705155265
View all 3Com 3C6090 manuals
Add to My Manuals
Save this manual to your list of manuals |
Page 10 highlights
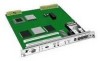
1-4 CHAPTER 1: INSTALLING THE DPE MODULE Installing in the Extended Chassis To install the DPE module into the NETBuilder II Extended chassis, follow these steps. If you own the 4- or 8-Slot chassis, refer to the previous section. Although it is not required, 3Com recommends that you turn off the system before you install or remove a DPE module. If you do not turn off the system, the bridge/router will automatically reset when you install the DPE module. You will need a small, flatblade screwdriver. 1 Insert the module into the left-most slot marked A. B A FORWARD FAULT RESET ATTENTION PACKET POWER/ a Grasp left and right sides of LED panel. b Turn the board so the 3Com logo is on the bottom. c Slide board along guide rails until it engages ejector tab notches. d Push ejector tabs closed until the module is flush with the chassis. 1 23 4 LOAD STATUS TEST RUN CONSOLE DPE ® ® 100BASE-TX FAST ETHERNET 2 Hand tighten the captive screws, then gently tighten them with a small (1/8 in. - 3/16 in.) screwdriver. Do not overtighten the screws. A solid connection of the front panel to the chassis is required for proper operation. Do not use the screws to force the board into place. You are now ready to install the I/O modules. Refer to the appropriate I/O module installation guides. After installing your I/O modules, refer to the next section, "Connecting a PC, Terminal, or Modem."
-
 1
1 -
2
-
3
-
4
-
 5
5 -
 6
6 -
 7
7 -
 8
8 -
 9
9 -
 10
10 -
 11
11 -
 12
12 -
 13
13 -
 14
14 -
 15
15 -
16
-
17
-
18
-
19
-
20
-
21
-
22
-
23
-
24
-
25
-
26
-
27
-
28
-
29
-
30
-
31
-
32
-
33
-
34
 |
 |
