3Com 3CR17333-91 Getting Started - Page 24
Rack-Mounting the Switch, ATTENTION, WARNUNG, PRECAUCIÓN
 |
UPC - 662705521763
View all 3Com 3CR17333-91 manuals
Add to My Manuals
Save this manual to your list of manuals |
Page 24 highlights
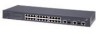
24 CHAPTER 2: INSTALLING THE SWITCH ATTENTION : le fait d'ouvrir le commutateur ou d'altérer la vignette de garantie pourrait rendre la garantie nulle. WARNUNG: Öffnen des Switches oder Manipulation des Garantieaufklebers kann das Erlöschen der Garantie zur Folge haben. PRECAUCIÓN: si se abre el conmutador o se manipula el adhesivo de la garantía, ésta quedará invalidada. ATTENZIONE: L'apertura dello switch o la manomissione dell'adesivo di garanzia può invalidare la garanzia. OSTRZEŻENIE: Otwarcie przełącznika lub naruszenie plomby gwarancyjnej może unieważnić gwarancję. Rack-Mounting the Switch Switch 4210 26-Port and 52-Port models are rack-mountable in a standard 19-inch rack. Switch 4210 9- and 18-Port models are not as wide as the 19-inch model and are intended for desktop or shelf installation. Follow the steps below to mount a 26- or 52-Port model unit in a standard 19-inch rack: 1 Check that the rack is sturdy and properly grounded. Attach the rack-mount brackets to the front or rear panel of the chassis with screws. 2 Place the switch on a shelf in the rack and slide it to a proper position along the guide rails, reserving a suitable clearance between the device and the guide rails. 3 Fix the brackets to the rack posts with screws, making sure that the device is securely attached.
-
 1
1 -
2
-
3
-
4
-
5
-
6
-
7
-
8
-
9
-
10
-
11
-
12
-
13
-
14
-
15
-
16
-
17
-
18
-
 19
19 -
 20
20 -
 21
21 -
 22
22 -
 23
23 -
 24
24 -
 25
25 -
 26
26 -
 27
27 -
 28
28 -
 29
29 -
30
-
31
-
32
-
33
-
34
-
35
-
36
-
37
-
38
-
39
-
40
-
41
-
42
-
43
-
44
-
45
-
46
-
47
-
48
-
49
-
50
-
51
-
52
-
53
-
54
-
55
-
56
-
57
-
58
-
59
-
60
-
61
-
62
-
63
-
64
-
65
-
66
-
67
-
68
-
69
-
70
-
71
-
72
-
73
-
74
 |
 |
