3Ware 7006-2 User Guide - Page 36
BIOS Screen, Invoking the 3ware BIOS tool - raid rebuild
 |
UPC - 693494700626
View all 3Ware 7006-2 manuals
Add to My Manuals
Save this manual to your list of manuals |
Page 36 highlights
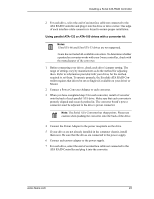
3ware Disk Array Configuration Utility BIOS Screen When designating a spare in the BIOS screen, it is assumed that as you are creating your array, you are "setting aside" drive(s) as Hot Spares. This is done by using the S key on the selected drive. Leaving a drive undesignated results in it becoming a JBOD drive. JBOD drives become available to the operating system as distinct volumes, and, consequently, they cannot be designated as spares and cannot be used to rebuild degraded arrays at a later time. If a spare is designated in the BIOS screen, the designation and configuration is in effect from this point on. The spare drive will be displayed as a Hot Spare in the 3DM Configuration page. 3DM Configure Page In order to designate an available drive as a spare from the 3DM Configure page, you select a drive that is not a JBOD drive or part of an existing array. To designate a drive as a Hot Spare from this page, you must use one of the two following methods: Replacing a Defective Drive with a Spare Replace the drive at the operating system level while the system is powered. This should only be done with an approved and recognized hot swap drivecarrier. If you do not use an approved and recognized hot swap drive-carrier, connecting interface cables and power cables can/will crash the system from bus or power supply issues. Select the checkbox next to the drive to be removed and click Remove Drive. Select the same checkbox and then click Add Spare. Adding a Spare Drive to an Available Port To add a new spare, follow the same steps except you will not be required to remove a drive. Invoking the 3ware BIOS tool Power up or reboot your system. Before the boot phase, wait until you see a screen similar to Figure 9. 28 3ware Escalade ATA RAID Controller User Guide
-
 1
1 -
2
-
3
-
4
-
5
-
6
-
7
-
8
-
9
-
10
-
11
-
12
-
13
-
14
-
15
-
16
-
17
-
18
-
19
-
20
-
21
-
22
-
23
-
24
-
25
-
26
-
27
-
28
-
29
-
30
-
 31
31 -
 32
32 -
 33
33 -
 34
34 -
 35
35 -
 36
36 -
 37
37 -
 38
38 -
 39
39 -
 40
40 -
 41
41 -
42
-
43
-
44
-
45
-
46
-
47
-
48
-
49
-
50
-
51
-
52
-
53
-
54
-
55
-
56
-
57
-
58
-
59
-
60
-
61
-
62
-
63
-
64
-
65
-
66
-
67
-
68
-
69
-
70
-
71
-
72
-
73
-
74
-
75
-
76
-
77
-
78
-
79
-
80
-
81
-
82
-
83
-
84
-
85
-
86
-
87
-
88
-
89
-
90
-
91
-
92
-
93
-
94
-
95
-
96
-
97
-
98
-
99
-
100
-
101
-
102
-
103
-
104
-
105
-
106
-
107
-
108
-
109
-
110
-
111
-
112
-
113
-
114
-
115
-
116
-
117
-
118
-
119
-
120
-
121
-
122
-
123
-
124
-
125
-
126
 |
 |