AIWA XH-A1000 Operating Instructions
AIWA XH-A1000 Manual
 |
View all AIWA XH-A1000 manuals
Add to My Manuals
Save this manual to your list of manuals |
AIWA XH-A1000 manual content summary:
- AIWA XH-A1000 | Operating Instructions - Page 1
DISC STEREO SYSTEM SISTEMA ESTEREO CON REPRODUCTOR DE DISCOS COMPACTOS CHAINE STEREO AVEC LECTEUR DE DISQUES COMPACTS XH-A1000 OPERATING INSTRUCTIONS MANUAL DE INSTRUCCIONES MODE D'EMPLOI En (English) E (Español) F (Français) For assistance and information call toll free 1-800-BUY-AIWA - AIWA XH-A1000 | Operating Instructions - Page 2
XH-A1000 CORRECTION Please read the incorrect description in the Operating Instructions as follows. Page 21 AI EDIT RECORDING WRONG 6 Press q REC/REC MUTE to start recording. RIGHT 6 Press qREC/REC MUTE and then press c /d within 2 seconds - AIWA XH-A1000 | Operating Instructions - Page 3
USER-SERVICEABLE PARTS INSIDE. REFER SERVICING TO QUALIFIED SERVICE Aiwa dealer in case of difficulty. Model No. CX-A1000 SX-WA1000 SX-C1800 SX-R1800 Serial No. (Lot No.) PRECAUTIONS Read the Operating Instructions cold spot to a warm spot - The heating system has just been turned on - The unit is - AIWA XH-A1000 | Operating Instructions - Page 4
damaged DO NOT ATTEMPT TO SERVICE THE UNIT YOURSELF. TABLE OF CONTENTS SOUND PREPARATIONS CHECK YOUR SYSTEM AND ACCESSORIES 4 BASIC CONNECTIONS 4 CONNECTING OTHER EQUIPMENTS 6 CONNECTING A DVD PLAYER 8 REMOTE CONTROL 9 BEFORE OPERATION 9 SOUND AUDIO ADJUSTMENTS 11 GRAPHIC EQUALIZER 12 - AIWA XH-A1000 | Operating Instructions - Page 5
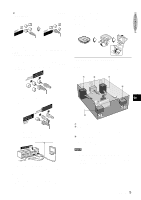
XH-A1000 CX-A1000 Compact disc stereo cassette receiver SX-WA1000 Front speakers SX-C1800 Center speaker SX-R1800 Surround speakers Remote control AM antenna Operating Instructions, etc. FM antenna BASIC CONNECTIONS The DOLBY PRO LOGIC system which is the biggest feature of this stereo system - AIWA XH-A1000 | Operating Instructions - Page 6
of or slightly behind the listening area. Align them horizontally, about 1 meter above ear height. NOTE • No sound is heard from the center and surround speakers when the DOLBY PRO LOGIC, the DSP SURROUND system and the 5.1CH (page 25) are set to off. • The sound is heard from the center - AIWA XH-A1000 | Operating Instructions - Page 7
antenna near other optional equipment, the stereo system itself, the AC cord or speaker cords, since noise will be AUDIO R by the audio cable. 6 ENGLISH • When CD DIGITAL OUT (OPTICAL) jack is not used, attach the dust cup a. PHONO IN jacks A turntable can be connected to these jacks. Use an Aiwa - AIWA XH-A1000 | Operating Instructions - Page 8
in jacks and Video in jack to Audio out jacks and Video out jack to Audio in jacks and Video in jack o o o o to Audio in jacks o CD-ROM driver, MD recorder, etc. Turntable to Digital in jack REC OUT/ VIDEO2/LD/TV VIDEO1/DVD/MD AUDIO MONITOR CX-A1000 (rear) MONITOR/ VIDEO2/LD/TV VIDEO1 - AIWA XH-A1000 | Operating Instructions - Page 9
SELECTING EXTERNAL AUDIO/VIDEO SOURCES AUX/ CONNECTING A DVD PLAYER 5.1CH INPUT jacks of this unit support the DOLBY DIGITAL SURROUND system (see page 25). Connect a DVD player with 5.1ch output instructions of the DVD player. • The DOLBY DIGITAL SURROUND sound cannot be recorded in any way. 8 - AIWA XH-A1000 | Operating Instructions - Page 10
new ones. Using the remote control The instructions in this manual refer mainly to the buttons on the main unit. Buttons on the remote control with the same names or flash. Example: When CLOCK is pressed, f and g light as a guide to setting the current time. En Demo mode When the AC cord is plugged - AIWA XH-A1000 | Operating Instructions - Page 11
minutes or if there is no audio input from any connected external CHANNEL MULTI-AMPLIFIER SYSTEM To provide reinforcement this system incorporates system. System SYSTEM The built-in subwoofer system has a separate subwoofer cavity area that is part AIWA's built-in subwoofer system incorporates a subwoofer - AIWA XH-A1000 | Operating Instructions - Page 12
. To change the left/right balance Press MANUAL SELECT on the remote control. L/R is displayed for 2 seconds. Press f or g on the remote control within these 2 seconds. • The DOLBY PRO LOGIC (page 24) and the DOLBY DIGITAL SURROUND (page 25) front speakers level is also changed. NOTE When playing - AIWA XH-A1000 | Operating Instructions - Page 13
LATIN CLASSIC Program mode JAZZ GEQ M5 GEQ M4 GEQ M3 GEQ M2 GEQ M1 Manual mode 3 Press GEQ FREQ (HIGH). The highest level frequency indicator flashes for 8 so that "GEQ OFF" is displayed. To select with the remote control Press GEQ repeatedly until the desired program mode is displayed. Each mode - AIWA XH-A1000 | Operating Instructions - Page 14
of the surround speakers Press MANUAL SELECT twice or three times on the remote control. "S-L" or "S-R" is displayed for 2 seconds. Press f or g on the remote control within these 2 seconds. • The DOLBY PRO LOGIC (page 23) and the DOLBY DIGITAL SURROUND (page 25) surround speakers level is also - AIWA XH-A1000 | Operating Instructions - Page 15
search manually. When an FM stereo broadcast contains noise Press MONO TUNER on the remote control STEREO" is displayed for 2 seconds. To change the AM tuning interval The default setting of the AM tuning interval is 10 kHz/step. If you use this unit in an area where the frequency allocation system - AIWA XH-A1000 | Operating Instructions - Page 16
RADIO RECEPTION PRESETTING STATIONS PRESET NUMBER TUNING Use the remote control to select the preset number directly. TUNER/ BAND a f,g TUNER/ BAND f,g a TUNER/ BAND TUNER PRESET MULTI JOG a s d TUNER/ BAND 0-9,+10 c/d s a The unit can store a total of - AIWA XH-A1000 | Operating Instructions - Page 17
TAPE PLAYBACK BASIC OPERATIONS REV MODE DOLBY NR zTAPE OPEN/ CLOSE Cassette tray TAPE a s f,g jl To stop play, press s. To pause play, press a. To resume play, press again. To fast forward or rewind, press f or g. Then press s to stop the tape. Types of tape Use Type I (normal), Type II (high/CrO2 - AIWA XH-A1000 | Operating Instructions - Page 18
of the selected DISC DIRECT PLAY flashes. Number of track being played Elapsed playing time Selected disc tray number To play with the remote control Press DISC DIRECT PLAY, then press one of the numbered buttons 1-3 within 3 seconds to select a disc. To stop play, press s. To pause play - AIWA XH-A1000 | Operating Instructions - Page 19
to either side (the recordable side or the labeled side) of a CD-R/RW disc. It may cause malfunction. RANDOM/REPEAT PLAY RANDOM/REPEAT Use the remote control. RANDOM PLAY All the tracks on the selected disc or all the discs can be played randomly. REPEAT PLAY A single disc or all the discs - AIWA XH-A1000 | Operating Instructions - Page 20
PRGM 0-9,+10 DISC DIRECT PLAY RANDOM/REPEAT c/d f,g s Use the remote control. 1 Press PRGM twice in stop mode. "- -" and the line of PRGM appear on the display. PRGM • When PRGM is pressed once in step 1, the unit enters the CD KARAOKE PROGRAM (page 28). 2 Press DISC DIRECT PLAY, then press one - AIWA XH-A1000 | Operating Instructions - Page 21
equipment connected to AUDIO IN jacks on the rear or the front.) To resume recording, press again. To start recording with the remote control First press qREC/REC MIC, ECHO and the rhythm play function) of the speakers or headphones are freely varied without affecting the recording. INSERTING - AIWA XH-A1000 | Operating Instructions - Page 22
AI edit recording will not start from a point halfway into the tape. The tape must be recorded from the beginning of either side. Use the remote control from steps 3 to 6. 1 Load the tape into the cassette tray, and press DOLBY NR to turn Dolby NR on or off. Load the tape with - AIWA XH-A1000 | Operating Instructions - Page 23
edit recording will not start from a point halfway in the tape. The tape must be recorded on from the beginning of either side. Use the remote control from steps 3 to 8. 1 Load the tape into the cassette tray, and press DOLBY NR to turn Dolby NR on or off. Load the tape with - AIWA XH-A1000 | Operating Instructions - Page 24
a new level of audio/visual entertainment. Independent control of the five sound support H. ADJUSTING SPEAKER LEVEL DOLBY PRO LOGIC f,g En MANUAL SELECT h PRO LOGIC f,g DOLBY NR system The Dolby Noise Reduction system "PHANTOM" or "3 STEREO" is displayed, press DOLBY PRO LOGIC repeatedly until "NORMAL" - AIWA XH-A1000 | Operating Instructions - Page 25
balance with the noise sequencer, the sound levels of the center or surround speakers can be adjusted during playback of laser discs or video software. 1 Press MANUAL SELECT on the remote control repeatedly to select "CEN" (center), "S-R" (surround right) or "S-L" (surround left). 2 While the "CEN - AIWA XH-A1000 | Operating Instructions - Page 26
system, Karaoke function, MIC and ECHO are automatically canceled when the 5.1CH is selected. • Make sure the software played back with the connected equipment support the DOLBY DIGITAL . DOLBY DIGITAL SURROUND is turned on. 2 Press MANUAL SELECT on the remote control repeatedly. Speaker name appears - AIWA XH-A1000 | Operating Instructions - Page 27
Function buttons VOLUME MIC 1/2 MIC ECHO KARAOKE Two microphones (not supplied) can be connected When the ECHO level is changed, the DSP SURROUND system and the DOLBY PRO LOGIC are automatically canceled. • If a microphone is held too near the speakers, a howling sound may be produced. In this - AIWA XH-A1000 | Operating Instructions - Page 28
with strong echoes - Those with the vocal part recorded on the right or left side of the sound • While the Karaoke function is on, the sound is output as only while there is audio input through a microphone. 3 Multiplex Only the sound on the left channel is heard from both speakers, and the sound on - AIWA XH-A1000 | Operating Instructions - Page 29
tracks to be played after the current track. Each reservation is cleared when it finishes playing. Use the remote control. 1 Press CD and load the discs. 2 Press PRGM once. After "CD KARAOKE" scrolls on the display, "K-P00" appeares. 5 Press d to start play. After a track is played, it is cleared - AIWA XH-A1000 | Operating Instructions - Page 30
a power failure, the entire clock display flashes. 1 Press CLOCK. The unit can be turned off automatically at a specified time. 1 Press SLEEP on the remote control. SLEEP 2 Within 4 seconds, turn MULTI JOG to designate the hour and the minute. Turning MULTI JOG changes both the hour and the minute - AIWA XH-A1000 | Operating Instructions - Page 31
clock is set correctly. 1 Press one of the function buttons to select a source. 2 Press TIMER once so that appears on the display. Time and audio source name flash alternately. 3 Within 6 seconds, turn MULTI JOG to designate the timer-on time, then press ENTER or a. Turning MULTI JOG changes both - AIWA XH-A1000 | Operating Instructions - Page 32
be erased - the tape cannot be recorded on After every 10 hours of use, clean the tape heads with a head cleaning cassette. Refer to the instructions of the cleaning cassette for details. To demagnetize the tape heads The tape heads may become magnetized after long-term use. This may narrow the - AIWA XH-A1000 | Operating Instructions - Page 33
0.15 % (40 W, 1 kHz, 8 ohms, DIN AUDIO/Front) LOW FREQ + SUB WOOFER amplifier Power output 200 W DIGITAL OUT (OPTICAL) SPEAKERS: LOW + SUB WOOFER 6 ohms HIGH 8 ohms SURROUND SPEAKERS: accept speakers of 8 -16 ohms CENTER SPEAKER: accepts speakers of 8 ohms or more PHONES (stereo - AIWA XH-A1000 | Operating Instructions - Page 34
TROUBLESHOOTING GUIDE If the unit fails to perform as described in these Operating Instructions, check the following guide system and the 5.1CH set to off? (b pages 13, 23) ) Sound is emitted from one speaker only. • Is the other speaker disconnected? The output sound is not stereo. • Is the Karaoke - AIWA XH-A1000 | Operating Instructions - Page 35
17 % VIDEO 3 IN, AUDIO IN (L,R) 7 ^ TIMER 14 KARAOKE 27 zCD OPEN/CLOSE .......... 17 [ VOL(N,M 11, 26, 30 ] c/dPRESET 15-19, 21, 22, 28 sCLEAR 15-17, 19-22, 28, 29 f/r(DOWN 11-17, 19, 21-25, 29, 30 g/t(UP 11-17, 19, 21-25, 28-30 For assistance and information call toll free 1-800-BUY-AIWA - AIWA XH-A1000 | Operating Instructions - Page 36
XH-A1000 CORRECTION Please read the incorrect description in the Operating Instructions as follows. Page 21 AI EDIT RECORDING WRONG 6 Press q REC/REC MUTE to start recording. RIGHT 6 Press qREC/REC MUTE and then press c /d within 2 seconds - AIWA XH-A1000 | Operating Instructions - Page 37
en la parte trasera de la unidad) en el espacio proporcionado a continuación. Téngalos presentes cuando se ponga en contacto con el proveedor Aiwa en caso de dificultades. Nº de modelo CX-A1000 SX-WA1000 SX-C1800 SX-R1800 Nº de serie (nº de lote) PRECAUCIONES Lea el manual de instrucciones - AIWA XH-A1000 | Operating Instructions - Page 38
PARTE H DEL NEC) Mantenimiento Limpie la unidad solamente como se recomienda en el manual EQUIPOS 6 CONEXIÓN DE UN REPRODUCTOR DE DVD 8 CONTROL REMOTO 9 ANTES DE LA UTILIZACIÓN 9 SONIDO SONIDO DOLBY DIGITAL SURROUND 25 KARAOKE MEZCLA DE SONIDOS CON MICRÓFONOS 26 PROGRAMA DE KARAOKE DE CD - AIWA XH-A1000 | Operating Instructions - Page 39
XH-A1000 Receptor estéreo de casetes y discos compactos CX-A1000 Altavoces frontales SX-WA1000 Altavoz central SX-C1800 Altavoces de sonido envolvente SX-R1800 Control remoto Antena de AM Manual Conecte el cable de altavoz con raya blanca al terminal SPEAKERS LOW FREQ R 0 y el cable negro al - AIWA XH-A1000 | Operating Instructions - Page 40
azul al terminal SPEAKERS HIGH FREQ L, y el otro cable de altavoz a los terminales SPEAKERS LOW FREQ Es posible conectar a esta unidad determinados equipos de audio y video (reproductor de LD, reproductor de MD, central Coloque los dos altavoces frontales en la parte central. Si conecta un TV a la - AIWA XH-A1000 | Operating Instructions - Page 41
en los terminales SIPMEPA:K6EΩR SPEAKERS o fallos de funcionamiento. • AUDIO R mediante el cable de audio. 6 ESPAÑOL • Cuando no utilice la toma CD DIGITAL OUT (OPTICAL), fije la tapa contra polvo a. Tomas PHONO IN Puede conectar un plato giradiscos a estas tomas. Utilice un plato giradiscos Aiwa - AIWA XH-A1000 | Operating Instructions - Page 42
audioo Unidad de CD-ROM, grabadora de MD, etc. Plato giradiscos REC OUT/ AUDIO VIDEO2/LD/TV VIDEO1/DVD/MD MONITOR a la toma de entrada digital CX-A1000 (parte posterior) MONITOR/ VIDEO2/LD/TV VIDEO1/DVD VIDEO OUT CD DIGITAL OUT (OPTICAL) PHONO IN AUX IN E TV a la toma de entrada de video - AIWA XH-A1000 | Operating Instructions - Page 43
SELECCIÓN DE FUENTES DE AUDIO/ VIDEO EXTERNAS CONEXIÓN DE UN REPRODUCTOR DE DVD AUX/PHONO/5.1CH VIDEO de espectros funcione y realizar grabaciones. Consulte también el manual de instrucciones del reproductor de DVD. • El sonido DOLBY DIGITAL SURROUND no puede grabarse de ninguna forma. 8 ESPAÑOL - AIWA XH-A1000 | Operating Instructions - Page 44
. Si dicha distancia disminuye, sustituya las pilas por otras nuevas. Uso del control remoto Las instrucciones de este manual se refieren principalmente a los botones de la unidad principal. Los botones del control remoto que tengan los mismos nombres a los de la unidad principal podrán utilizarse - AIWA XH-A1000 | Operating Instructions - Page 45
incorporado dispone de una cavidad independiente para dicho altavoz que es parte de la estructura de alojamiento de los altavoces, y que act ón y nitidez. El sistema de altavoz potenciador de graves incorporado de AIWA incluye un altavoz potenciador de graves con capacidad de reproducción de graves - AIWA XH-A1000 | Operating Instructions - Page 46
MANUAL SELECT T-BASS VOL / SISTEMA BBE El sistema BBE potencia la claridad del sonido de alta frecuencia. También enriquece la función de Karaoke balance izquierdo/derecho Presione MANUAL SELECT en el control remoto. Aparece L/R durante 2 segundos. Presione f o g en el control remoto antes de que - AIWA XH-A1000 | Operating Instructions - Page 47
ECUALIZADOR GRÁFICO AJUSTE MANUAL DE UNA CURVA DE ECUALIZACIÓN NUEVA SELECCIÓN DE LA CURVA DE Presione GEQ dos veces para que aparezca "GEQ OFF". Para realizar la selección con el control remoto Presione GEQ repetidamente hasta que aparezca el modo de programa deseado. Aparecerá cíclicamente cada - AIWA XH-A1000 | Operating Instructions - Page 48
MANUAL SELECT dos o tres veces en el control remoto. Aparece "S-L" o "S-R" durante 2 segundos. Presione f o g en el control remoto antes de que transcurran estos 2 segundos. • El nivel de los altavoces de sonido envolvente DOLBY PRO LOGIC (página 23) y DOLBY DIGITAL SURROUND - AIWA XH-A1000 | Operating Instructions - Page 49
el modo de sintonización manual. Cada vez que presione el reo se recibe con ruido Presione MONO TUNER en el control remoto para que "MONO" aparezca en el visualizador. MONO TUNER para que "MONO" desaparezca y se muestre "STEREO" durante 2 segundos. Para cambiar el intervalo de sintonización - AIWA XH-A1000 | Operating Instructions - Page 50
RECEPCIÓN DE LA RADIO MEMORIZACIÓN DE EMISORAS SINTONIZACIÓN DEL NÚMERO DE MEMORIZACIÓN Utilice el control remoto para seleccionar directamente el número de memorización. TUNER/ BAND a f,g TUNER/ BAND f,g a La unidad puede almacenar un total de 32 emisoras memorizadas de todas las - AIWA XH-A1000 | Operating Instructions - Page 51
REPRODUCCIÓN DE CINTAS OPERACIONES BÁSICAS REV MODE DOLBY NR zTAPE OPEN/ CLOSE BaCnadsesjaetdtee catsraeytes TAPE a s f,g jl 1 Presione DOLBY NR para activar o desactivar Dolby NR según la cinta que vaya a reproducir. hNR Para detener la reproducción, presione s. Para introducir una pausa - AIWA XH-A1000 | Operating Instructions - Page 52
de la pista en reproducción Tiempo de reproducción transcurrido Número de la bandeja de disco seleccionado Para realizar la reproducción mediante el control remoto Presione DISC DIRECT PLAY y, a continuación, uno de los botones numéricos 1-3 antes de 3 segundos con el fin de seleccionar un disco - AIWA XH-A1000 | Operating Instructions - Page 53
én se activará y el compartimiento de discos se abrirá al presionar z CD OPEN/CLOS. Para comprobar el tiempo restante Presione CD EDIT/CHECK en el control remoto durante la reproducción. Aparecerá el espacio de tiempo restante hasta el final de la reproducción de todas las pistas. Para recuperar la - AIWA XH-A1000 | Operating Instructions - Page 54
DIRECT PLAY RANDOM/REPEAT c/d f,g s Emplee el control remoto. 1 Presione PRGM dos veces en el en el paso 1, la unidad entrará en el modo CD KARAOKE PROGRAM (página 28). 2 Presione DISC DIRECT PLAY y, a Presione d para iniciar la reproducción. Las partes sin sonido existentes entre las pistas se - AIWA XH-A1000 | Operating Instructions - Page 55
fuente de grabación es TUNER, VIDEO1/2/3 o un equipo externo conectado a las tomas AUDIO IN de la parte posterior o frontal.) Para reanudar la grabación, presiónelo de nuevo. Para iniciar la grabación con el control remoto Primero presione qREC/REC MUTE y, a continuación, d antes de 2 segundos. NOTA - AIWA XH-A1000 | Operating Instructions - Page 56
edición AI no se iniciará desde un punto en medio de la cinta. La cinta debe grabarse desde el principio de alguna cara. Utilice el control remoto para realizar los pasos 3 a 6. 1 Introduzca la cinta en la bandeja de casetes, y presione DOLBY NR para activar o desactivar Dolby NR. Inserte la cinta - AIWA XH-A1000 | Operating Instructions - Page 57
programada no se iniciará desde un punto en medio de la cinta. La cinta debe grabarse desde el principio de alguna cara. Utilice el control remoto para realizar los pasos 3 a 8. 1 Introduzca la cinta en la bandeja de casetes, y presione DOLBY NR para activar o desactivar Dolby NR. Inserte la cinta - AIWA XH-A1000 | Operating Instructions - Page 58
de entretenimiento audiovisual. El control independiente de los cinco canales que se obtiene una experiencia de audio y video increíblemente real. Lea AJUSTE DEL NIVEL DE LOS ALTAVOCES DOLBY PRO LOGIC f,g MANUAL E SELECT h PRO LOGIC f,g Sistema DOLBY NR El STEREO", presione DOLBY PRO LOGIC varias veces - AIWA XH-A1000 | Operating Instructions - Page 59
PRO LOGIC, el de los sistemas DSP SURROUND (página 13) y DOLBY DIGITAL SURROUND (página 25) también cambiará. • Mientras se muestre "S-R" o milisegundos). Para cambiar dicho tiempo de retardo estándar, presione MANUAL SELECT en el control remoto varias veces en el modo NORMAL o PHANTOM hasta que - AIWA XH-A1000 | Operating Instructions - Page 60
izquierdo y derecho. Modo 3 STEREO: Utilice este modo cuando no haya . - los auriculares están conectados. - se activa la función de Karaoke. - se activa 5.1CH (página 25). • Ajuste el volumen del sistema DOLBY DIGITAL SURROUND se activará. 2 Presione MANUAL SELECT varias veces en el control remoto. - AIWA XH-A1000 | Operating Instructions - Page 61
CON MICRÓFONOS FBuontocntieosn bduettfounnsción VOLUME MIC 1/2 MIC ECHO KARAOKE Es posible conectar dos micrófonos (no suministrados) a tipo unidireccional para evitar aullidos. Póngase en contacto con un proveedor Aiwa local para obtener información detallada. 2 Presione uno de los botones - AIWA XH-A1000 | Operating Instructions - Page 62
audio múltiple. Presione KARAOKE varias veces para seleccionar la función VOCAL FADER o MULTIPLEX. Cada vez que presione KARAOKE parte vocal grabada en el lado derecho o izquierdo del sonido • Mientras la función de Karaoke esté activada, el sonido se emitirá como monofónico. • La función de Karaoke - AIWA XH-A1000 | Operating Instructions - Page 63
actual. Cada pista o disco reservado se borra al finalizar su reproducción. Emplee el control remoto. 1 Presione CD e inserte los discos. 2 Pulse PRGM una vez. Después de desplazarse "CD KARAOKE" por el visualizador, aparece "K-P00". 5 Presione d para iniciar la reproducción. Una vez reproducida - AIWA XH-A1000 | Operating Instructions - Page 64
RELOJ Y TEMPORIZADOR KARAOKE RELOJ Y TEMPORIZADOR AJUSTE DEL RELOJ AJUSTE DEL TEMPORIZADOR DE APAGADO CLOCK s la unidad para que se apague automáticamente a una hora especificada. 1 Presione SLEEP en el control remoto. SLEEP 2 Antes de 4 segundos, gire MULTI JOG para determinar la hora y los - AIWA XH-A1000 | Operating Instructions - Page 65
para seleccionar una fuente. 2 Presione TIMER una vez para que aparezca en el visualizador. La hora y el nombre de la fuente de audio parpadearán alternativamente. Al llegar la hora de encendido del temporizador, la unidad se encenderá y comenzará a reproducir la fuente seleccionada. Para comprobar - AIWA XH-A1000 | Operating Instructions - Page 66
GENERAL RELOJ Y TEMPORIZADOR GRABACIÓN CON TEMPORIZADOR La grabación con temporizador es aplicable solamente para las fuentes TUNER, VIDEO1/2/3 y AUX/PHONO/5.1CH (con temporizador externo). Presione TUNER/BAND, VIDEO1/2/3 o AUX/PHONO/5.1CH para seleccionar una fuente, y presione TIMER varias veces - AIWA XH-A1000 | Operating Instructions - Page 67
-A1000 armónica total 0,15 % (100 W, 100 Hz, 6 ohmios, DIN AUDIO/Frontal) Entradas AUX: 310 mV PHONO: 400 mV VIDEO1, VIDEO2, VIDEO3: DIGITAL OUT (OPTICAL) SPEAKERS: LOW + SUB WOOFER 6 ohmios, bajo HIGH 8 ohmios, alto SURROUND SPEAKERS: aceptan altavoces de 8 - 16 ohmios CENTER SPEAKER - AIWA XH-A1000 | Operating Instructions - Page 68
límites de dispositivo digital de Clase B, según la Parte 15 de las Normas la unidad no funciona como se describe en este manual de instrucciones, consulte la siguiente guía. GENERAL No se oye en estéreo. • ¿Está activada la función de Karaoke? (b página 26) Aparece una indicación errónea o se ha - AIWA XH-A1000 | Operating Instructions - Page 69
XH-A1000 CORRECTION Please read the incorrect description in the Operating Instructions as follows. Page 21 AI EDIT RECORDING WRONG 6 Press q REC/REC MUTE to start recording. RIGHT 6 Press qREC/REC MUTE and then press c /d within 2 seconds - AIWA XH-A1000 | Operating Instructions - Page 70
NO USER-SERVICEABLE PARTS INSIDE. REFER SERVICING TO QUALIFIED SERVICE PERSONNEL." présence d'instructions d'utilisation (et votre revendeur Aiwa en cas de problème. N° de modèle CX-A1000 SX-WA1000 6 Chariots et supports - Lorsque l'appareil est placé ou installé sur un support ou dans un chariot - AIWA XH-A1000 | Operating Instructions - Page 71
l'appareil conformément aux instructions précisées dans le TELECOMMANDE 9 AVANT LA MISE EN SERVICE 9 SON REGLAGES AUDIO 11 EGALISEUR GRAPHIQUE 12 DSP SURROUND LE SON SPATIAL DOLBY DIGITAL 25 F KARAOKE MIXAGE DU MICROPHONE 26 PROGRAMMATION D'UN CD KARAOKE 28 HORLOGE ET PROGRAMMATEUR - AIWA XH-A1000 | Operating Instructions - Page 72
LA CHAINE ET DES ACCESSOIRES XH-A1000 Récepteur à cassette stéréo et disques compacts CX-A1000 Haut-parleurs frontaux SX- à l'appareil principal. 1 Branchez le câble de haut-parleur rayé de blanc sur la borne SPEAKERS LOW FREQ R 0 et le câble noir sur la borne 9. SIPMEPA:K6EΩR Enroulez l'extrémit - AIWA XH-A1000 | Operating Instructions - Page 73
borne SPEAKERS HIGH FREQ L et un autre câble de haut-parleur sur les bornes SPEAKERS LOW FREQ . Pour placer l'antenne AM sur un support Fixez la griffe dans la fente. POSITIONNEMENT Antenne AM 6 Raccordez les autres appareils. Certains appareils audio et vidéo (lecteur LD, lecteur MD, lecteur DVD - AIWA XH-A1000 | Operating Instructions - Page 74
SIPMEPA:K6EΩR SPEAKERS ou des dysfonctionnements AUDIO R à l'aide du câble audio. 6 FRANÇAIS • Si la prise CD DIGITAL OUT (OPTICAL) n'est pas utilisée, fixez le capuchon antipoussière a. Prises PHONO IN Vous pouvez raccorder une platine à disques via ces prises. Utilisez une platine à disques Aiwa - AIWA XH-A1000 | Operating Instructions - Page 75
/DVD/MD MONITOR vers la prise d'entrée numérique CX-A1000 (arrière) MONITOR/ VIDEO2/LD/TV VIDEO1/DVD VIDEO OUT CD DIGITAL OUT (OPTICAL) PHONO IN AUX IN Téléviseur vers la prise d'entrée vidéo F o vers les prises de sortie audio CX-A1000 (avant) CCaammécsocrodpeer vers les prises de sortie - AIWA XH-A1000 | Operating Instructions - Page 76
SELECTION DE SOURCES AUDIO/VIDEO EXTERNES RACCORDEMENT D'UN LECTEUR DVD AUX/PHONO/5.1CH VIDEO disques connectée ne peut être ajusté. Les prises 5.1CH INPUT de cette unité supportent le système DOLBY DIGITAL SURROUND (voir page 25). Raccordez un lecteur DVD aux prises de sortie 5.1ch de cette - AIWA XH-A1000 | Operating Instructions - Page 77
R6 (AA). AVANT LA MISE EN SERVICE FL DISPLAY TFouuncchtieosnde fbountctotinosn Quand faut-il les piles. Utilisation de la télécommande Les instructions présentées dans ce mode d'emploi mettre l'appareil hors tension Appuyez sur POWER. Guide lumineux Chaque fois que vous appuyez sur POWER - AIWA XH-A1000 | Operating Instructions - Page 78
pendant 10 minutes ou s'il n'y a pas d'entrée audio d'aucun des appareils externes raccordés pendant 10 minutes lorsque VIDEO1 une superbe reproduction sonore exempte de distorsions. SYSTEME D'EXTREMES-GRAVES INTEGRE Le système d'extr d'extrêmes-graves intégré AIWA intègre un hautparleur d'extrêmes - AIWA XH-A1000 | Operating Instructions - Page 79
AUDIO T-BASS BBE PHONES VOLUME MANUAL SELECT T-BASS VOL / SYSTEME BBE Le système BBE renforce la clarté des sons de haute fréquence. Il enrichit également la fonction karaok . • Le niveau DOLBY PRO LOGIC (page 24) et DOLBY DIGITAL SURROUND (page 25) des haut-parleurs avant est également modifié. - AIWA XH-A1000 | Operating Instructions - Page 80
EGALISEUR GRAPHIQUE SELECTION MANUELLE D'UNE NOUVELLE COURBE D'EGALISATION SELECTION DE LA COURBE D'EGALISATION PROGRAMMEE Cet appareil fournit les cinq courbes d'égalisation différentes suivantes. ROCK: Son puissant renforçant les aiguës et les graves. POP: Présence accrue de la partie vocale et - AIWA XH-A1000 | Operating Instructions - Page 81
secondes, tournez MULTI JOG pour sélectionner un numéro de M1 à M5. MANUAL SELECT f,g 1 Appuyez sur SURROUND. Le mode en cours s'affiche. 2 Dans de 2 secondes. • Le niveau DOLBY PRO LOGIC (page 23) et DOLBY DIGITAL SURROUND (page 25) des haut-parleurs spatiaux est également modifié. REMARQUE Le mode - AIWA XH-A1000 | Operating Instructions - Page 82
stéréo, 1 s'affiche. 1 Pour restaurer la réception stéréo, appuyez sur MONO TUNER de façon à ce que l'indication "MONO" disparaisse et que "STEREO" s'affiche pendant 2 secondes. Pour changer l'intervalle de syntonisation AM L'intervalle de syntonisation AM est réglé par défaut sur 10 kHz/ incrément - AIWA XH-A1000 | Operating Instructions - Page 83
RECEPTION RADIO PRESELECTION DE STATIONS SYNTONISATION D'UN NUMERO DE PRESELECTION Utilisez la télécommande pour sélectionner directement un numéro de présélection. TUNER/ BAND a f,g TUNER/ BAND f,g a L'appareil peut mémoriser un total de 32 stations présélectionnées pour toutes les bandes. - AIWA XH-A1000 | Operating Instructions - Page 84
LECTURE D'UNE CASSETTE OPERATIONS DE BASE REV MODE DOLBY NR zTAPE OPEN/ CLOSE PClastesaeutteà ctraasysette TAPE a s f,g jl 1 Appuyez sur DOLBY NR pour activer ou désactiver la fonction Dolby NR en fonction de la cassette en lecture. hNR Pour les cassettes enregistrées en DOLBY NR, activez hNR. - AIWA XH-A1000 | Operating Instructions - Page 85
LECTURE DE CD LECTURE D'UNE CASSETTE LECTURE DE CD OPERATIONS DE BASE CHARGEMENT DE DISQUES CD DISC CHANGE zCD OPEN /CLOSE Appuyez sur CD et appuyez ensuite sur zCD OPEN/ CLOSE pour ouvrir le compartiment à disques. Placez le(s) disque(s) avec la face imprimée vers le haut. Pour placer un ou - AIWA XH-A1000 | Operating Instructions - Page 86
Pour démarrer la lecture alors que l'appareil est hors tension (fonction de lecture directe) Appuyez sur CD. L'appareil se met sous tension la lecture du (des) disque(s) introduit(s) démarre. Si vous appuyez sur zCD OPEN/CLOSE l'appareil se met également sous tension et le compartiment à disques s' - AIWA XH-A1000 | Operating Instructions - Page 87
et la ligne de PRGM apparaissent dans la fenêtre d'affichage. PRGM • Si vous appuyez sur PRGM à l'étape 1, l'appareil passe en mode CD KARAOKE PROGRAM (page 28). 2 Appuyez sur DISC DIRECT PLAY et appuyez ensuite sur les touches numériques 1-3 dans les 3 secondes pour sélectionner un disque. Passez - AIWA XH-A1000 | Operating Instructions - Page 88
des touches de fonction et préparez la source à enregistrer. Pour enregistrer au départ de CD, appuyez sur CD et introduisez le(s) disques(s). Pour enregistre une é est TUNER, VIDEO1/2/3 ou un appareil externe raccordé aux prises AUDIO IN à l'arrière ou à l'avant.) Pour reprendre l'enregistrement - AIWA XH-A1000 | Operating Instructions - Page 89
ENREGISTREMENT PAR MONTAGE INTELLIGENT CD EDIT/ CHECK 0-9,+10 DISC DIRECT PLAY q CD c/d f,g s La fonction d'enregistrement par montage intelligent vous permet d'enregistrer des CD sans vous inquiéter de la longueur de bande disponible et de la durée des plages. Lorsqu'un CD est introduit, l' - AIWA XH-A1000 | Operating Instructions - Page 90
ENREGISTREMENT PAR MONTAGE PROGRAMME CD EDIT/ CHECK 0-9,+10 DISC DIRECT PLAY q CD c/d f,g s La fonction d'enregistrement par montage programmé permet de programmer les plages tout en contrôlant la durée restante sur chaque face de la cassette lorsque les plages sont programmées. REMARQUE La - AIWA XH-A1000 | Operating Instructions - Page 91
indépendant des cinq canaux audio permet à l'auditeur de vivre de toutes parts afin de faire la cassette vidéo, etc., supportent H. Pour réenregistrer sur cette NIVEAU DES HAUT-PARLEURS DOLBY PRO LOGIC MANUAL SELECT h PRO LOGIC f,g F indication "PHANTOM" ou "3 STEREO" s'affiche, appuyez plusieurs - AIWA XH-A1000 | Operating Instructions - Page 92
-parleurs avant gauche et droit, voir page 11. 4 Appuyez de nouveau sur MANUAL SELECT pour arrêter la génération du signal sonore. REMARQUE • Si le LOGIC est changé, celui des systèmes DSP SURROUND (page 13) et DOLBY DIGITAL SURROUND (page 25) est également changé. • Pendant que "S-R" ou "S-L" est - AIWA XH-A1000 | Operating Instructions - Page 93
le mode PHANTOM ou 3 STEREO Appuyez plusieurs fois de DIGITAL AUX/ PHONO/ 5.1CH VIDEO 1/2/3 f,g MANUAL SELECT supporte le DOLBY DIGITAL SURROUND. • La fonction est commutée de 5.1CH à AUX lorsque: - le casque d'écoute est branché; - le système DSP SURROUND ou DOLBY PRO LOGIC, ou la fonction karaok - AIWA XH-A1000 | Operating Instructions - Page 94
DU MICROPHONE TFouuncchteiosn dbeuftotonncstion VOLUME MIC 1/2 MIC ECHO KARAOKE Deux microphones (non fournis) peuvent être raccordés éviter les bruits de hurlement. Pour plus de détails, consultez votre revendeur Aiwa. 2 Appuyez sur l'une des touches de fonction pour sélectionner la source à - AIWA XH-A1000 | Operating Instructions - Page 95
la partie vocale enregistrée à gauche ou à droite du son • Lorsque la fonction karaoké est activée, le son est diffusé en mode monaural. • Lorsque la fonction La voix du chanteur ne s'atténue que lorsqu'il y a une entrée audio via un microphone. 3 Multiplex Seul le son du canal gauche est diffusé - AIWA XH-A1000 | Operating Instructions - Page 96
ès qu'elle a été reproduite. Utilisez la télécommande. 1 Appuyez sur CD et introduisez le(s) disque(s). 2 Appuyez une fois sur PRGM. Après que "CD KARAOKE" a défilé dans la fenêtre d'affichage, "K-P00" apparaît. 5 Appuyez sur d pour démarrer la lecture. Après qu'une plage a été reproduite, elle est - AIWA XH-A1000 | Operating Instructions - Page 97
HORLOGE ET PROGRAMMATEUR KARAOKE HORLOGE ET PROGRAMMATEUR REGLAGE DE L'HORLOGE REGLAGE DU PROGRAMMATEUR D'EXTINCTION s a MULTI JOG ENTER CLOCK f,g CLOCK f,g MULTI a JOG f,g SLEEP f,g Lorsque l'horloge est réglée, le ":" entre les - AIWA XH-A1000 | Operating Instructions - Page 98
lectionner une source. 2 Appuyez une fois sur TIMER de façon à ce que l'indication apparaisse dans la fenêtre d'affichage. L'heure et la source audio clignotent alternativement. 5 Réglez le volume. Le son de la source sera diffusé au niveau de volume réglé à cette étape lorsque l'appareil sera mis - AIWA XH-A1000 | Operating Instructions - Page 99
• Vous ne pouvez pas utiliser la fonction de programmateur pour enregistrer au départ d'un CD. • Vous pouvez vérifier le réglage du programmateur en d'une cassette de nettoyage. Pour plus de détails, reportez-vous aux instructions de la cassette de nettoyage. Pour démagnétiser les têtes magnétiques - AIWA XH-A1000 | Operating Instructions - Page 100
Appareil principal CX-A1000 Syntoniseur FM Plage AUDIO/avant) Entrées AUX: 310 mV PHONO: 400 mV VIDEO1, VIDEO2, VIDEO3: 310mV 5.1CH INPUT (réglable) FRONT: 300 mV SURROUND: 300 mV CENTER: 600 mV SUB WOOFER: 300 mV MIC 1, MIC 2: 1,4 mV (20 kohms) CD DIGITAL OUT (OPTICAL) SPEAKERS - AIWA XH-A1000 | Operating Instructions - Page 101
d'alimentation et rebranchez-le ensuite. Exécutez ensuite l'étape 2. GUIDE DE DEPANNAGE Si l'appareil ne fonctionne pas comme décrit dans le pr -il déconnecté ? Le son n'est pas diffusé en stéréo. • La fonction karaoké est-elle activée ? (b page 26) Un affichage erroné ou un dysfonctionnement se
-
 1
1 -
 2
2 -
 3
3 -
 4
4 -
 5
5 -
 6
6 -
 7
7 -
8
-
9
-
10
-
11
-
12
-
13
-
14
-
15
-
16
-
17
-
18
-
19
-
20
-
21
-
22
-
23
-
24
-
25
-
26
-
27
-
28
-
29
-
30
-
31
-
32
-
33
-
34
-
35
-
36
-
37
-
38
-
39
-
40
-
41
-
42
-
43
-
44
-
45
-
46
-
47
-
48
-
49
-
50
-
51
-
52
-
53
-
54
-
55
-
56
-
57
-
58
-
59
-
60
-
61
-
62
-
63
-
64
-
65
-
66
-
67
-
68
-
69
-
70
-
71
-
72
-
73
-
74
-
75
-
76
-
77
-
78
-
79
-
80
-
81
-
82
-
83
-
84
-
85
-
86
-
87
-
88
-
89
-
90
-
91
-
92
-
93
-
94
-
95
-
96
-
97
-
98
-
99
-
100
-
101
 |
 |
E
(Español)
COMPACT DISC STEREO SYSTEM
SISTEMA ESTEREO CON REPRODUCTOR DE DISCOS COMPACTOS
CHAINE STEREO AVEC LECTEUR DE DISQUES COMPACTS
U
En
(English)
8A-MTM-903-11
000223BKY-Y-M
F
(Français)
OPERATING INSTRUCTIONS
MANUAL DE INSTRUCCIONES
MODE D’EMPLOI
XH-A1000
For assistance and information
call toll free 1-800-BUY-AIWA
(United States and Puerto Rico)