AIWA XH-A1000 Operating Instructions - Page 7
Connecting Other, Equipments - digital
 |
View all AIWA XH-A1000 manuals
Add to My Manuals
Save this manual to your list of manuals |
Page 7 highlights
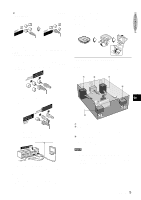
To mount the surround speakers on a wall Use wall mounting screws (not supplied). Select a spot that will hold the weight of the speakers and carefully mount the surround speakers so that they are firmly secured. Aiwa disclaims any responsibility for injury to persons or other accidents caused by not fitting the surround speakers properly or if the place of the installation is not suitable. NOTE • Be sure to connect the speaker cords correctly. Contact of bare conductor with other jacks or other conductors may cause short circuits in SPEAKERS terminals SIPMEPA:K6EΩR or malfunctions. • Do not leave objects generating magnetism, such as credit cards, near the speakers, as the objects may be damaged. • Do not bring the FM antenna near metal objects or curtain rails. • Do not bring the AM antenna near other optional equipment, the stereo system itself, the AC cord or speaker cords, since noise will be picked up. • Do not unwind the AM antenna wire. CONNECTING AN OUTDOOR ANTENNA For better FM reception, use of an outdoor antenna is recommended. Connect the outdoor antenna to FM 75 Ω terminals. VIDEO2/LD/TV jacks A video equipment, an LD player or a cable TV, etc. can be connected to these jacks. • Use the audio cable and video cable commercially available. • To input signals from the connected equipment to this unit, connect the cables to VIDEO2/LD/TV IN jacks. To output signals from this unit to the connected equipment, connect the cables to VIDEO2/LD/TV OUT jacks. • Connect L (left) output of the connected equipment and AUDIO L of this unit, R (right) output and AUDIO R by the audio cable. VIDEO3 jacks A video equipment, a camcorder or a TV game, etc. can be connected to these jacks. Turn VOLUME to "0" before connecting equipment to VIDEO 3 jacks. • Use the audio cable and video cable commercially available. • Connect L (left) output of the connected equipment and AUDIO IN L of this unit, R (right) output and AUDIO IN R by the audio cable. • Connect Video output of the connected equipment and VIDEO IN of this unit by the video cable. REC OUT/AUDIO MONITOR jacks A recording equipment such as an MD recorder, a CD-R/RW recorder or a cassette deck, or the TV set etc. can be connected to these jacks. The sounds from the equipment connected to VIDEO1/DVD/MD or VIDEO2/LD/TV can be recorded or monitored as well. • Use the audio cable commercially available. • Connect L (left) output of the connected equipment and AUDIO L of this unit, R (right) output and AUDIO R by the audio cable. MONITOR/VIDEO OUT jacks The TV set, etc. can be connected to these jacks. The videos from the equipment connected to VIDEO1/DVD/MD or VIDEO2/LD/TV can be monitored. • Use the video cable commercially available. CD DIGITAL OUT (OPTICAL) jack A digital equipment such as an MD recorder, a DAT deck, a digital cassette deck or a digital amplifier, etc. can be connected to this jack. The digital signals from the CD player of this unit are output to the connected equipment. • Use the optical cable commercially available. • Before connecting an optical cable remove the dust cap a from CD DIGITAL OUT (OPTICAL) jack. CONNECTING OTHER EQUIPMENTS A video equipment, the TV set, an LD player, a DVD player or an MD player, etc. can be connected to this unit. VIDEO1/DVD/MD jacks A video equipment, a DVD player, or an MD player, etc. can be connected to these jacks. • Use the audio cable and video cable commercially available. • To input signals from the connected equipment to this unit, connect the cables to VIDEO1/DVD/MD IN jacks. To output signals from this unit to the connected equipment, connect the cables to VIDEO1/DVD/MD OUT jacks. • Connect L (left) output of the connected equipment and AUDIO L of this unit, R (right) output and AUDIO R by the audio cable. 6 ENGLISH • When CD DIGITAL OUT (OPTICAL) jack is not used, attach the dust cup a. PHONO IN jacks A turntable can be connected to these jacks. Use an Aiwa turntable equipped with a built-in equalizer amplifier. AUX IN jacks A playback equipment such as the TV set or an MD player, etc. can be connected to these jacks. • Use the audio cable and video cable commercially available. • Connect L (left) output of the connected equipment and AUDIO L of this unit, R (right) output and AUDIO R by the audio cable. NOTE The signals input through VIDEO 1 IN jack are output from VIDEO 2 OUT or MONITOR OUT. The signals input through VIDEO 2 IN jack are output from VIDEO 1 OUT or MONITOR OUT.
-
 1
1 -
 2
2 -
 3
3 -
 4
4 -
 5
5 -
 6
6 -
 7
7 -
 8
8 -
 9
9 -
 10
10 -
 11
11 -
 12
12 -
13
-
14
-
15
-
16
-
17
-
18
-
19
-
20
-
21
-
22
-
23
-
24
-
25
-
26
-
27
-
28
-
29
-
30
-
31
-
32
-
33
-
34
-
35
-
36
-
37
-
38
-
39
-
40
-
41
-
42
-
43
-
44
-
45
-
46
-
47
-
48
-
49
-
50
-
51
-
52
-
53
-
54
-
55
-
56
-
57
-
58
-
59
-
60
-
61
-
62
-
63
-
64
-
65
-
66
-
67
-
68
-
69
-
70
-
71
-
72
-
73
-
74
-
75
-
76
-
77
-
78
-
79
-
80
-
81
-
82
-
83
-
84
-
85
-
86
-
87
-
88
-
89
-
90
-
91
-
92
-
93
-
94
-
95
-
96
-
97
-
98
-
99
-
100
-
101
 |
 |
