ASRock 775XFire-RAID Quick Installation Guide - Page 18
connector - driver download
 |
View all ASRock 775XFire-RAID manuals
Add to My Manuals
Save this manual to your list of manuals |
Page 18 highlights
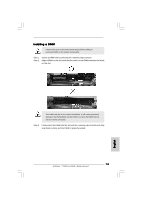
Radeon CrossFireTM Edition graphics card DMS connector Connect the DVI-DMS cable to DMS connector of the CrossFireTM Edition graphics card. Connect the DVI-DMS cable to the monitor connector. If you install two CrossFireTM Edition graphics cards to this motherboard, please connect one end of DVI-DMS cable to the monitor, another end to DMS of one of the CrossFireTM Edition graphics cards to PCIE1 slot (PCI Express x 16), and the other end to DVI of another CrossFireTM Edition graphics card to AGI Express slot (PCI Express x 4). If you install one CrossFireTM Edition graphics card and one compatible standard Radeon (CrossFireTM Ready) graphics card to this motherboard, please connect one end of DVI-DMS cable to the monitor, another end to DMS of the CrossFireTM Edition graphics card, and the other end to DVI of the compatible standard Radeon (CrossFireTM Ready) graphics card. Step 6. Power on your computer and boot into OS. Step 7. Remove the ATI driver if you have any VGA driver installed in your system. The Catalyst Uninstaller is an optional download. We recommend using this utility to uninstall any previously installed Catalyst drivers prior to installation. Please visit this website for the driver: http://support.ati.com/ics/support/DLRedirect.asp? fileIDExt=050553d40196ef109fff37cbb40aaf28&accountID=737&deptID=894 Step 8. Install the required drivers to your system. Please visit the websites below for installing the drivers that ATI recommends: A. ATI recommends Windows XP Service Pack 2 or higher to be installed (If you have Windows XP Service Pack 2 or higher installed in your system, there is no need to download it again): http://www.microsoft.com/windowsxp/sp2/default.mspx B. You must have Microsoft .NET Framework installed prior to downloading and installing the CATALYST Control Center: http://www.microsoft.com/downloads/details.aspx? FamilyId=262D25E3-F589-4842-8157-034D1E7CF3A3&displaylang=en Step 9. Restart your computer. English 18 ASRock 775XFire-RAID Motherboard
-
 1
1 -
2
-
3
-
4
-
5
-
6
-
7
-
8
-
9
-
10
-
11
-
12
-
 13
13 -
 14
14 -
 15
15 -
 16
16 -
 17
17 -
 18
18 -
 19
19 -
 20
20 -
 21
21 -
 22
22 -
 23
23 -
24
-
25
-
26
-
27
-
28
-
29
-
30
-
31
-
32
-
33
-
34
-
35
-
36
-
37
-
38
-
39
-
40
-
41
-
42
-
43
-
44
-
45
-
46
-
47
-
48
-
49
-
50
-
51
-
52
-
53
-
54
-
55
-
56
-
57
-
58
-
59
-
60
-
61
-
62
-
63
-
64
-
65
-
66
-
67
-
68
-
69
-
70
-
71
-
72
-
73
-
74
-
75
-
76
-
77
-
78
-
79
-
80
-
81
-
82
-
83
-
84
-
85
-
86
-
87
-
88
-
89
-
90
-
91
-
92
-
93
-
94
-
95
-
96
-
97
-
98
-
99
-
100
-
101
-
102
-
103
-
104
-
105
-
106
-
107
-
108
-
109
-
110
-
111
-
112
-
113
-
114
-
115
-
116
-
117
-
118
-
119
-
120
-
121
-
122
-
123
-
124
-
125
-
126
-
127
-
128
-
129
-
130
-
131
-
132
-
133
-
134
-
135
-
136
-
137
-
138
-
139
-
140
-
141
-
142
-
143
-
144
-
145
-
146
-
147
-
148
-
149
-
150
-
151
-
152
-
153
-
154
-
155
-
156
-
157
-
158
-
159
-
160
-
161
-
162
-
163
 |
 |
