ASRock 939Dual-VSTA RAID Installation Guide - Page 11
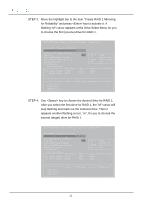
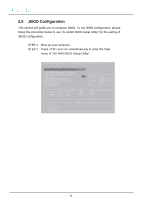
After you select the first dirve for RAID 1, the M cursor will
 |
View all ASRock 939Dual-VSTA manuals
Add to My Manuals
Save this manual to your list of manuals |
Page 11 highlights
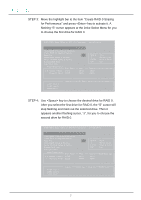
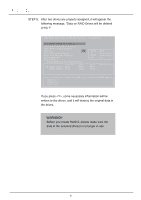
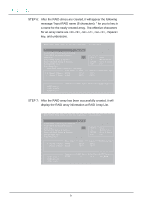
STEP 3: Move the highlight bar to the item "Create RAID 1 Mirroring for Reliability" and press key to activate it. A flashing "M" cursor appears at the Drive Select Menu for you to choose the first (source) drive for RAID 1. RAID BIOS Setup Utility (c) 2003 ALi Corporation www.ali.com.tw Create RAID 0 Striping for Performance Create RAID 1 Mirroring for Reliability Create JBOD for integrated Capacity Stripe Size Delete RAID Setting & Partition Delete All RAID Setting & Partition Rebuild RAID Array Select Boot Drive Select Mirror Drives Drive Model M B Channel 1 Master : XXXX Channel 2 Master : XXXX 16K Mode XXXX XXXX SPACE ENTER ESC : Select : Moving Cursor : Select & Finish : Exit Capacity XXXX XXXX RAID Array/Type RAID Array A RAID Array B RAID Array C Capacity : : : RAID Type Stripe Size RAID Name STEP 4: Use key to choose the desired drive for RAID 1. After you select the first dirve for RAID 1, the "M" cursor will stop flashing and mark out the selected drive. Then it appears another flashing cursor, "m", for you to choose the second (target) drive for RAID 1. RAID BIOS Setup Utility (c) 2003 ALi Corporation www.ali.com.tw Create RAID 0 Striping for Performance Create RAID 1 Mirroring for Reliability Create JBOD for integrated Capacity Stripe Size Delete RAID Setting & Partition Delete All RAID Setting & Partition Rebuild RAID Array Select Boot Drive Select Mirror Drives Drive Model M B Channel 1 Master : XXXX m Channel 2 Master : XXXX 16K Mode XXXX XXXX SPACE ENTER ESC : Select : Moving Cursor : Select & Finish : Exit Capacity XXXX XXXX RAID Array/Type RAID Array A RAID Array B RAID Array C Capacity : : : RAID Type Stripe Size RAID Name 11
-
 1
1 -
2
-
3
-
4
-
5
-
 6
6 -
 7
7 -
 8
8 -
 9
9 -
 10
10 -
 11
11 -
 12
12 -
 13
13 -
 14
14 -
 15
15 -
 16
16 -
17
-
18
-
19
-
20
-
21
-
22
 |
 |
