ASRock ALiveXFire-eSATA2 R3.0 Quick Installation Guide - Page 31
Hot Plug and Hot Swap Functions for SA
 |
View all ASRock ALiveXFire-eSATA2 R3.0 manuals
Add to My Manuals
Save this manual to your list of manuals |
Page 31 highlights
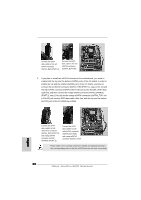
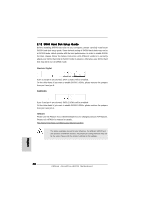
2.13 Serial ATA (SATA) / Serial ATAII (SATAII) Hard Disks Installation This motherboard adopts ATITM SB600 south bridge chipset that supports Serial ATA (SATA) / Serial ATAII (SATAII) hard disks and RAID (RAID 0, RAID 1, and RAID 10) functions. You may install SATA / SATAII hard disks on this motherboard for internal storage devices. This section will guide you to install the SATA / SATAII hard disks. STEP 1: Install the SATA / SATAII hard disks into the drive bays of your chassis. STEP 2: Connect the SATA power cable to the SATA / SATAII hard disk. STEP 3: Connect one end of the SATA data cable to the motherboard's SATAII connector. STEP 4: Connect the other end of the SATA data cable to the SATA / SATAII hard disk. 1. If you plan to use RAID 0 or RAID 1 function, you need to install at least 2 SATA / SATAII hard disks. If you plan to use RAID 10 function, you need to install 4 SATA / SATAII hard disks. 2. It is recommended to build RAID 0, RAID 1 or RAID 10 on internal SATA/ SATAII ports. In other words, if SATAII_RED (PORT 1) and SATAII_ORANGE (PORT 2) are used for eSATAII ports, please build RAID on SATAII_BLUE (PORT 4) and SATAII_BLACK (PORT 3). 3. For OS installation on SATA / SATAII HDDs, please refer to page 32 to 37 for details. If you install a new SATA / SATAII HDD just for data storage purpose, and your SATA / SATAII mode is in RAID or AHCI mode, this empty SATA / SATAII HDD information will not appear in "Disk Management". You need to enter WebPAM to create JBOD first, which means, after you enter WebPAM, please click "Logical Drive View" "Create" "JBOD". After that, you can find the empty SATA / SATAII HDDs information in "Disk Management" and start to use it. (WebPAM is an utility for ATITM Windows RAID. Please refer to RAID Installation Guide in our support CD for detailed operation procedures.) 2.14 Hot Plug and Hot Swap Functions for SATA / SATAII HDDs and eSATAII Devices This motherboard supports Hot Plug and Hot Swap functions for SATA / SATAII / eSATAII Devices in RAID / AHCI mode. ATITM SB600 south bridge chipset provides hardware support for Advanced Host controller Interface (AHCI), a new programming interface for SATA host controllers developed thru a joint industry effort. AHCI also provides usability enhancements such as Hot Plug. 31 ASRock ALiveXFire-eSATA2 Motherboard English
-
 1
1 -
2
-
3
-
4
-
5
-
6
-
7
-
8
-
9
-
10
-
11
-
12
-
13
-
14
-
15
-
16
-
17
-
18
-
19
-
20
-
21
-
22
-
23
-
24
-
25
-
 26
26 -
 27
27 -
 28
28 -
 29
29 -
 30
30 -
 31
31 -
 32
32 -
 33
33 -
 34
34 -
 35
35 -
 36
36 -
37
-
38
-
39
-
40
-
41
-
42
-
43
-
44
-
45
-
46
-
47
-
48
-
49
-
50
-
51
-
52
-
53
-
54
-
55
-
56
-
57
-
58
-
59
-
60
-
61
-
62
-
63
-
64
-
65
-
66
-
67
-
68
-
69
-
70
-
71
-
72
-
73
-
74
-
75
-
76
-
77
-
78
-
79
-
80
-
81
-
82
-
83
-
84
-
85
-
86
-
87
-
88
-
89
-
90
-
91
-
92
-
93
-
94
-
95
-
96
-
97
-
98
-
99
-
100
-
101
-
102
-
103
-
104
-
105
-
106
-
107
-
108
-
109
-
110
-
111
-
112
-
113
-
114
-
115
-
116
-
117
-
118
-
119
-
120
-
121
-
122
-
123
-
124
-
125
-
126
-
127
-
128
-
129
-
130
-
131
-
132
-
133
-
134
-
135
-
136
-
137
-
138
-
139
-
140
-
141
-
142
-
143
-
144
-
145
-
146
-
147
-
148
-
149
-
150
-
151
-
152
-
153
-
154
-
155
-
156
-
157
-
158
-
159
-
160
-
161
-
162
-
163
-
164
-
165
-
166
-
167
-
168
-
169
-
170
-
171
-
172
-
173
-
174
-
175
-
176
-
177
-
178
-
179
-
180
-
181
-
182
-
183
-
184
-
185
-
186
-
187
-
188
-
189
-
190
-
191
-
192
-
193
-
194
-
195
-
196
-
197
-
198
-
199
-
200
-
201
-
202
-
203
-
204
-
205
-
206
-
207
-
208
-
209
-
210
-
211
-
212
-
213
-
214
-
215
-
216
-
217
-
218
-
219
-
220
-
221
-
222
-
223
-
224
-
225
-
226
-
227
-
228
-
229
-
230
-
231
-
232
-
233
-
234
-
235
-
236
-
237
-
238
-
239
-
240
-
241
-
242
-
243
-
244
-
245
-
246
-
247
-
248
-
249
-
250
-
251
-
252
-
253
-
254
-
255
-
256
-
257
-
258
-
259
-
260
 |
 |
