ASRock H55iCafe Quick Installation Guide
ASRock H55iCafe Manual
 |
View all ASRock H55iCafe manuals
Add to My Manuals
Save this manual to your list of manuals |
ASRock H55iCafe manual content summary:
- ASRock H55iCafe | Quick Installation Guide - Page 1
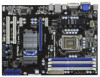
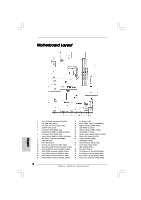
for backup purpose, without written consent of ASRock Inc. Products and corporate names appearing in this guide may or may not be registered trademarks or ASRock Website: http://www.asrock.com Published July 2010 Copyright©2010 ASRock INC. All rights reserved. 1 ASRock H55iCafe Motherboard English - ASRock H55iCafe | Quick Installation Guide - Page 2
Connector (ATXPWR1) 25 Chassis Speaker Header 8 16Mb SPI Flash (SPEAKER 1, White) 9 Intel H55 Chipset 26 Infrared Module Header (IR1) 10 Chassis Fan Connector (CHA_FAN1) 27 Front Panel Fourth SATAII Connector (SATAII_4, Blue) 32 Power Fan Connector (PWR_FAN1) 2 ASRock H55iCafe Motherboard - ASRock H55iCafe | Quick Installation Guide - Page 3
"Stereo". Click "Device advanced settings", choose "Make front and rear output devices playbacks two different audio streams simultaneously", and click "ok". Then reboot your system. 3 ASRock H55iCafe Motherboard English - ASRock H55iCafe | Quick Installation Guide - Page 4
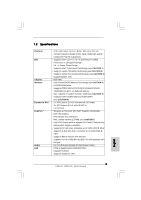
specific information about the model you are using. www.asrock.com/support/index.asp 1.1 Package Contents ASRock H55iCafe Motherboard (ATX Form Factor: 12.0-in x 8.8-in, 30.5 cm x 22.4 cm) ASRock H55iCafe Quick Installation Guide ASRock H55iCafe Support CD 2 x Serial ATA (SATA) Data Cables (Optional - ASRock H55iCafe | Quick Installation Guide - Page 5
up to 2048x1536 @ 75Hz - Supports HDCP function with DVI port - Supports Full HD 1080p Blu-ray (BD) / HD-DVD playback with DVI port - 5.1 CH HD Audio (Realtek ALC662 Audio Codec) - PCIE x1 Gigabit LAN 10/100/1000 Mb/s - Realtek RTL8111C - Supports Wake-On-LAN English 5 ASRock H55iCafe Motherboard - ASRock H55iCafe | Quick Installation Guide - Page 6
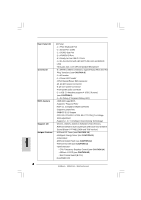
Saver (see CAUTION 11) - Instant Boot - ASRock Instant Flash (see CAUTION 12) - ASRock OC DNA (see CAUTION 13) - Hybrid Booster: - CPU Frequency Stepless Control (see CAUTION 14) - ASRock U-COP (see CAUTION 15) - Boot Failure Guard (B.F.G.) - Good Night LED English 6 ASRock H55iCafe Motherboard - ASRock H55iCafe | Quick Installation Guide - Page 7
is a certain risk involved with overclocking, including adjusting the setting in the BIOS, applying Untied Overclocking Technology, or using the thirdparty overclocking tools. Overclocking may are not responsible for possible damage caused by overclocking. English 7 ASRock H55iCafe Motherboard - ASRock H55iCafe | Quick Installation Guide - Page 8
Disk Setup Guide" on page 28 of "User Manual" in the support CD to BIOS only in a few clicks without preparing an additional floppy diskette or other complicated flash utility. Please be noted that the USB flash drive or hard drive must use FAT32/16/12 file system. 8 ASRock H55iCafe Motherboard - ASRock H55iCafe | Quick Installation Guide - Page 9
system shall be under 1.00W in off mode condition. To meet EuP standard, an EuP ready motherboard and an EuP ready power supply are required. According to Intel's suggestion, the EuP ready power checking with the power supply manufacturer for more details. 9 ASRock H55iCafe Motherboard English - ASRock H55iCafe | Quick Installation Guide - Page 10
placing screws into the screw holes to secure the motherboard to the chassis, please do not over-tighten the screws! Doing so may damage the motherboard. 2.1 CPU Installation For the installation of Intel 1156 . Otherwise, the CPU will be seriously damaged. 10 ASRock H55iCafe Motherboard English - ASRock H55iCafe | Quick Installation Guide - Page 11
tab to handle and avoid kicking off the PnP cap. 2. This cap must be placed if returning the motherboard for after service. Step 3. Insert the 1156-Pin CPU: Step 3-1. Hold the CPU by the edges where are marked CPU with the two alignment keys of the socket. 11 ASRock H55iCafe Motherboard English - ASRock H55iCafe | Quick Installation Guide - Page 12
refer to the instruction manuals of your CPU motherboard. Step 5. Connect fan header with the CPU fan connector on the motherboard. Step 6. Secure excess cable with tie-wrap to ensure cable does not interfere with fan operation or contact other components. English 12 ASRock H55iCafe Motherboard - ASRock H55iCafe | Quick Installation Guide - Page 13
Modules (DIMM) This motherboard provides four 240-pin DDR3 (Double Data Rate 3) DIMM slots, and supports Dual Channel Memory motherboard and DIMM may be damaged. 4. Please install the memory module into the white slot (DDR3_B1) for the first priority. English 13 ASRock H55iCafe Motherboard - ASRock H55iCafe | Quick Installation Guide - Page 14
cause permanent damage to the motherboard and the DIMM if you force the DIMM into the slot at incorrect orientation. Step 3. Firmly insert the DIMM into the slot until the retaining clips at both ends fully snap back in place and the DIMM is properly seated. 14 ASRock H55iCafe Motherboard English - ASRock H55iCafe | Quick Installation Guide - Page 15
for the card before you start the installation. Step 2. Remove the system unit cover (if your motherboard is already installed in a chassis). Step 3. Remove the bracket facing the slot that you intend the chassis with screws. Step 6. Replace the system cover. 15 ASRock H55iCafe Motherboard English - ASRock H55iCafe | Quick Installation Guide - Page 16
pin3 on CLRCMOS1 for 5 seconds. However, please do not clear the CMOS right after you update the BIOS. If you need to clear the CMOS when you just finish updating the BIOS, you must boot up the system first, and then shut it down before you do the clear-CMOS action. 16 ASRock H55iCafe Motherboard - ASRock H55iCafe | Quick Installation Guide - Page 17
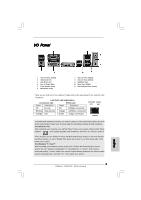
on the I/O panel, there are two USB 2.0 headers on this motherboard. Each USB 2.0 header can support two USB 2.0 ports. Infrared Module Header (5-pin IR1) (see p.2 No. 26) This header supports an optional wireless transmitting and receiving infrared module. English 17 ASRock H55iCafe Motherboard - ASRock H55iCafe | Quick Installation Guide - Page 18
supports Jack Sensing, but the panel wire on the chassis must support HDA to function correctly. Please follow the instruction in our manual and chassis manual connect them for AC'97 audio panel. E. Enter BIOS Setup Utility. Enter Advanced Settings, and then select ASRock H55iCafe Motherboard - ASRock H55iCafe | Quick Installation Guide - Page 19
to this connector and match the black wire to the ground pin. Though this motherboard provides 4-Pin CPU fan (Quiet Fan) support, the 3-Pin CPU fan still can work successfully even without the fan speed control 13. 20-Pin ATX Power Supply Installation 1 ASRock H55iCafe Motherboard 13 19 English - ASRock H55iCafe | Quick Installation Guide - Page 20
see p.2 No. 1) 4 1 Please connect an ATX 12V power supply to this connector. Though this motherboard provides 8-pin ATX 12V power connector, it can still work if you adopt a traditional 4-pin ATX 5. 8 5 4-Pin ATX 12V Power Supply Installation 4 1 English 20 ASRock H55iCafe Motherboard - ASRock H55iCafe | Quick Installation Guide - Page 21
information, which makes troubleshooting even easier. Please BIOS into memory. Leaves all RAM below 1MB Read-Write including E000 and F000 shadow areas but closing SMRAM. Restore CPUID value back into register. Give control to BIOS POST (ExecutePOSTKernel). English 21 ASRock H55iCafe Motherboard - ASRock H55iCafe | Quick Installation Guide - Page 22
BIOS modules on POST entry and GPNV area. Initialized CMOS as mentioned in the Kernel Variable "wCMOSFlags." Check CMOS diagnostic byte to determine if battery power is OK and CMOS checksum is OK. Verify CMOS checksum manually modules for ADM. Activate ADM module. ASRock H55iCafe Motherboard English - ASRock H55iCafe | Quick Installation Guide - Page 23
response for error. 87 Execute BIOS setup if needed / requested. 8C Late POST initialization of chipset registers. 8D Build ACPI tables (if ACPI is supported) 8E Program the peripheral parameters. 00 Passes control to OS Loader (typically INT19h). English 23 ASRock H55iCafe Motherboard - ASRock H55iCafe | Quick Installation Guide - Page 24
HDDs without NCQ function (IDE mode) STEP 1: Set up BIOS. A. Enter BIOS SETUP UTILITY Advanced screen Storage Configuration. B. Set the option "SATA Operation Mode" to [IDE]. STEP 2: Install Windows® 7 / 7 64-bit / VistaTM / VistaTM 64-bit OS on your system. 24 ASRock H55iCafe Motherboard English - ASRock H55iCafe | Quick Installation Guide - Page 25
Technology This motherboard supports Untied Overclocking Technology, which means during overclocking, FSB enjoys better margin due to fixed PCI / PCIE buses. Before you enable Untied Overclocking function, please enter "Overclock Mode" option of BIOS setup to set the selection from [Auto] to [Manual - ASRock H55iCafe | Quick Installation Guide - Page 26
detailed information about BIOS Setup, please refer to the User Manual (PDF file) contained in the Support CD. 4. Software Support CD information This motherboard supports various Microsoft® EXE" from the BIN folder in the Support CD to display the menus. 26 ASRock H55iCafe Motherboard English - ASRock H55iCafe | Quick Installation Guide - Page 27
27 ASRock H55iCafe Motherboard - ASRock H55iCafe | Quick Installation Guide - Page 28
® ® ® ® ® ® ® 28 ASRock H55iCafe Motherboard - ASRock H55iCafe | Quick Installation Guide - Page 29
29 ASRock H55iCafe Motherboard - ASRock H55iCafe | Quick Installation Guide - Page 30
® 30 ASRock H55iCafe Motherboard - ASRock H55iCafe | Quick Installation Guide - Page 31
® ® ® " " ® ® ® " " " " ® 31 ASRock H55iCafe Motherboard - ASRock H55iCafe | Quick Installation Guide - Page 32
® 32 ASRock H55iCafe Motherboard - ASRock H55iCafe | Quick Installation Guide - Page 33
33 ASRock H55iCafe Motherboard - ASRock H55iCafe | Quick Installation Guide - Page 34
Pin1 Pin1 34 ASRock H55iCafe Motherboard - ASRock H55iCafe | Quick Installation Guide - Page 35
35 ASRock H55iCafe Motherboard - ASRock H55iCafe | Quick Installation Guide - Page 36
- 36 ASRock H55iCafe Motherboard - ASRock H55iCafe | Quick Installation Guide - Page 37
37 ASRock H55iCafe Motherboard - ASRock H55iCafe | Quick Installation Guide - Page 38
38 ASRock H55iCafe Motherboard - ASRock H55iCafe | Quick Installation Guide - Page 39
"" "" "" "" "" "" 39 ASRock H55iCafe Motherboard - ASRock H55iCafe | Quick Installation Guide - Page 40
40 ASRock H55iCafe Motherboard SATAII_6 SATAII_4 SATAII_2 SATAII_5 SATAII_3 SATAII_1 - ASRock H55iCafe | Quick Installation Guide - Page 41
® ® ® ® " " " " " " ® " " " "" " 41 ASRock H55iCafe Motherboard - ASRock H55iCafe | Quick Installation Guide - Page 42
1 2 3 4 12 24 1 13 42 ASRock H55iCafe Motherboard - ASRock H55iCafe | Quick Installation Guide - Page 43
8 5 4 1 12 24 1 13 8 5 4 1 43 ASRock H55iCafe Motherboard - ASRock H55iCafe | Quick Installation Guide - Page 44
® ® ® ® ® ® 44 ASRock H55iCafe Motherboard - ASRock H55iCafe | Quick Installation Guide - Page 45
® ® ® ® 45 ASRock H55iCafe Motherboard - ASRock H55iCafe | Quick Installation Guide - Page 46
" " \\ " " 46 ASRock H55iCafe Motherboard - ASRock H55iCafe | Quick Installation Guide - Page 47
47 ASRock H55iCafe Motherboard - ASRock H55iCafe | Quick Installation Guide - Page 48
® ® ® ® ® ® ® 48 ASRock H55iCafe Motherboard - ASRock H55iCafe | Quick Installation Guide - Page 49
49 ASRock H55iCafe Motherboard - ASRock H55iCafe | Quick Installation Guide - Page 50
® ® 50 ASRock H55iCafe Motherboard - ASRock H55iCafe | Quick Installation Guide - Page 51
® ® ® ® ® ® ® ® ® 51 ASRock H55iCafe Motherboard - ASRock H55iCafe | Quick Installation Guide - Page 52
® 52 ASRock H55iCafe Motherboard - ASRock H55iCafe | Quick Installation Guide - Page 53
53 ASRock H55iCafe Motherboard - ASRock H55iCafe | Quick Installation Guide - Page 54
54 ASRock H55iCafe Motherboard - ASRock H55iCafe | Quick Installation Guide - Page 55
55 ASRock H55iCafe Motherboard - ASRock H55iCafe | Quick Installation Guide - Page 56
56 ASRock H55iCafe Motherboard - ASRock H55iCafe | Quick Installation Guide - Page 57
57 ASRock H55iCafe Motherboard - ASRock H55iCafe | Quick Installation Guide - Page 58
58 ASRock H55iCafe Motherboard - ASRock H55iCafe | Quick Installation Guide - Page 59
59 ASRock H55iCafe Motherboard - ASRock H55iCafe | Quick Installation Guide - Page 60
60 ASRock H55iCafe Motherboard SATAII_6 SATAII_4 SATAII_2 SATAII_5 SATAII_3 SATAII_1 - ASRock H55iCafe | Quick Installation Guide - Page 61
® ® ® ® ® 61 ASRock H55iCafe Motherboard - ASRock H55iCafe | Quick Installation Guide - Page 62
1 2 3 4 12 24 1 13 62 ASRock H55iCafe Motherboard - ASRock H55iCafe | Quick Installation Guide - Page 63
8 5 4 1 12 24 1 13 8 5 4 1 63 ASRock H55iCafe Motherboard - ASRock H55iCafe | Quick Installation Guide - Page 64
® ® ® ® ® ® ® ® ® ® ® 64 ASRock H55iCafe Motherboard - ASRock H55iCafe | Quick Installation Guide - Page 65
® ® ® ® ® 65 ASRock H55iCafe Motherboard
-
 1
1 -
 2
2 -
 3
3 -
 4
4 -
 5
5 -
 6
6 -
 7
7 -
8
-
9
-
10
-
11
-
12
-
13
-
14
-
15
-
16
-
17
-
18
-
19
-
20
-
21
-
22
-
23
-
24
-
25
-
26
-
27
-
28
-
29
-
30
-
31
-
32
-
33
-
34
-
35
-
36
-
37
-
38
-
39
-
40
-
41
-
42
-
43
-
44
-
45
-
46
-
47
-
48
-
49
-
50
-
51
-
52
-
53
-
54
-
55
-
56
-
57
-
58
-
59
-
60
-
61
-
62
-
63
-
64
-
65
 |
 |
1
ASRock
H55iCafe
Motherboard
English
English
English
English
English
Copyright Notice:
Copyright Notice:
Copyright Notice:
Copyright Notice:
Copyright Notice:
No part of this installation guide may be reproduced, transcribed, transmitted, or trans-
lated in any language, in any form or by any means, except duplication of documen-
tation by the purchaser for backup purpose, without written consent of ASRock Inc.
Products and corporate names appearing in this guide may or may not be registered
trademarks or copyrights of their respective companies, and are used only for identifica-
tion or explanation and to the owners’ benefit, without intent to infringe.
Disclaimer:
Disclaimer:
Disclaimer:
Disclaimer:
Disclaimer:
Specifications and information contained in this guide are furnished for informational
use only and subject to change without notice, and should not be constructed as a
commitment by ASRock. ASRock assumes no responsibility for any errors or omissions
that may appear in this guide.
With respect to the contents of this guide, ASRock does not provide warranty of any kind,
either expressed or implied, including but not limited to the implied warranties or
conditions of merchantability or fitness for a particular purpose. In no event shall
ASRock, its directors, officers, employees, or agents be liable for any indirect, special,
incidental, or consequential damages (including damages for loss of profits, loss of
business, loss of data, interruption of business and the like), even if ASRock has been
advised of the possibility of such damages arising from any defect or error in the guide
or product.
This device complies with Part 15 of the FCC Rules. Operation is subject to the
following two conditions:
(1)
this device may not cause harmful interference, and
(2)
this device must accept any interference received, including interference that
may cause undesired operation.
CALIFORNIA, USA ONLY
The Lithium battery adopted on this motherboard contains Perchlorate, a toxic
substance controlled in Perchlorate Best Management Practices (BMP) regulations
passed by the California Legislature. When you discard the Lithium battery in
California, USA, please follow the related regulations in advance.
“Perchlorate Material-special handling may apply, see
www
.dtsc.ca.gov/hazardouswa
ste/perchlorate”
ASRock Website: http://www.asrock.com
Published July 2010
Copyright
©
2010 ASRock INC. All rights reserved.