ASRock TRX40 Creator RAID Installation Guide - Page 8
STEP 4: Windows installation
 |
View all ASRock TRX40 Creator manuals
Add to My Manuals
Save this manual to your list of manuals |
Page 8 highlights
STEP 3.1: Copy RAID driver to a USB flash drive You can choose either STEP 3.1 or STEP 3.2 to finish the configuration. A. Please install the DVD-ROM. B. During system boot, press or key to enter UEFI setup utility. C. Plug a USB drive into one of the USB port. D. Insert the Support CD into the DVD-ROM drive. E. Go to Tools Easy RAID Installer F. Follow instructions to finish the driver copy process. STEP 3.2: Download driver from ASRock's website A. Please download the "SATA Floppy Imaged driver" from ASRock's website and unzip the file into your USB flash disk. STEP 4: Windows installation A. During Windows installation process, when Disk selection page show up, please click . B. Click to find the driver inside your USB flash drive. 8
-
 1
1 -
2
-
 3
3 -
 4
4 -
 5
5 -
 6
6 -
 7
7 -
 8
8 -
 9
9 -
 10
10 -
 11
11 -
 12
12 -
 13
13 -
14
-
15
-
16
-
17
-
18
-
19
-
20
 |
 |

8
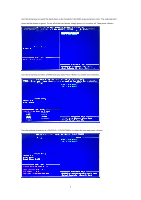
STEP 3.1: Copy RAID driver to a USB flash drive
You can choose either STEP 3.1 or STEP 3.2 to finish the configuration.
A.
Please install the DVD-ROM.
B.
During system boot, press <F2> or <Del> key to enter UEFI setup utility.
C.
Plug a USB drive into one of the USB port.
D.
Insert the Support CD into the DVD-ROM drive.
E.
Go to Tools
Easy RAID Installer
F.
Follow instructions to finish the driver copy process.
STEP 3.2: Download driver from ASRock's website
A.
Please download the “SATA Floppy Imaged driver” from ASRock's website and unzip the file into your USB flash
disk.
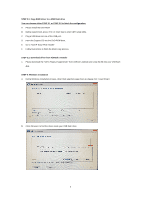
STEP 4: Windows installation
A.
During Windows installation process, when Disk selection page show up, please click <Load Driver>.
B.
Click <Browse> to find the driver inside your USB flash drive.