ASRock X58 Deluxe3 User Manual - Page 35
ASRock USB 3.0 Card Quick Guide, I. Introduction, II. Installation
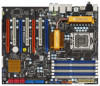 |
View all ASRock X58 Deluxe3 manuals
Add to My Manuals
Save this manual to your list of manuals |
Page 35 highlights
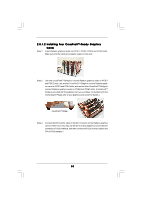
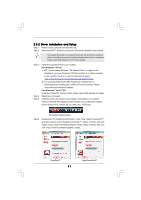
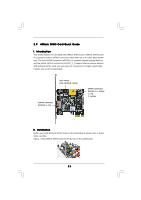
2.10 ASRock USB 3.0 Card Quick Guide I. Introduction ASRock USB 3.0 Card allows you to enjoy the high speed data transfer rate up to 5.0 Gb/s, which is ten times faster than current USB 2.0 device (480 Mb/s). With two USB 3.0 ports on ASRock USB 3.0 Card, you can have a more flexible option to upgrade the USB data transfer rate for your motherboard. Therefore, on this basis of the advantageous data transfer speed and the facilitating mobile capability, USB 3.0 may replace other devices to become a trend for external interface. USB 3.0 Ports: Connect USB 3.0 devices to USB 3.0 ports. 3V_DUAL_POWER Jumper: Short pin1, pin2 to enable USB Wakeup. Short pin2, pin3 to disable USB Wakeup to meet EuP standard. II. Installation Before you install ASRock USB 3.0 Card on your motherboard, please refer to below steps carefully. Step 1. Insert ASRock USB 3.0 Card into PCIE slot on ASRock motherboard. Please make sure to disconnect power supply before installing or removing ASRock USB 3.0 Card. Step 2. Boot your system and install ASRock USB 3.0 Card driver from ASRock support CD. ASRock USB 3.0 driver is located in the following path of ASRock support CD: ..\Drivers\USB3.0\NEC\Win7-64_Win7_Vista64_Vista_XP64_XP (v10170)\NECEL-USB3-Host-Driver-10170-setup.exe Step 3. Restart your system. Then you can freely enjoy the convenience of ASRock USB 3.0 Card. * Whether USB legacy can work depends on the system motherboard BIOS support. 35
-
 1
1 -
2
-
3
-
4
-
5
-
6
-
7
-
8
-
9
-
10
-
11
-
12
-
13
-
14
-
15
-
16
-
17
-
18
-
19
-
20
-
21
-
22
-
23
-
24
-
25
-
26
-
27
-
28
-
29
-
 30
30 -
 31
31 -
 32
32 -
 33
33 -
 34
34 -
 35
35 -
 36
36 -
 37
37 -
 38
38 -
 39
39 -
 40
40 -
41
-
42
-
43
-
44
-
45
-
46
-
47
-
48
-
49
-
50
-
51
-
52
-
53
-
54
-
55
-
56
-
57
-
58
-
59
-
60
-
61
-
62
-
63
-
64
-
65
-
66
-
67
-
68
-
69
-
70
-
71
-
72
-
73
-
74
-
75
 |
 |
