ASRock Z270M-ITX/ac Quick Installation Guide - Page 160
Step 5, Step 6, Step 7
 |
View all ASRock Z270M-ITX/ac manuals
Add to My Manuals
Save this manual to your list of manuals |
Page 160 highlights
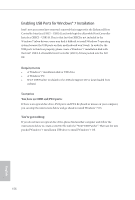
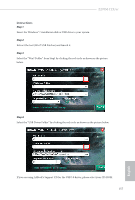
Step 5 Select where to save the ISO file by pressing the red circle as shown as the picture below. Step 6 If you want to burn the patched image to a CD, please check "Burn Image" and select "Target Device to Burn". If not, the patched ISO image will be exported to the destination selected in Step5. Then Press "Start" to proceed. Step 7 Now you are able to install Windows® 7 on processors with the new burned CD. Or please use the patched ISO image to make an OS USB drive to install the OS. 158 English
-
 1
1 -
2
-
3
-
4
-
5
-
6
-
7
-
8
-
9
-
10
-
11
-
12
-
13
-
14
-
15
-
16
-
17
-
18
-
19
-
20
-
21
-
22
-
23
-
24
-
25
-
26
-
27
-
28
-
29
-
30
-
31
-
32
-
33
-
34
-
35
-
36
-
37
-
38
-
39
-
40
-
41
-
42
-
43
-
44
-
45
-
46
-
47
-
48
-
49
-
50
-
51
-
52
-
53
-
54
-
55
-
56
-
57
-
58
-
59
-
60
-
61
-
62
-
63
-
64
-
65
-
66
-
67
-
68
-
69
-
70
-
71
-
72
-
73
-
74
-
75
-
76
-
77
-
78
-
79
-
80
-
81
-
82
-
83
-
84
-
85
-
86
-
87
-
88
-
89
-
90
-
91
-
92
-
93
-
94
-
95
-
96
-
97
-
98
-
99
-
100
-
101
-
102
-
103
-
104
-
105
-
106
-
107
-
108
-
109
-
110
-
111
-
112
-
113
-
114
-
115
-
116
-
117
-
118
-
119
-
120
-
121
-
122
-
123
-
124
-
125
-
126
-
127
-
128
-
129
-
130
-
131
-
132
-
133
-
134
-
135
-
136
-
137
-
138
-
139
-
140
-
141
-
142
-
143
-
144
-
145
-
146
-
147
-
148
-
149
-
150
-
151
-
152
-
153
-
154
-
 155
155 -
 156
156 -
 157
157 -
 158
158 -
 159
159 -
 160
160 -
 161
161 -
 162
162
 |
 |

158
English
Step 5
Select where to save the ISO Fle by pressing the red circle as shown as the picture below.
Step 6
If you want to burn the patched image to a CD, please check “Burn Image” and select “³arget
Device to Burn”. If not, the patched ISO image will be exported to the destination selected
in Step5. Ten Press “Start” to proceed.
Step 7
Now you are able to install Windows® 7 on processors with the new burned CD. Or please
use the patched ISO image to make an OS USB drive to install the OS.