Acer AL2416W User Manual
Acer AL2416W Manual
 |
View all Acer AL2416W manuals
Add to My Manuals
Save this manual to your list of manuals |
Acer AL2416W manual content summary:
- Acer AL2416W | User Manual - Page 1
Unpacking...4 Viewing Angle Adjustment ...4 Detaching LCD Monitor from Its Stand 4 Interface for Arm Applications ...5 Connecting the Display...5 Connecting the AC Power ...5 Power Management System...5 Chapter 2 Display Controls 6 General Instructions...6 Front Panel Control ...7 How to - Acer AL2416W | User Manual - Page 2
Preface This manual is designed to assist users in setting up and using the LCD Monitor. Information in this document has been carefully checked for accuracy; however, no guarantee is given to the correctness of the contents. The information in this - Acer AL2416W | User Manual - Page 3
the LCD Monitor near a window. Exposing the monitor to rain water, moisture or sunlight can severely damage it. 3. Do not apply pressure to the LCD screen. Excess pressure may cause permanent damage to the display. 4. Do not remove the cover or attempt to service this unit by yourself. Servicing of - Acer AL2416W | User Manual - Page 4
does not become too hot. After you unpack the LCD Monitor, make sure that the following items were included in the box: * LCD Monitor * User's Manual * Quick Setup Guide * 1.8M Power Cord * 1.8M Monitor-to-PC D-SUB Cable * 1.8M Monitor-to-PC DVI Cable (option) If you find that any of these items - Acer AL2416W | User Manual - Page 5
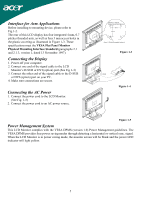
covering as illustrated in Figure 1-3. These specifications meet the VESA Flat Panel Monitor Physical Mounting Interface Standard (paragraphs 2.1 and 2.1.3, version 1, dated 13 November 1997). Connecting the Display 1. Power off your computer. 2. Connect one end of the signal cable to the LCD - Acer AL2416W | User Manual - Page 6
Chapter 2 Display Controls General Instructions Press the power button to turn the monitor on or off. The other control buttons are located at front panel of the monitor (See Figure 2-1). By changing these settings, the picture can be adjusted to your personal preferences. z The power cord should be - Acer AL2416W | User Manual - Page 7
Button: Press this button to turn the monitor ON or OFF, And display the monitor's state. Power Indicator: Green - Power On mode. Orange - off mode MENU to set the HPos, VPos, Clock and Focus. NOTES ‧ Do not install the monitor in a location near heat sources such as radiators or air ducts, or in a - Acer AL2416W | User Manual - Page 8
How to Adjust a Setting 1. Press the MENU-button to activate the OSD window. 2. Press < or > to select the desired function. 3. Press the between the foreground and background of the screen image. Adjusts the background brightness of the screen image. Focus Adjusts picture Focus Clock Adjusts - Acer AL2416W | User Manual - Page 9
N/A Auto Config Auto Adjust the H/V Position, Focus and Clock of picture. N/A Source Change Analog and Digital source change.(option) N/A Information N/A Reset Show the resolution, H/V frequency and input port of current input timing. Clear each old status of Auto-configuration and set the color - Acer AL2416W | User Manual - Page 10
Specifications LCD Panel Size Display Type Resolution Display Dot Display Area (mm)(H x V) Display Color Brightness Contrast Ratio Response Time Lamp Voltage Lamp Current Viewing Angle Video Input Signal Input Impedance Polarity Amplitude Multi-mode Supported Control Power Frequency: 24 ~ 80 - Acer AL2416W | User Manual - Page 11
DPMS requirements measured from AC Input end of AC power cord. Sync Input Signal Polarity Plug & Play Separate TTL compatible horizontal and vertical synchronization Positive and negative Supports VESA DDC2B functions External Connection Power Input (AC input) Video Cable AC socket 1.8M with - Acer AL2416W | User Manual - Page 12
3 4 10 5 Description Red Green Blue Digital GND Digital GND Signal PIN Description 6 Red Rtn 7 Green Rtn 8 Blue Rtn 9 11 Shield (TX1 / TX3) 4 NC 12 NC 5 NC 13 NC 6 DDC-Serial Clock 14 +5V power *) 7 DDC-Serial Data 15 Ground (+5V) 8 NC 16 Hot plug detect Pin assignment for DVI - D - Acer AL2416W | User Manual - Page 13
the selected timing is NOT included in table below, this LCD monitor will use the most suitable available timing. TIMING FH(KHZ) 49.5 VESA-600-75Hz 75 + 625 600 3 1 21 1024x768 48.363 - 1344 1024 136 24 160 65 XGA 60.004 - 806 768 6 3 29 1024x768 53.964 + 1328 1024 176 - Acer AL2416W | User Manual - Page 14
193 VGSA-1200-60Hz 60 + 1245 1200 6 3 36 Note: Mode 640x350, 640x400 and 720x400 will locate on middle position but cannot be expanded to full screen on vertical direction. 14 - Acer AL2416W | User Manual - Page 15
monitor screen to its most clear display. 4. Click "No" on "Shut Down Windows" and back to the normal PC operating environment. PROBLEM There is no picture on LCD Monitor If there's no picture on the LCD Monitor, please perform the following steps: 1. Make sure the power indicator on the LCD Monitor
-
 1
1 -
 2
2 -
 3
3 -
 4
4 -
 5
5 -
 6
6 -
 7
7 -
8
-
9
-
10
-
11
-
12
-
13
-
14
-
15
 |
 |

1
Table of Contents
Preface
...............................................................................................................................
2
FCC Statement Warning
...............................................................................................................
2
Canadian DOC Notice
..................................................................................................................
2
Important Safety Instructions
........................................................................................................
3
Special Notes on LCD Monitors
...................................................................................................
3
Chapter 1 Installation
.......................................................................................................
4
Unpacking
.....................................................................................................................................
4
Viewing Angle Adjustment
..........................................................................................................
4
Detaching LCD Monitor from Its Stand
.......................................................................................
4
Interface for Arm Applications
.....................................................................................................
5
Connecting the Display
.................................................................................................................
5
Connecting the AC Power
............................................................................................................
5
Power Management System
..........................................................................................................
5
Chapter 2 Display Controls
...............................................................................................
6
General Instructions
......................................................................................................................
6
Front Panel Control
......................................................................................................................
7
How to Adjust a Setting
................................................................................................................
8
Adjusting the Picture
....................................................................................................................
8
Chapter 3 Technical Information
...................................................................................
10
Specifications
..............................................................................................................................
10
Standard Timing Table
...............................................................................................................
13
Troubleshooting
..........................................................................................................................
15
English