Acer Aspire 9120 User Manual
Acer Aspire 9120 Manual
 |
View all Acer Aspire 9120 manuals
Add to My Manuals
Save this manual to your list of manuals |
Acer Aspire 9120 manual content summary:
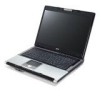
- Acer Aspire 9120 | User Manual - Page 1
Aspire 9120 Series User's Guide - Acer Aspire 9120 | User Manual - Page 2
All Rights Reserved. Aspire 9120 Series User's Guide Original Issue: 12/2006 Changes may be made periodically to the information in this publication without obligation to notify any person of such revisions or changes. Such changes will be incorporated in new editions of this manual or supplementary - Acer Aspire 9120 | User Manual - Page 3
the dummy for use when no PCMCIA or Express Card is installed in the slot. CAUTION for Listening To protect your hearing, follow these instructions. • Increase the volume gradually until you can hear clearly and comfortably. • Do not increase the volume level after your ears have adjusted. • Do not - Acer Aspire 9120 | User Manual - Page 4
through cabinet slots as they may touch dangerous voltage points or short-out parts that could result in a fire or electric shock. Never spill liquid of the product. • To avoid damage of internal components and to prevent battery leakage, do not place the product on a vibrating surface. • Never - Acer Aspire 9120 | User Manual - Page 5
performance, indicating a need for service • the product does not operate normally after following the operating instructions Note: Adjust only those bundled with your product. Use of another battery may present a risk of fire or explosion. Warning! Batteries may explode if not handled properly. - Acer Aspire 9120 | User Manual - Page 6
when not in use and/or before servicing. • To avoid the remote risk of laptop under the following conditions. These devices may include, but are not limited to: wireless lan (WLAN), Bluetooth above separation distance instructions are followed until the transmission is completed. Parts of the device - Acer Aspire 9120 | User Manual - Page 7
in the same compartment as the device, its parts, or enhancements. For vehicles equipped with an air atmosphere and obey all signs and instructions. Potentially explosive atmospheres include areas at refueling points such as near gas pumps at service stations. Observe restrictions on the use of radio - Acer Aspire 9120 | User Manual - Page 8
your mobile phone or other telephone call system. Disposal instructions Do not throw this electronic device into the trash when Equipment (WEEE) regulations, visit http://global.acer.com/about/sustainability.htm Mercury advisory For projectors specific disposal information, check www.lamprecycle.org. - Acer Aspire 9120 | User Manual - Page 9
minutes of user inactivity. • Wake the computer from Sleep mode by pushing power button. • More power management settings can be done through Acer ePower Management. Tips and information for comfortable use Computer users may complain of eyestrain and headaches after prolonged use. Users are also at - Acer Aspire 9120 | User Manual - Page 10
x Finding your comfort zone Find your comfort zone by adjusting the viewing angle of the monitor, using a footrest, or raising your sitting height to achieve maximum comfort. Observe the following tips: • refrain from staying too long in one fixed posture • avoid slouching forward and/or leaning - Acer Aspire 9120 | User Manual - Page 11
breaks regularly, and do some stretching exercises. Note: For more information, please refer to "Regulations and safety notices" on page 90 in the AcerSystem User's Guide. - Acer Aspire 9120 | User Manual - Page 12
is not installed on your computer, clicking on AcerSystem User's Guide will run the Adobe Reader setup program first. Follow the instructions on the screen to complete the installation. For instructions on how to use Adobe Reader, access the Help and Support menu. Basic care and tips for using your - Acer Aspire 9120 | User Manual - Page 13
xiii To turn the power off, do any of the following: • Use the Windows shutdown command Click on Start then click on Shut Down. • Use the power button You can also shut down the computer by closing the display cover, or by pressing the sleep hotkey + . Note: If you cannot power off the - Acer Aspire 9120 | User Manual - Page 14
as replacements. Turn the power off before removing or replacing batteries. • Do not tamper with batteries. Keep them away from children. • Dispose of used batteries according to local regulations. Recycle if possible. Cleaning and servicing When cleaning the computer, follow these steps: 1 Turn off - Acer Aspire 9120 | User Manual - Page 15
xii Your guides xii Basic care and tips for using your computer xii Turning your computer on and off xii Taking care of your computer xiii Taking care of your AC adapter xiii Taking care of your battery pack xiv Cleaning and servicing xiv Acer Empowering Technology 1 Empowering - Acer Aspire 9120 | User Manual - Page 16
Using the system utilities 39 Acer GridVista (dual-display compatible) 39 Launch Manager 40 Norton Internet Security 41 Frequently asked questions 42 Requesting service 45 International Travelers Warranty (ITW) 45 Before you call 45 Battery pack 46 Battery pack characteristics 46 - Acer Aspire 9120 | User Manual - Page 17
61 Program guide 61 Find program 61 TV settings 61 Using TeleText functions 62 Make DVDs 63 Authoring CD/DVDs 63 Acer Arcade Deluxe 64 Remote control (for selected models) 65 Remote functions 66 Starting Acer Arcade Deluxe 67 VideoMagician 67 TV Joy (selected models only) 67 - Acer Aspire 9120 | User Manual - Page 18
memory Connecting your TV and AV-in cables BIOS utility Boot sequence Enable disk-to-disk recovery Password Using software Playing DVD movies Power management Acer eRecovery Management Create backup Burn backup disc Restore and recovery Troubleshooting Troubleshooting ergonomic specifications Index - Acer Aspire 9120 | User Manual - Page 19
of your screen, it provides access to the following utilities: • Acer eNet Management hooks up to location-based networks intelligently. • Acer ePower Management optimizes battery usage via customizable power plans. • Acer ePresentation Management connects to a projector and adjusts display settings - Acer Aspire 9120 | User Manual - Page 20
Technology program group in Start menu. You can also set Acer eNet Management to start automatically when you boot up your PC. Acer eNet Management automatically detects the best settings for a new location, while offering you the option to manually adjust the settings to match your needs. - Acer Aspire 9120 | User Manual - Page 21
Empowering Technology 3 Acer eNet Management can save network settings for a location to a profile, and automatically switch to the AP details, etc.), as well as default printer settings. Security and safety concerns mean that Acer eNet Management does not store username and password information. - Acer Aspire 9120 | User Manual - Page 22
power plans Acer ePower Management comes with three predefined power plans: Balanced, High performance and Power saver. You can also create customized power plans. You can create, switch between, edit, delete and restore power plans, as described below. View and adjust settings for On Battery and - Acer Aspire 9120 | User Manual - Page 23
to another one first. 1 Select the power plan you wish to delete from the drop-down list. 2 Click the Delete Power Plan icon. Battery status For real-time battery life estimates based on current usage, refer to the panel in the upper half of the window. Click the sleep and hibernate modes - Acer Aspire 9120 | User Manual - Page 24
display setting. Note: If the restored resolution is not correct after disconnecting a projector, or you need to use an external resolution that is not supported by Acer ePresentation Management, adjust your display settings using Display Properties or the utility provided by the graphics vendor. - Acer Aspire 9120 | User Manual - Page 25
integrated with Windows Explorer as a shell extension for quick data encryption/decryption and also supports on-the-fly file encryption for Lotus Notes and Microsoft Outlook. The Acer eDataSecurity Management setup wizard will prompt you for a supervisor password and default encryption password - Acer Aspire 9120 | User Manual - Page 26
, USB pen drives, USB flash drives, USB MP3 drives, USB memory card readers, IEEE 1394 disk drives, and any other removable storage drive devices. • Floppy Drive Devices - 3.5-inch floppy drives only. To use Acer eLock Management, the Empowering Technology password must be set first. Once set, you - Acer Aspire 9120 | User Manual - Page 27
Empowering Technology 9 - Acer Aspire 9120 | User Manual - Page 28
image to optical disc, and restore from previously created backups or reinstall applications and drivers. By default, user-created backups are stored to the D:\ drive. Acer eRecovery Management provides you with: • Password protection (Empowering Technology password) • Full and incremental backups - Acer Aspire 9120 | User Manual - Page 29
Empowering Technology 11 For more information, please refer to "Acer eRecovery Management" on page 87 in the AcerSystem User's Guide. Note: If your computer did not come with a Recovery CD or System CD, please use Acer eRecovery Management's "System backup to optical disc" feature to burn a backup - Acer Aspire 9120 | User Manual - Page 30
12 Acer eSettings Management Acer eSettings Management allows you to inspect hardware specifications, set BIOS passwords and modify boot options. Acer eSettings Management also: • Provides a simple graphical user interface for navigation. • Prints and saves hardware specifications. • Lets - Acer Aspire 9120 | User Manual - Page 31
orientation and synchronization status. Windows Mobility Center also includes Acer-specific settings like Bluetooth Add Device (if applicable), sharing folders overview/sharing service on or off, and a shortcut to the Acer user guide, drivers and utilities. To launch Windows Mobility Center: • Use - Acer Aspire 9120 | User Manual - Page 32
Empowering Technology 14 - Acer Aspire 9120 | User Manual - Page 33
tour After setting up your computer as illustrated in the Just for Starters... poster, let us show you around your new Acer notebook. Front view # Icon 1 2 Item Description Built-in camera 1.3 megapixel web camera for video communication. Display screen Also called Liquid-Crystal Display - Acer Aspire 9120 | User Manual - Page 34
Battery indicator Indicates the computer's batttery status. TV/media/ For use with Acer Arcade and other media volume buttons playing programs. Palmrest Comfortable support area for your hands when you use the computer. Microphone Internal microphone for sound recording. Bluetooth Enables - Acer Aspire 9120 | User Manual - Page 35
walkman). 3 Microphone-in jack Accepts input from external microphones. 4 Headphones/speaker/ Connects to audio line-out devices (e.g., line-out jack with speakers, headphones). S/PDIF support 5 CIR receiver Receives signals from a remote control. 6 Latch Locks and releases the lid. - Acer Aspire 9120 | User Manual - Page 36
port Interfaces with infrared devices (e.g., infrared printer and IR-aware computer). 5-in-1 card reader Accepts Secure Digital (SD), MultiMediaCard (MMC), Memory Stick (MS), Memory Stick PRO (MS PRO), xDPicture Card (xD). 7 4-pin IEEE 1394 Connects to IEEE 1394 devices. port 8 PC Card slot - Acer Aspire 9120 | User Manual - Page 37
19 Right view English # Item Description 1 Slot-load optical Ejects the optical disk from the drive. drive eject button 2 Optical disk access Lights up when the optical drive is active. indicator 3 Slot-load optical drive Internal optical drive; accepts CDs or DVDs. Rear view # Icon Item - Acer Aspire 9120 | User Manual - Page 38
external monitor, LCD projector). Supports digital video connections. Enable the computer to stay cool, even after prolonged use. Base view # Item 1 Hard disk bay 2 Ventilation slots and cooling fan 3 Memory compartment 4 Sub woofer 5 Battery bay 6 Battery lock Description Houses the computer - Acer Aspire 9120 | User Manual - Page 39
21 English Specifications Operating system Platform System memory Display Graphics • Windows Vista™ Home supporting Acer SignalUp™ wireless technology Up to 2 GB of DDR2 667 MHz memory, upgradeable to 4 GB using two soDIMM modules (dual-channel support) • 15.4" WXGA high-brightness (200 nit) Acer - Acer Aspire 9120 | User Manual - Page 40
Acer BasSonic subwoofer • Built-in microphone • MS Sound compatible • 80/100/120/160 GB Serial ATA hard disk drive • Optical drive options: • DVD-Super Multi double-layer drive (slot-load) • HD-DVD • 5-in-1 card reader, supporting Secure Digital (SD), MultiMediaCard (MMC), Memory Stick® (MS), Memory - Acer Aspire 9120 | User Manual - Page 41
™ technology WLAN: Intel® PRO/Wireless 3945ABG network connection (dual-band tri-mode 802.11a/b/g) Wi-Fi CERTIFIED™ solution, supporting Acer SignalUp™ wireless technology WPAN: Bluetooth® 2.0+EDR (Enhanced Data Rate) LAN: gigabit Ethernet; Wake-on-LAN ready Modem: 56K ITU V.92 with PTT ; Wake - Acer Aspire 9120 | User Manual - Page 42
standard: supports Standby and Hibernation power-saving modes • 71 W 4800 mAh Li-ion battery pack (8-cell) • Acer QuicCharge™ 1394 port • Consumer infrared (CIR) port • Fast infrared (FIR) port • External display (VGA) port • RF-in jack for digital and analog TV input • AV-in port for audio/ - Acer Aspire 9120 | User Manual - Page 43
the model purchased. • Acer Bluetooth® VoIP phone • 512 MB/1 GB/2 GB DDR2 533/667 MHz soDIMM modules • 8-cell Li-ion battery pack • 3-pin 90 2.0 One-year International Travelers Warranty (ITW) Note: The specifications listed above are for reference only. The exact configuration of your PC depends - Acer Aspire 9120 | User Manual - Page 44
computer cover is closed up. Icon Function Power Description Indicates the computer's power status. Battery Indicates the computer's batttery status. HDD Indicates when the hard disk drive is active LAN Indicates the status of wireless LAN communication. Bluetooth Indicates the status of - Acer Aspire 9120 | User Manual - Page 45
27 1. Charging: The light shows amber when the battery is charging. 2. Fully charged: The light shows green Key < one user-programmable button. > and Press < > to run the Acer Empowering Technology. Please see "Acer Empowering Technology" on page 1. The mail and Web browser buttons are pre-set to - Acer Aspire 9120 | User Manual - Page 46
the cursor responds as you move your finger across the surface of the touchpad. The central location on the palmrest provides optimum comfort and support. Touchpad basics The following items show you how to use the touchpad: • Move your finger across the touchpad (2) to move the cursor. • Press the - Acer Aspire 9120 | User Manual - Page 47
English 29 Function Left button (1) Right button (4) Main touchpad (2) Center button (3) Execute Quickly click twice. Tap twice (at the same speed as double-clicking a mouse button). Select Click once. Tap once. Drag Click and hold, then use finger on the touchpad to drag the cursor. - Acer Aspire 9120 | User Manual - Page 48
English 30 Using the keyboard The keyboard has full-sized keys and an embedded numeric keypad, separate cursor, lock, Windows, function and special keys. Lock keys and embedded numeric keypad The keyboard has three lock keys which you can toggle on and off. Lock key Caps Lock Num Lock + - Acer Aspire 9120 | User Manual - Page 49
English 31 Windows keys The keyboard has two keys that perform Windows-specific functions. Key Description Windows key Pressed alone, this key has the same effect as clicking on the Windows Start button; it launches the Start menu. - Acer Aspire 9120 | User Manual - Page 50
most of the computer's controls like screen brightness, volume output and the BIOS utility. To activate hotkeys, press and hold the key before Icon + Function Hotkey help + Acer eSettings + Acer ePower Management + + Sleep Display - Acer Aspire 9120 | User Manual - Page 51
33 English Hotkey Icon + + + + Function Touchpad toggle Speaker toggle Media lock Volume up Description Turns the internal touchpad on and off. Turns the speakers on and off. Turns the front panel Arcade media buttons on and off. Increases the sound - Acer Aspire 9120 | User Manual - Page 52
the keyboard, or hold and then press the key at the upper-center of the keyboard. Note: Some fonts and software do not support the Euro symbol. Please refer to www.microsoft.com/typography/faq/faq12.htm for more information. The US dollar sign 1 Open a text editor or word - Acer Aspire 9120 | User Manual - Page 53
English 35 Ejecting the optical (CD or DVD) disk Press the drive eject button to eject the optical disk when the computer is on. Using a computer security lock The notebook comes with a Kensington-compatible security slot for a security lock. Wrap the computer security lock cable around an - Acer Aspire 9120 | User Manual - Page 54
English 36 Audio The computer comes with 32-bit Intel High-Definition audio, and built-in stereo speakers. Adjusting the volume Adjusting the volume on the computer is as easy as pressing some buttons. See "Hotkeys" on page 32 for more information on adjusting the speaker volume. - Acer Aspire 9120 | User Manual - Page 55
English 37 Using surround/multi-channel sound Your Acer notebook comes with the following two features to give you high-quality digital surround sound for enjoying movies, games and music in a realistic, multi-channel - Acer Aspire 9120 | User Manual - Page 56
English 38 2 Open the Realtek HD Audio Manager 3 Click the Dolby Digital Live icon to convert audio signals into Dolby Digital bitstream and begin Dolby Digital output Note: When the Dolby Digital Live icon is enabled, only the digital audio (S/PDIF) port of your computer will be active. You - Acer Aspire 9120 | User Manual - Page 57
confirm the new settings and click OK to complete the process. Acer GridVista is a handy utility that offers four pre-defined display settings To access this function, please go to Start, All Programs and click on Acer GridVista. You may choose any one of the four display settings indicated below: 12 - Acer Aspire 9120 | User Manual - Page 58
English 40 1 Run Acer GridVista and select your preferred screen configuration for each display from the taskbar. 2 Drag and drop each window into the appropriate grid. 3 Enjoy the convenience - Acer Aspire 9120 | User Manual - Page 59
optimal security, run a Full System Scan when scanning your computer for the first time. You can schedule customized virus scans that run unattended on specific dates and times or at periodic intervals. If you are using the computer when the scheduled scan begins, it runs in the background so that - Acer Aspire 9120 | User Manual - Page 60
power is being supplied to the computer. Check the following: • If you are using on the battery, it may be low and unable to power the computer. Connect the AC adapter to recharge the battery pack. • Make sure that the AC adapter is properly plugged into the computer and to the power - Acer Aspire 9120 | User Manual - Page 61
port on the computer. If it works, contact your dealer or an authorized service center as the internal keyboard cable may be loose. The infrared port does you have the appropriate drivers (for printing to an infrared printer). • During the POST, press to access the BIOS utility and verify that - Acer Aspire 9120 | User Manual - Page 62
on Dialing Rules and begin setting up your location. Refer to the Windows manual. Note: Please note, on first booting your notebook, that you can this option. Before performing a restore operation, please check the BIOS settings. 1 Check to see if Acer disk-to-disk recovery is enabled or not. 2 Make - Acer Aspire 9120 | User Manual - Page 63
the Acer logo is showing, press + at the same time to enter the recovery process. 3 Refer to the onscreen instructions to Acer for online service, and please be at your computer when you call. With your support, we can reduce the amount of time a call takes and help solve your problems - Acer Aspire 9120 | User Manual - Page 64
the following characteristics: • Employs current battery technology standards. • Delivers a battery-low warning. The battery is recharged whenever you connect the computer to the AC adapter. Your computer supports charge-in-use, enabling you to recharge the battery while you continue to operate the - Acer Aspire 9120 | User Manual - Page 65
packs to temperatures below 0°C (32°F) or above 45°C (113°F). Extreme temperatures may adversely affect the battery pack. By following the battery conditioning process you condition your battery to accept the maximum possible charge. Failure to follow this procedure will prevent you from obtaining - Acer Aspire 9120 | User Manual - Page 66
the charge/recharge cycle and improving recharging efficiency. You are advised to follow the suggestions set out below: • Purchase an extra battery pack. • Use AC power whenever possible, reserving battery for on-the-go use. • Eject a PC Card if it is not being used, as it will continue to draw - Acer Aspire 9120 | User Manual - Page 67
to the mains power supply. 2. Save all necessary files. 3. Resume work. Turn off the computer if you want to recharge the battery rapidly. An extra fully charged battery pack is available. 1. Save all necessary files. 2. Close all applications. 3. Shut down the operating system to turn off the - Acer Aspire 9120 | User Manual - Page 68
Arcade (for selected models) Acer Arcade is an integrated player for music, photos, TV, DVD movies and videos. It can be operated using your pointing device or remote control. To - Acer Aspire 9120 | User Manual - Page 69
English 51 Remote control (for selected models) If your Aspire is bundled with a TV-tuner card, a 48-button remote control is included for use with the Acer Arcade software. The table below explains the functions for this controller. Warning! The Arcade and Power buttons have different functions - Acer Aspire 9120 | User Manual - Page 70
TeleText*/ closed captions 18 Color buttons Teletext shortcut functions* 19 TV/AV Toggle between TV-in and AV-in 20 Arcade Launch/quit Acer Arcade; return to Arcade main page 21 Angle Toggle between different viewing angles** 22 Subtitle Open subtitles menu** 23 Stop Stop current playing - Acer Aspire 9120 | User Manual - Page 71
Arcade, please refer to the Arcade Help menu. This can be accessed from the Arcade home page by selecting Help . Settings There are settings in Acer Arcade that allow you to fine-tune its performance to suit your machine and your personal preferences. To access Settings, click on this icon located - Acer Aspire 9120 | User Manual - Page 72
damaging your speakers. Click Run Setup Wizard to change your original startup settings. Click About Acer Arcade to open a page with version and copyright information. Click Restore Default Settings to return the . These are discussed in more detail in the Cinema and TV sections of this guide. - Acer Aspire 9120 | User Manual - Page 73
use the onscreen virtual keyboard. You can quickly enter the information you need using the mouse, cursor keys or keyboard. Background mode With Acer Arcade you can continue listening to music or watching Live TV while you perform certain other functions. TV, video and music will continue playing - Acer Aspire 9120 | User Manual - Page 74
English 56 Cinema If your computer came with a DVD drive, you can play movies from DVDs and video CDs (VCDs) with the Cinema function of Acer Arcade. This player has the features and controls of a typical DVD player. When you insert a disk into the DVD drive, the movie begins playing automatically. - Acer Aspire 9120 | User Manual - Page 75
English 57 Album Acer Arcade lets you view digital photos individually or as a slide show, from any available drive on your computer. Click the Album button on the Arcade - Acer Aspire 9120 | User Manual - Page 76
appear at the bottom of the screen when you move the mouse. To return to the Video page, click Stop. Capturing video (TV models only) Acer Arcade allows you to capture and record video clips from other external devices, such as a DVD player or camcorder. Click Capture Device on the video - Acer Aspire 9120 | User Manual - Page 77
burned to disk to share with family and friends. Note: For more details on editing video and all the associated features, please refer to the Acer Arcade help menu. Music For convenient access to your music collection, click Music on the Arcade homepage to open the Music homepage. Select the folder - Acer Aspire 9120 | User Manual - Page 78
TV recording schedules for later viewing. See Scheduling Recordings. The Program Guide option lets you view program information for all channels. See Program Guide. The Find Program option enables you to search for a specific kind of program. The Settings button opens a page containing TV settings - Acer Aspire 9120 | User Manual - Page 79
schedule to open it for modification. To change the order in which schedules are displayed, click Sort by Channel or Sort by Date. Program guide Click the Program Guide button to view program listing details for each channel. These listings and information are provided by the Electronic Program - Acer Aspire 9120 | User Manual - Page 80
TV shows. You can also select the destination for any recorded TV. Guide settings Click on EPG Source to select the source for your EPG program their default values. Using TeleText functions For regions with the TeleText service, TeleText can be activated by using the onscreen controller or the - Acer Aspire 9120 | User Manual - Page 81
direct from Make DVD mode or some of the other Acer Arcade media modes. Authoring CD/DVDs With Acer Arcade it is possible to create CD or DVDs directly , film and TV clips all in one. The possibilities are endless! For specific details about each of these options, click the Help button to open the - Acer Aspire 9120 | User Manual - Page 82
files, create your own customized content, and more. Arcade Deluxe includes the following utilities: Acer Arcade Deluxe extends the capabilities of your Windows Media Centerequipped system with a set of Acer utilities designed to make it easy to manage your multimedia files, create your own - Acer Aspire 9120 | User Manual - Page 83
English 65 Remote control (for selected models) If your computer is bundled with a remote control for use wiht the Arcade Deluxe software, the table below explains the functions. 16 1 17 2 18 3 19 4 20 5 6 21 7 8 9 22 10 11 23 12 13 24 14 15 25 - Acer Aspire 9120 | User Manual - Page 84
playback or go to previous picture 4 Skip Backward Skip a section backward 5 Pause Pause playback 6 Recorded TV Display Recorded TV page 7 Guide Display the Guide 8 Navigation/ Navigate and confirm selections OK buttons 9 Mute Toggle audio on/off 10 Back Move up one level in the UI 11 - Acer Aspire 9120 | User Manual - Page 85
list and left/right to select a utility. To run the Acer Arcade Deluxe utilities outside of Windows Media Center, double-click the Acer Arcade Deluxe icon from the Windows desktop. Note: For detailed information about specific Acer Arcade Deluxe utiltiies, use the built-in help files. VideoMagician - Acer Aspire 9120 | User Manual - Page 86
Wizard provides real-time preview and capture from DV camcorders and webcams to your computer's hard drive or directly burned to DVD. DV Wizard also supports the capture of High Definition video to your computer's hard disk in the DVD format. Attach your DV camcorder or web cam to your computer - Acer Aspire 9120 | User Manual - Page 87
English 69 Taking your notebook PC with you This section gives you tips and hints to consider when moving around or traveling with your computer. Disconnecting from the desktop Follow these steps to disconnect your computer from external accessories: 1 Save any open files. 2 Remove any media, - Acer Aspire 9120 | User Manual - Page 88
computer in the meeting room. If the meeting room does not have an electrical outlet, reduce the drain on the battery by putting the computer in Sleep mode. Press + or close the display cover whenever you are following items with you: • AC adapter and power cord • The printed User's Guide - Acer Aspire 9120 | User Manual - Page 89
computer Prepare the computer as if you were taking it home. Make sure that the battery in the computer is charged. Airport security may require you to turn on your computer when • AC adapter • Spare, fully-charged battery pack(s) • Additional printer driver files if you plan to use another printer - Acer Aspire 9120 | User Manual - Page 90
the country to which you are traveling • Spare, fully-charged battery packs • Additional printer driver files if you plan to use another printer • Proof of check that the local AC voltage and the AC adapter power cord specifications are compatible. If not, purchase a power cord that is compatible - Acer Aspire 9120 | User Manual - Page 91
data: • Supervisor Password prevents unauthorized entry into the BIOS utility. Once set, you must enter this password to gain access to the BIOS utility. See "BIOS utility" on page 84. • User Password secures forget your password, please get in touch with your dealer or an authorized service center. - Acer Aspire 9120 | User Manual - Page 92
screen. • When the Supervisor Password is set, a prompt appears when you press to enter the BIOS utility at boot-up. • Type the Supervisor Password and press to access the BIOS utility. If you enter the password incorrectly, a warning message appears. Try again and press . • When - Acer Aspire 9120 | User Manual - Page 93
mobile computing experience. Connectivity options Ports allow you to connect peripheral devices to your computer as you would with a desktop PC. For instructions on how to connect different external devices to the computer, read the following section. Fax/data modem Your computer has a built-in - Acer Aspire 9120 | User Manual - Page 94
English 76 Built-in network feature The built-in network feature allows you to connect your computer to an Ethernet-based network. To use the network feature, connect an Ethernet cable from the Ethernet (RJ-45) port on the chassis of the computer to a network jack or hub on your network. Fast - Acer Aspire 9120 | User Manual - Page 95
English 77 Universal Serial Bus (USB) The USB 2.0 port is a high-speed serial bus which allows you to connect USB peripherals without taking up precious system resources. IEEE 1394 port The computer's IEEE 1394 port allows you to connect to an IEEE 1394compatible device like a video camera or - Acer Aspire 9120 | User Manual - Page 96
by expanding the bandwidth to 32 bits. Note: Refer to your card's manual for details on how to install and use the card, and its slot and make the proper connections (e.g., network cable), if necessary. See your card manual for details. Ejecting a PC Card Before ejecting a PC Card: 1 Exit the - Acer Aspire 9120 | User Manual - Page 97
support a vast number of expansion options, including flash memory card adapters, TV-tuners, Bluetooth connectivity and IEEE 1394B adapters. ExpressCards support functions. Not all ExpressCard slots will support both types. Please refer to your card's manual for details on how to install and - Acer Aspire 9120 | User Manual - Page 98
the computer, unplug the AC adapter (if connected) and remove the battery pack. Then turn the computer over to access its base. 2 Remove the screws from the memory cover; then lift up and remove the memory cover. 3 (a) Insert the memory module diagonally into the slot, then (b) gently press it down - Acer Aspire 9120 | User Manual - Page 99
your TV and AV-in cables Follow the instructions below to set up the TV function of your Acer notebook. PAL/SECAM and NTSC systems 1 correct cable system for your region before attempting to connect the antenna cable. Acer DVB-T digital antenna To connect the antenna: Plug the antenna cable into the - Acer Aspire 9120 | User Manual - Page 100
English 82 To set up the antenna: 1 Push gently at the top until the bottom section pops out. 2 Pull the bottom up until it is positioned at 90 degrees to the antenna body. 1 2 3 3 To ensure good reception, the antenna can be positioned on top of your notebook display using the special clip, as - Acer Aspire 9120 | User Manual - Page 101
English 83 AV-in cable The AV-in cable can be used to connect your notebook to a VHS player or camcorder for viewing, capturing and recording video clips. 1 Plug the single end of the cable into the AV-input port of your notebook. 2 Connect the other ends to the S-video or composite audio/video - Acer Aspire 9120 | User Manual - Page 102
run this utility. However, if you encounter configuration problems, you may need to run it. To activate the BIOS utility, press during the POST; recovery To enable disk-to-disk recovery (hard disk recovery), activate the BIOS utility, then select Main from the categories listed at the top of - Acer Aspire 9120 | User Manual - Page 103
or region USA, Canada Europe, Middle East, South Africa, Japan Southeast Asia, Taiwan, South Korea Latin America, Australia, New Zealand Former USSR, parts of Africa, India People's Republic of China Note: To change the region code, insert a DVD movie of a different region into the DVD drive - Acer Aspire 9120 | User Manual - Page 104
keyboard, mouse, hard disk, peripherals connected to the computer, and video memory. If no activity is detected for a period of time (called an conserve energy. This computer employs a power management scheme that supports the advanced configuration and power interface (ACPI), which allows for - Acer Aspire 9120 | User Manual - Page 105
also backup/restore the factory default image, and reinstall applications and drivers. Acer eRecovery Management consists of the following functions: 1 Create backup 2 Burn backup disc 3 Restore and recovery This chapter will guide you through each process. Note: This feature is only available on - Acer Aspire 9120 | User Manual - Page 106
will burn your most recently created backup image to disc. 4 Follow the instructions on screen to complete the process. Note: Create a factory default image drivers for your Acer system. 1 Press + or select Acer eRecovery Management from the Empowering Technology toolbar to start Acer - Acer Aspire 9120 | User Manual - Page 107
Keyboard interface error Contact your dealer or an authorized service center. Memory size mismatch Press (during POST) to enter the BIOS utility, then press Exit in the BIOS utility to reboot. If you still encounter problems after going through the corrective measures, please contact your - Acer Aspire 9120 | User Manual - Page 108
to comply with the limits for a Class B digital device pursuant to Part 15 of the FCC rules. These limits are designed to provide reasonable energy and, if not installed and used in accordance with the instructions, may cause harmful interference to radio communications. However, there is - Acer Aspire 9120 | User Manual - Page 109
Canada. Declaration of Conformity for EU countries Hereby, Acer, declares that this notebook PC series is in Notice for USA This equipment complies with Part 68 of the FCC rules. Located network, the telephone company may discontinue your service temporarily. If possible, they will notify you - Acer Aspire 9120 | User Manual - Page 110
advance to give you an opportunity to maintain uninterrupted telephone service. If this equipment should fail to operate properly, disconnect the equipment from the phone line to determine if it is causing the problem. If the problem is with the equipment, discontinue use and contact your dealer or - Acer Aspire 9120 | User Manual - Page 111
Specifications: a There shall be no more than 10 call attempts to the same number within any 30 minute period for any single manual that Telecom lines will always continue to support pulse dialing. 7 Use of pulse Should such problems occur, the user should NOT contact the telecom Fault Service. 8 This - Acer Aspire 9120 | User Manual - Page 112
English 94 Laser compliance statement The CD or DVD drive used with this computer is a laser product. The CD or DVD drive's classification label (shown below) is located on the drive. CLASS 1 LASER PRODUCT CAUTION: INVISIBLE LASER RADIATION WHEN OPEN. AVOID EXPOSURE TO BEAM. APPAREIL A LASER DE - Acer Aspire 9120 | User Manual - Page 113
approved for wireless use. Depending on configurations, this product may or may not contain wireless radio devices (such as wireless LAN and/or Bluetooth modules). Below information is for products with such devices. European Union (EU) R&TTE Directive 1999/5/EC as attested by conformity with the - Acer Aspire 9120 | User Manual - Page 114
English 96 wireless mouse/keyboard) • EN301 511 V9.0.2:2003 (Applied to models with 3G function) • EN301 908-1 V2.2.1:2003 (Applied to models with 3G function). • EN301 908-2 V2.2.1:2003 (Applied to models with 3G function). - Acer Aspire 9120 | User Manual - Page 115
requirement The radiated output power of the wireless LAN Mini PCI Card and Bluetooth card is far below the FCC radio frequency exposure limits. Nevertheless, the to follow the RF safety instructions on wireless option devices that are included in the user's manual of each RF option device. - Acer Aspire 9120 | User Manual - Page 116
, including interference that may cause undesired operation of the device. b Operation in 2.4 GHz band To prevent radio interference to the licensed service, this device is intended to be operated indoors and installation outdoors is subject to licensing. c Operation in 5 GHz band • The device - Acer Aspire 9120 | User Manual - Page 117
Federal Communications Comission Declaration of Conformity This device complies with Part 15 of the FCC Rules. Operation is subject to Model number: BQ60 Machine type: Aspire 9120 SKU number: Aspire 912xxx ("x" = 0 - 9, a - z, or A - Z) Name of responsible party: Acer America Corporation - Acer Aspire 9120 | User Manual - Page 118
. Easy Lai Tel: 886-2-8691-3089 Fax: 886-2-8691-3000 E-mail: [email protected] Hereby declare that: Product: Personal Computer Trade Name: Acer Model Number: BQ60 Machine Type: Aspire 9120 SKU Number:Aspire 912xxx ("x" = 0~9, a ~ z, or A ~ Z) Is compliant with the essential requirements and other - Acer Aspire 9120 | User Manual - Page 119
Substances in Electrical and Electronic Equipment LCD panel ergonomic specifications Design viewing distance Design inclination angle Design azimuth angle where α = 85° • Color: Source D65 • Ordinary LCD: Class I • Protective or Acer CrystalBrite™ LCD: Class III Both • Yn • u'n • v'n Class II - Acer Aspire 9120 | User Manual - Page 120
life 46 optimizing 48 removing 48 using the first time 46 BIOS utility 84 brightness hotkeys 33 C caps lock 30 on indicator 26 care AC adapter xiii battery pack xiv computer xiii CD-ROM ejecting manually 43 troubleshooting 43 charging checking level 48 cleaning computer xiv computer caring for - Acer Aspire 9120 | User Manual - Page 121
103 English on indicator 26 memory installing 80 messages error 89 modem 75 N network 76 Notebook Manager hotkey 32 num lock 30 on indicator 26 numeric keypad embedded 30 P password 73 types 73 PC Card 78 ejecting 78 inserting 78 ports 75 printer troubleshooting 43 problems 42 CD-ROM 43 display 42
-
 1
1 -
 2
2 -
 3
3 -
 4
4 -
 5
5 -
 6
6 -
 7
7 -
8
-
9
-
10
-
11
-
12
-
13
-
14
-
15
-
16
-
17
-
18
-
19
-
20
-
21
-
22
-
23
-
24
-
25
-
26
-
27
-
28
-
29
-
30
-
31
-
32
-
33
-
34
-
35
-
36
-
37
-
38
-
39
-
40
-
41
-
42
-
43
-
44
-
45
-
46
-
47
-
48
-
49
-
50
-
51
-
52
-
53
-
54
-
55
-
56
-
57
-
58
-
59
-
60
-
61
-
62
-
63
-
64
-
65
-
66
-
67
-
68
-
69
-
70
-
71
-
72
-
73
-
74
-
75
-
76
-
77
-
78
-
79
-
80
-
81
-
82
-
83
-
84
-
85
-
86
-
87
-
88
-
89
-
90
-
91
-
92
-
93
-
94
-
95
-
96
-
97
-
98
-
99
-
100
-
101
-
102
-
103
-
104
-
105
-
106
-
107
-
108
-
109
-
110
-
111
-
112
-
113
-
114
-
115
-
116
-
117
-
118
-
119
-
120
-
121
 |
 |

Aspire 9120 Series
User's Guide