Acer E2200HQ User Manual - Page 24
Using the OSD Menus - monitor specification
 |
View all Acer E2200HQ manuals
Add to My Manuals
Save this manual to your list of manuals |
Page 24 highlights
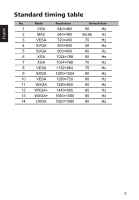
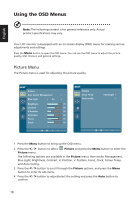
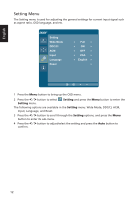
English Using the OSD Menus Note: The following content is for general reference only. Actual product specifications may vary. Your LCD monitor is equipped with an on-screen display (OSD) menu for making various adjustments and settings. Press the Menu button to open the OSD menu. You can use the OSD menu to adjust the picture quality, OSD timeout, and general settings. Picture Menu The Picture menu is used for adjusting the picture quality. Picture Acer eColor Management Blue Light On Brightness 70 Contrast 50 H.Position 20 V.Position 50 Focus 70 Clock 50 Picture Color Temp Auto config BlueLight 1 Press the Menu button to bring up the OSD menu. 2 Press the < / > button to select Picture and press the Menu button to enter the Picture menu. The following options are available in the Picture menu: Acer ecolor Management, Blue Light, Brightness, Contrast, H. Position, V. Position, Focus, Clock, Colour Temp, and Auto Config. 3 Press the < / > button to scroll through the Picture options, and press the Menu button to enter its sub-menu. 4 Press the < / > button to adjust/select the setting and press the Auto button to confirm. 10
-
 1
1 -
2
-
3
-
4
-
5
-
6
-
7
-
8
-
9
-
10
-
11
-
12
-
13
-
14
-
15
-
16
-
17
-
18
-
 19
19 -
 20
20 -
 21
21 -
 22
22 -
 23
23 -
 24
24 -
 25
25 -
 26
26 -
 27
27 -
 28
28 -
 29
29
 |
 |