Acer KA240HY User Manual - Page 22
Users controls, Using the Shortcut Menu
 |
View all Acer KA240HY manuals
Add to My Manuals
Save this manual to your list of manuals |
Page 22 highlights
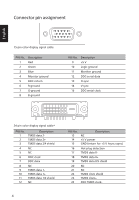
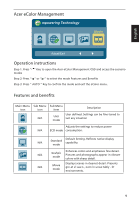
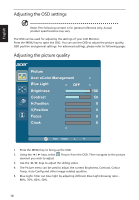
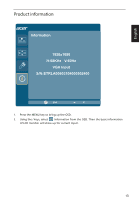
Users controls English Power Switch / Power LED: To turn the monitor ON or OFF. Lights up to indicate the power is turned ON. Using the Shortcut Menu AUTO Input Press the function button to open the shortcut menu. The shortcut menu lets you quickly select the most commonly accessed settings. empowering Technology Press this button to activate the eColor Management OSD. AUTO Auto Adjust: Press this button to activate the Auto Adjustment function. The Auto Adjustment function is used to set the HPos, VPos, Clock and Focus.(Only available on VGA port.) MENU OSD functions Press this button to activate the OSD menu. Volume adjust Press this button to activate the volume OSD menu. INPUT Input Key Use Input key to select from different video sources that may be connected to your monitor. (a) VGA input (b) DVI input (c) HDMI input(Option) As you cycle through the sources you will see the following messages on right top side of screen to indicate currently selected input source. It may take 1 or 2 seconds for the image to appear. VGA or DVI or HDMI If either VGA or DVI input is selected ,but the VGA and DVI cables are not connected, a floating dialog box indicates: "No Cable Connect" or "No Signal" 8
-
 1
1 -
2
-
3
-
4
-
5
-
6
-
7
-
8
-
9
-
10
-
11
-
12
-
13
-
14
-
15
-
16
-
 17
17 -
 18
18 -
 19
19 -
 20
20 -
 21
21 -
 22
22 -
 23
23 -
 24
24 -
 25
25 -
 26
26 -
 27
27 -
28
-
29
 |
 |
