Acer P1250 User Manual - Page 9
Contents
 |
View all Acer P1250 manuals
Add to My Manuals
Save this manual to your list of manuals |
Page 9 highlights
Contents Information for Your Safety and Comfort iii First Thing First viii Usage Notes viii Precautions viii Introduction 1 Product Features 1 Package Overview 2 Projector Overview 3 Projector Outlook 3 Control Panel 4 Remote Control Layout 5 MHL Feature Introduction 7 Getting Started 8 Connecting the Projector 8 Turning the Projector On/Off 10 Turning On the Projector 10 Turning Off the Projector 11 Adjusting the Projected Image 12 Adjusting the Height of the Projected Image 12 How to Optimize Image Size and Distance 13 How to Get a Preferred Image Size by Adjusting Distance and Zoom 16 User Controls 19 Installation Menu 19 Onscreen Display (OSD) Menus 20 Color 21 Image 23 Setting 24 Management 29 Audio 30 3D 31 Language 32
-
 1
1 -
2
-
3
-
 4
4 -
 5
5 -
 6
6 -
 7
7 -
 8
8 -
 9
9 -
 10
10 -
 11
11 -
 12
12 -
 13
13 -
 14
14 -
15
-
16
-
17
-
18
-
19
-
20
-
21
-
22
-
23
-
24
-
25
-
26
-
27
-
28
-
29
-
30
-
31
-
32
-
33
-
34
-
35
-
36
-
37
-
38
-
39
-
40
-
41
-
42
-
43
-
44
-
45
-
46
-
47
-
48
-
49
-
50
-
51
-
52
-
53
-
54
-
55
-
56
-
57
-
58
-
59
-
60
-
61
-
62
-
63
 |
 |

Information for Your Safety and Comfort
iii
First Thing First
viii
Usage Notes
viii
Precautions
viii
Introduction
1
Product Features
1
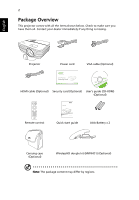
Package Overview
2
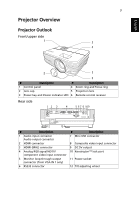
Projector Overview
3
Projector Outlook
3
Control Panel
4
Remote Control Layout
5
MHL Feature Introduction
7
Getting Started
8
Connecting the Projector
8
Turning the Projector On/Off
10
Turning On the Projector
10
Turning Off the Projector
11
Adjusting the Projected Image
12
Adjusting the Height of the Projected Image
12
How to Optimize Image Size and Distance
13
How to Get a Preferred Image Size by Adjusting
Distance and Zoom
16
User Controls
19
Installation Menu
19
Onscreen Display (OSD) Menus
20
Color
21
Image
23
Setting
24
Management
29
Audio
30
3D
31
Language
32
Contents