Acer P1623 User Manual - Page 60
Refer to the How to Get a Preferred Image Size
 |
View all Acer P1623 manuals
Add to My Manuals
Save this manual to your list of manuals |
Page 60 highlights
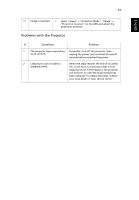
50 English 7 Image is out of focus • Adjust the focus ring on the projector lens. • Make sure the projection screen is within the required distance: X1185/X1185N/P1185: 1.0 m - 11.9 m (3.3' - 39.2') X1285/X1285N/P1285: 1.0 m - 11.3 m (3.3' - 37.2') S1285/S1285N: 0.5 m - 3.7 m (1.6' - 12.2') P1385W/X1385WH: 1.0 m - 9.7 m (3.3' - 31.8') H5381BD 1.0 m - 10.0 m (3.3' - 32.7') H6518BD/P1525/H6525BD: 1.5 m - 7.6 m (4.9' - 25.1') H6502BD: 1.0 m - 9.9 m (3.3' - 32.5') P1623: 1.0 m - 7.4 m (3.3' - 24.4') Refer to the "How to Get a Preferred Image Size by Adjusting Distance and Zoom" section for more information. 8 Image is stretched When you play a DVD encoded in anamorphic or 16:9 when displaying a aspect ratio you may need to adjust the following "widescreen" DVD title settings: • If you play a 4:3 format DVD title, please change the format to 4:3 with the projector OSD. • If the image is still stretched, you will also need to adjust the aspect ratio. Set up the display format to 16:9 (wide) aspect ratio on your DVD player. 9 Image is too small • Adjust the zoom lever on the top of the projector. or too large • Move the projector closer to or further from the screen. • Press "MENU" on the control panel or remote control. Go to "Image" > "Aspect Ratio" and try different settings. 10 Image has slanted • If possible, reposition the projector so that it is sides centered on the screen and below the bottom of the screen. • Press the Keystone correction keys on the control panel or remote control until the image becomes square. • Press "MENU" on the control panel or remote control to open the OSD menu. Go to "Image" > "Auto Keystone" or "Image" > "Keystone" to make adjustments.
-
 1
1 -
2
-
3
-
4
-
5
-
6
-
7
-
8
-
9
-
10
-
11
-
12
-
13
-
14
-
15
-
16
-
17
-
18
-
19
-
20
-
21
-
22
-
23
-
24
-
25
-
26
-
27
-
28
-
29
-
30
-
31
-
32
-
33
-
34
-
35
-
36
-
37
-
38
-
39
-
40
-
41
-
42
-
43
-
44
-
45
-
46
-
47
-
48
-
49
-
50
-
51
-
52
-
53
-
54
-
 55
55 -
 56
56 -
 57
57 -
 58
58 -
 59
59 -
 60
60 -
 61
61 -
 62
62 -
 63
63 -
 64
64 -
 65
65 -
66
-
67
-
68
-
69
-
70
-
71
-
72
-
73
-
74
-
75
-
76
-
77
-
78
-
79
-
80
-
81
-
82
-
83
-
84
 |
 |
